Powering Up A Pluggable Module From The 1948 IBM 604 Electronic Calculator

In that awkward transition phase between electromechanical accounting systems used in the 1940s and the introduction of fully digital computers we find systems such as the IBM 604 Electronic Calculator, advertised for accounting, calculating and engineering tasks. While not capable of complex instructions, loops and other advanced features, it did use an interesting modular architecture with easily swappable modules containing a vacuum tube and associated components. Recently [Ken Shirriff] took a poke at one of these and even powered it up.

This kind of pluggable system would become a staple of computer systems, as they enabled the use of modules or cards with specific functions that could be swapped and combined at will to increase system flexibility, lower costs and make repairs a snap. For the IBM 604 a total of about 1250 vacuum tubes were used, apparently all of which were found on these pluggable modules.

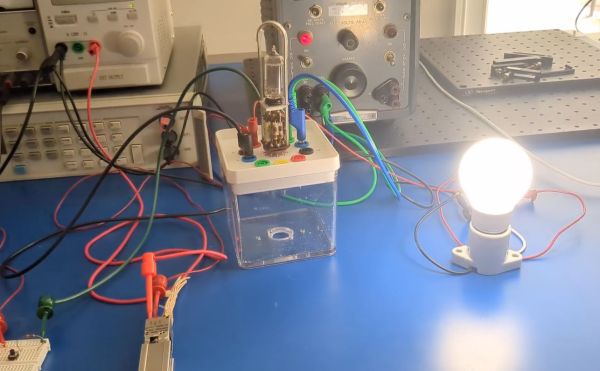
The module that [Ken] got his hands on has a thyratron tube, which is effectively a high current switch and rectifier. In the short demonstration video you can see it being used to switch a lamp on and off, with further details explained in the article.

Despite being rather limited in its functionality and limited by the punch card input and output speed, the IBM 604 was still a smashing commercial success with over 5600 units produced. A transistorized prototype version with 2200 transistors and 95% less power usage was created in 1954 that formed the basis for the IBM 608, the world’s first commercial all-transistorized calculator.

The 608 didn’t last too long, however, as at that point the breakneck pace of semiconductor technology meant that any newly released product was already obsolete by the time it hit the market. Despite this, fundamentals like pluggable modules would keep showing up over and over, ranging from the 1950s Bendix G-15 to even modern day systems, including PCs with pluggable RAM and expansion cards as well as mainframes where hot swapping of even entire CPU modules is just another feature.

Continue reading “Powering Up A Pluggable Module From The 1948 IBM 604 Electronic Calculator”

Restoring The Soul Of A 1940s Radio

Although we do often see projects that take antiques and replace some or all of their components with modern equipment, we can also sympathize with the view that (when possible and practical) certain antique electronics should be restored rather than gutted. [David] has this inclination for his 1948 GE radio, but there are a few issues with it that prevented a complete, period-correct restoration.

The main (pun intended) issue at the start of this project was safety. The original radio had a chassis that was just as likely as not to become energized, with the only protection being the plastic housing. [David] set up an isolation transformer with a modern polarized power cable to help solve this issue, and then got to work replacing ancient capacitors. With a few other minor issues squared away this is all it took to get the radio working to receive AM radio, and he also was able to make a small modification to allow the radio to accept audio via a 3.5mm jack as well.

However, [David] also has the view that a period-correct AM transmission should accompany this radio as well and set about with the second bit of this project. It’s an adaptation of a project called FieldStation42 originally meant to replicate the experience of cable TV, but [Shane], the project’s creator, helped [David] get it set up for audio as well. A notable feature of this system is that when the user tunes away from one station, it isn’t simply paused, but instead allowed to continue playing as if real time is passing in the simulated radio world.

Although there are a few modern conveniences here for safety and for period-correct immersion, we think this project really hits the nail on the head for preserving everything possible while not rolling the dice with 40s-era safety standards. There’s also a GitHub page with some more info that [David] hopes to add to in the near future. This restoration of a radio only one year newer has a similar feel, and there are also guides for a more broad category of radio restorations as well.

Continue reading “Restoring The Soul Of A 1940s Radio”

Build A High Voltage Supply For Vacuum Tube Work

If you work on simple digital projects, just about any bench supply will offer the voltage and current you’re looking for. However, if you’re working with valves, you’ll often find yourself needing much higher voltages that can be tricky to source. [Chappy Happy] has shared a design for a simple HV power supply that should prove useful to vacuum tube enthusiasts.

The build is fairly basic in nature, lacing together some commonly available parts to generate the necessary voltages for working with common vacuum tubes from a 12 volt DC input. Inside the supply is a UC3843A DC boost converter, set up to output high voltage up to around 300 volts DC, with a ripple filter added for good measure. The output can be adjusted with a knob, with a voltmeter on the front panel. There’s also a 12-volt output, and a LM2596 step down converter to produce 6.3 volts for the filament supply. The whole project is built in an old Heathkit project box, and he demonstrates the supply with a simple single-tube amplifier.

If you find yourself regularly whipping up tube circuits, you might like to have something like this on your workbench. Or, you might even consider cooking up your own tubes from scratch if you’re more adventurous like that. Video after the break.

Continue reading “Build A High Voltage Supply For Vacuum Tube Work”

Breadboard for vacuum tubes

This Board Helps You Prototype Circuits With Tubes

There you are at the surplus store, staring into the bin of faded orange, yellow, red, and black, boxes–a treasure trove of vintage vacuum tubes—dreaming about building a tube amp for your guitar or a phonograph preamp for your DIY hi-fi sound system. But, if you are not already in possession of a vintage, purpose-built tube testing device, how would you test them to know whether they are working properly? How would you test out your designs before committing to them? Or maybe your goal is simply to play around and learn more about how tubes work.

One approach is to build yourself a breadboard for tubes, like [MarceloG19] has done. Working mostly with what was laying around, [MarceloG19] built a shallow metal box to serve as a platform for a variety of tube sockets and screw terminals. Connecting the terminals to the socket leads beneath the outer surface of the box made for a tidy and firm base on which to connect other components. The built-in on/off switch, fuse and power socket are a nice touch.

[MarceloG19’s] inaugural design is a simple Class A amplifier, tested with a sine wave and recorded music. Then it’s on to some manual curve tracing, to test a tube that turns out to be fairly worn-out but serviceable for certain use cases.

If you’re dipping your toes into tube-based electronics, you’re going to want a piece of equipment like this prototyping board and [MarceloG19’s] documentation and discussion are a good read to help get you started.

Once you have your board ready, it’s time to move on to building a stereo amplifier , a tube-based headphone preamp, or take things in a different direction with this CRT-driven audio amplifier.

Retro Computer Goes Back To The 1950s

When thinking of retrocomputing, many of us will imagine machines such as the Commodore 64 or Apple II. These computers were very popular and have plenty of parts and documentation available. Fewer will go back to the Intel 8008 or even 4004 era which were the first integrated circuit chips commercially available. But before even those transistor-based computers is a retrocomputing era rarely touched on: the era of programmable vacuum tube machines. [Mike] has gone back to the 1950s with this computer which uses vacuum tubes instead of transistors.

The computer has an eight-bit architecture and features most of the components of any modern transistor-based computer of similar computational ability. Memory, I/O, an arithmetic logic unit including a carry bit that allows it to do 16-bit arithmetic, are all implemented using 6N3P dual triode tubes that date to the 50s and 60s and would have been used in similar computers like the IBM 700. All of this drives a flight simulator program or a Fibonacci number generator, demonstrating its general purpose computing capabilities.

Of course, tubes were generally phased out in favor of transistors largely due to their power and space requirements; [Mike] needs a stepladder to maintain this computer as well as around ten minutes each time he starts it up to allow the tubes to warm up, with each module needing over three amps of current each. It’s a hugely impressive build and we’d recommend checking out the video linked below to get more details on its operation. If you’re looking for something a little more accessible to get into the world of vacuum tubes, this single-board tube computer fits the bill.

Continue reading “Retro Computer Goes Back To The 1950s”

Grid Leak Radio Draws The Waves

[Stephen McNamera] found a schematic for a grid leak radio online and decided to throw together a few tubes on a piece of wood and see how it worked. As you can see in the video below, it works well. The video is a bit light on details, but the web page he found the plans on also has quite a bit of explanation.

The name “grid leak detector” is due to the grid leak resistor between the grid and ground, in this case, a 2.7 megaohm resistor. The first tube does everything, including AM detection. The second tube is just an audio amplifier that drives the speaker. This demodulation method relies on the cathode to control grid conduction characteristics and was found in radios up to about the 1930s. The control grid performs the usual function but also acts as a diode with the cathode, providing demodulation. In a way, this is similar to a crystal radio but with an amplified tube diode instead of a crystal.

It looks like [Stephen] wound his own coil, and the variable capacitor looks suspiciously like it may have come from an old AM radio. The of the old screw terminal tube sockets on the wood board looks great. Breadboard indeed! What we didn’t see is where the 150 V plate voltage comes from. You hope there is a transformer somewhere and some filter capacitors. Or, perhaps he has a high-voltage supply on the bench.

While tubes are technologically passe, we still like them. Especially in old radios. Just take care around the high voltages, please.

Continue reading “Grid Leak Radio Draws The Waves”

Supercon 2022: Nick Poole Makes A Jolly Wrencher Tube

[Nick Poole] shared his circuitous journey into the obscure world of homemade vacuum tubes on the Supercon 2022 stage. It began innocently enough when he saw [Usagi Electric]’s single bit computer vacuum tube computer, which uses dozens of vacuum tubes. He got to wondering, could you make vacuum-tube-like devices containing multiple elements? There are some examples, like the 256-bit memory Selectron tube from the 1950’s, but nothing general purpose like a 555 timer or quad NAND gate packages. Unencumbered by a deep understanding of how vacuum tubes work, [Nick] proceeds to fill this void by imagining Integrated Thermionic, a fictitious company that exists in an alternate history where transistors were not invented and the vacuum tube reigns supreme. He also showcases a variety of innovative products that Integrated Thermionics manufactured over the decades, including surface mount tubes.

Continue reading “Supercon 2022: Nick Poole Makes A Jolly Wrencher Tube”