Making A Coil Gun Without Giant Caps

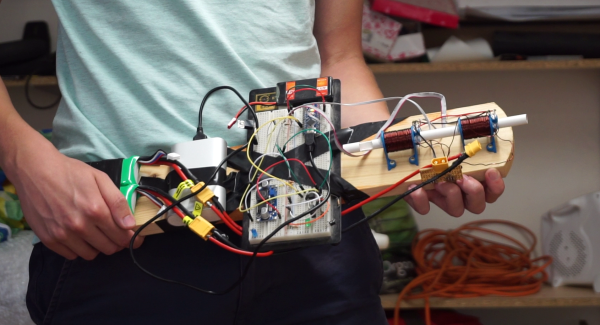
Whenever we see a coil gun project on the Internet, it seems to involve a bank of huge capacitors. [miroslavus] took a different approach with his gun–he wanted his project to be built without those monster caps.

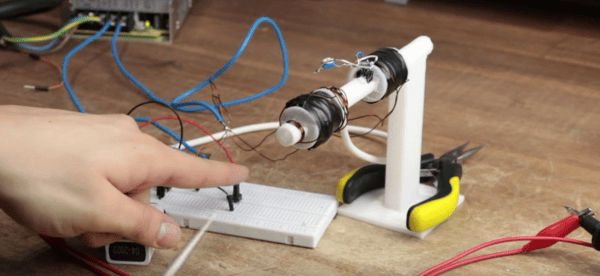
It’s powered by quadcopter LiPo batteries, 2x 1400 MaH drone batteries wired up in series and triggering 21SWG copper coils that [miroslavus] created with the help of a custom 3D-printed winding rig he designed. The rigs have ridges to help you lay the coils down neatly, and they also have mounts for photodiodes, ensuring the gun knows when it’s loaded.

When triggered, the Arduino Nano activates a pair of IRF3205 MOSFETS with logic signals stepped up to 20V, shooting lengths of 7mm or 8mm steel rod. The gun isn’t exactly creating plasma discharges with its launches, but it’s a fascinating project nonetheless.

Check out the disposable camera coil gun project and the coil guns for newbies posts we previously ran.

Continue reading “Making A Coil Gun Without Giant Caps”

Disposable Camera Coil Gun!

Some of the most enjoyable projects tend to have the terrible drawback of also having the most potential to cause bodily harm, like getting zapped by the capacitor when digging into a disposable camera. But often — if you’re careful — this curiosity pays off and you wind up learning how to make something cool like this coil gun from a camera flash’s capacitor. This handheld launches a small nail, and is packed in a handheld form factor with a light switch trigger.

[LabRatMatt] dispels any illusions of potential harm upfront and then repeatedly urges caution throughout his detailed guide. He breaks down the physics at work while maintaining a lighthearted tone. This coil gun uses a capacitor and charging circuit ripped from a disposable camera — [LabRatMatt] decided to double up with another capacitor that he had on hand from a previous project. The coil was repurposed from an old doorbell, but make sure to use a few hundred windings if you make your own coil. A light switch ended up being suitable for a trigger since it is able to handle the voltage spikes.

When assembled, it almost looks like something you’d expect to see in a post-apocalyptic wasteland, but it works!

Continue reading “Disposable Camera Coil Gun!”

Arduino Versus Logic: The Coil Gun War Continues

Looks like another shot has been fired in the simmering Coil Gun Control War. This time, [Great Scott] is taken to the discrete woodshed with a simplified and improved control circuit using a single CMOS chip and a few transistors. Where will it end? Won’t somebody think of the children?

The latest salvo is in response to [GreatScott]’s attempt to control a DIY coil gun with discrete logic, which in turn was a response to comments that he took the easy way out and used an Arduino in the original build. [Great Scott]’s second build was intended to justify the original design choice, and seemed to do a good job of explaining how much easier and better the build was with a microcontroller. Case closed, right?

Nope. Embedded designer [fede.tft] wasn’t sure the design was even close to optimized, so he got to work — on his vacation, no less!’ He trimmed the component count down to a single CMOS chip (a quad Schmitt trigger NAND), a couple of switching transistors, the MOSFETs that drive the coils, and a few passives. The NANDs are set up as flip-flops that are triggered and reset by the projectile sensors, which are implemented as hardwired AND gates. The total component count is actually less than the support components on the original Arduino build, and [fede.tft] goes so far as to offer ideas for an alternative that does away with the switching transistors.

Even though [fede.tft] admits that [GreatScott] has him beat since he actually built both his circuits, hats off to him for showing us what can likely be accomplished with just a few components. We’d like to see someone implement this design, and see just how simple it can get.

DIY Coil Gun Redux: Life Really Is Easier With Arduino

A common complaint in the comments of many a Hackaday project is: Why did they use a microcontroller? It’s easy to Monday morning quarterback someone else’s design, but it’s rare to see the OP come back and actually prove that a microcontroller was the best choice. So when [GreatScott] rebuilt his recent DIY coil gun with discrete logic, we just had to get the word out.

You’ll recall from the original build that [GreatScott] was not attempting to build a brick-wall blasting electromagnetic rifle. His build was more about exploring the concepts and working up a viable control mechanism for a small coil gun, and as such he chose an Arduino to rapidly prototype his control circuit. But when taken to task for that design choice, he rose to the challenge and designed a controller using discrete NAND and NOR gates, some RS latches, and a couple of comparators. The basic control circuit was simple, but too simple for safety — a projectile stuck in the barrel could leave a coil energized indefinitely, leading to damage. What took a line of code in the Arduino sketch to fix required an additional comparator stage and an RC network to build a timer to deenergize the coil automatically. In the end the breadboarded circuit did the job, but implementing it would have required twice the space of the Arduino while offering none of the flexibility.

Not every project deserves an Arduino, and sometimes it’s pretty clear the builder either took the easy way out or was using the only trick in his or her book. Hats off to [GreatScott] for not only having the guts to justify his design, but also proving that he has the discrete logic chops to pull it off.

Continue reading “DIY Coil Gun Redux: Life Really Is Easier With Arduino”

Coil Gun For Newbies: Learning Electromagnetic Propulsion

There’s something attractive about coil guns, especially big ones. It’s probably the danger; between the charge stored in banks of capacitors and the flying projectiles, big coil guns can be lethal to experiment with. But there is a lot to be learned from how coil guns work, especially if you build this 3D-printed entry-level coil gun.

For the coil gun newbie, [Great Scott] does a fantastic job of explaining the basics. Pulsing the coil at just the right time will suck a ferromagnetic projectile into the coil core and let momentum fling it out, and multiple coils used correclty improve performance.

His gun is a simple pistol design with two coils, optical sensors to tell when the projectile is centered in each coil, and an Arduino to coordinate everything. The results are not spectacular — he uses only a modest amount of current — but the gun still works. [Great Scott] points out how a capacitor bank could be used to increase the current, but for the sake of keeping it simple he leaves that as an exercise for the builder.

Many coil gun and rail gun builds have made it to our pages over the years, including his ridiculously powerful gun that uses a capacitor bank so large it needs its own car. We like this build for its simplicity, its approachability, and the excellent explanation of its function.

Continue reading “Coil Gun For Newbies: Learning Electromagnetic Propulsion”

Coil Gun With Parts Pulled From An Electric Stapler

[Lou’s] latest tutorial details the process of turning an electric stapler into a coil gun. The stapler is the expensive part, but the rest is pretty simple. He used PVC pipe and a handful of fittings along with a few supplies you probably have kicking around your shop.

It’s surprising how perfect the Bostitch stapler (from which the parts were pulled) is for this project. The mechanism that drives the staples into your pages uses a solenoid with a rather large coil. To turn it into a coil gun you simply need to replace the core of the solenoid with a metal projectile. In the video after the break [Lou] shows us how to make a barrel onto which the coil can be mounted. From there he uses a wooden spacer to position a hunk of smooth metal from a bolt which serves as the projectile. The stapler’s original drive circuitry and trigger mechanism do the rest.

Continue reading “Coil Gun With Parts Pulled From An Electric Stapler”

Coil Gun Revolver

[Sam] sent in a coil gun revolver – a feature we’ve never seen on a coil gun build before. The gun is based on a cheap toy revolver and is powered by a 9 Volt battery connected to an “electrified fly swatter tennis racquet” instead of the usual disposable camera build.

The revolver mechanism isn’t perfect – [Sam] has to advance the chamber with his thumb while the capacitor is recharging. This is only because of the mechanics of the plastic toy his gun is based on, though. He figures a small motor could do the work for him, but he’ll be forgoing that project to work on the MK II version.

Most of the coil gun builds on Hack A Day have been muzzle or breech loaders, so with [Sam]’s revolver we’re probably seeing the evolution of firearms mirrored in coil gun advancements. Does anyone want to take a guess and predict when we’ll see the equivalent of a this .50 caliber beast?. [Sam] says his next project is going to be a rifle, so he might have his work cut out for him.