Tips For Winding Durable Coils With Nice, Flat Sides

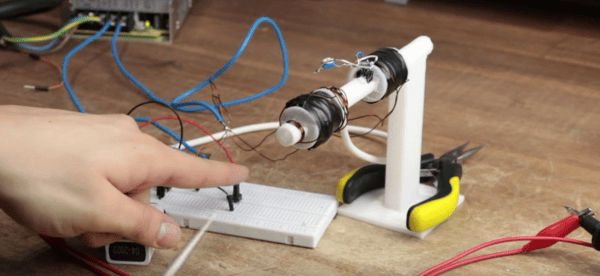
[Drew Pilcher] needed durable, custom-wound coils with no core, and perfectly flat sides. Coils can be wound by hand, of course, but reliably creating perfect coils with thin wire and lots of layers requires some additional help. Happily, [Drew] shares his method for doing exactly that. Perhaps coming as no surprise, the key to repeatable, high-quality coils is good preparation and tools.

The most important part is the ability to rotate a spool for winding without having to take one’s hands off the workpiece. To accomplish this, a cheap, no-name power drill and foot pedal (made from the harvested trigger unit of the drill) forms the basis of [Drew]’s DIY winder. To make coils with precision, one must also count the number of turns. Thankfully, there is a simple solution for this; [Drew] used a cheap digital turn counter from Amazon. This economical device uses a magnet and sensor, so [Drew] simply stuck the magnet on the side of the drill’s chuck.
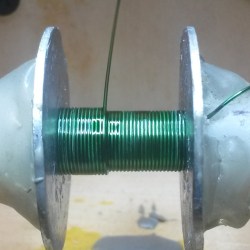
Careful winding and a liberal application of CA glue helps ensure good results.

The spool is what the wire gets wound around to form the coil, and it will need to be removed from the coil afterwards. To accomplish this, [Drew] uses a brass shaft, metal washers, and some plastic spacers. A light coating of grease on the spool surfaces helps ensure things come apart properly in the end.

To actually make the coil, [Drew] recommends some means of magnification, and a supply of CA glue. Wind the wire as cleanly and closely as possible, and apply CA glue during the process to secure things. It takes some practice, but really clean windings are possible if done correctly.

For thick coils with a lot of layers, the CA glue will hold things together well enough, but for smaller coils [Drew] likes to give them a final coating of two-part epoxy. After things are completely set, the spool is disassembled and the inner core is pushed out as gently as possible.

The result? A tightly-wound, durable coil with perfectly flat sides. It’s exactly the thing [Drew] needs for his upcoming coil gun project. How’s that work, you wonder? You can see the basics covered right here.

Flexible PCB Becomes The Actuator

An electromagnetic coil gun takes a line of electromagnets working together to form a moving electromagnetic field. These fields accelerate a project and boom, you have electricity moving matter, often at an impressive rate of speed.

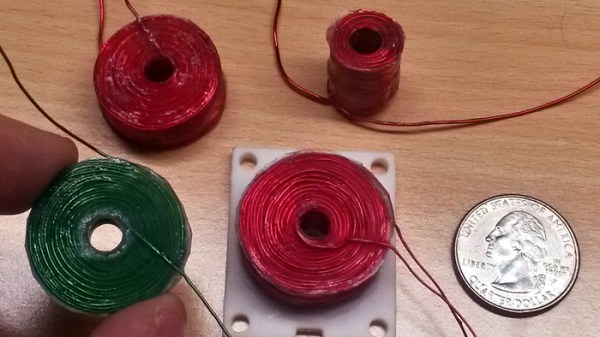
[Carl Bugeja] has taken the idea and in a sense turned it upon its head with his flexible PCB actuator. Now the line of electromagnets are the moving part and the magnetic object the stationary one. There is still a line of flat PCB inductors in the classic coil gun configuration, but as the title suggests on a flexible substrate.

The result is a curiously organic motion reminiscent of some lizards, caterpillars, or snakes. It can move over the magnet in a loop, or flex in the air above it. It’s a novel moving part, and he’s treated us to a video which we’ve placed below the break.

He has plans to put it to use in some form of robot, though while it certainly has promise we’d be interested to know both what force it can produce and whether flexible PCB is robust enough for repeated operation. We salute him for taking a simple idea and so effectively proving the concept.

We’ve brought you [Carl]’s work before, most notably with his PCB motor.

Continue reading “Flexible PCB Becomes The Actuator”

You Can Now Buy A Practical Gauss Gun

Occasionally we come across a piece of information which reminds us that, while flying cars are still nowhere to be found, we’re definitely living in the future. Usually it’s about some new application of artificial intelligence, or maybe another success in the rapidly developing field of private spaceflight. But sometimes it’s when you look at a website and say to yourself: “Oh cool, they have 1.5kW electromagnetic accelerators in stock.”

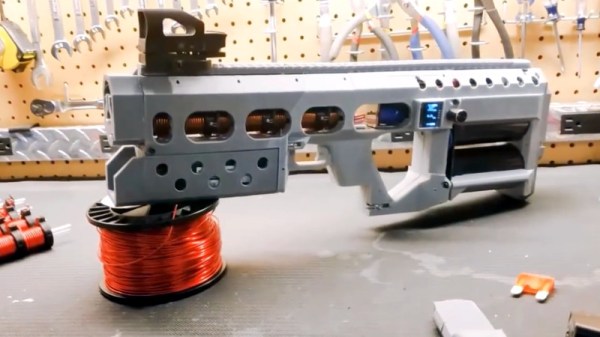
Arcflash Labs, a partnership between [David Wirth] and [Jason Murray], have put their EMG-01A Gauss gun up for sale for anyone who’s brave enough and willing to put down $1,000 USD on what’s essentially a high-tech BB gun. The creators claim it obtains an efficiency of 6.5% out of its RC-style 6S LiPo battery pack, which allows it to fire over 100 rounds before needing to be recharged. Firing 4.6g steel projectiles at a rather leisurely 45 m/s, this futuristic weapon would be more of a match for tin cans than invading alien forces, but at least you’ll be blasting those cans from a position of supreme technical superiority.

The EMG-01A builds on the work of the team’s previous experiments, such as the semi-automatic railgun we covered last year. They’ve made the device much smaller and lighter than their previous guns, as well as worked on making them safer and more reliable. That said, the page for the EMG-01A has a number of warnings and caveats that you won’t see on the back of a Red Ryder BB gun box; it’s certainly not a toy, and anyone who takes ownership of one needs to be respectful of the responsibility they’re taking on.

Speaking of which, who can actually buy one of these things? The Arcflash Labs site makes it clear they will only ship to the United States, and further gives a list of states and cities were they can’t send a completed gun. Essentially they are following the same laws and guidelines used for shipping air guns within the US, as they believe that’s a fair classification for their electromagnetic guns. Whether or not the ATF feels the same way is unclear, and it should be interesting to see what kind of legal response there may be if Arcflash Labs starts moving enough units.

If you’d like to wage warfare on your recyclables without spending quite so much cash, you can always build your own for less. Or nearly nothing, if you want to go the full MacGyver route.

Continue reading “You Can Now Buy A Practical Gauss Gun”

Semi-Automatic Rail Gun Is A Laptop Killer

It’s huge, it’s unwieldy, and it takes 45 seconds to shoot all three rounds in its magazine. But it’s a legitimate semi-automatic railgun, and it’s pretty awesome.

Yes, it has its limits, but every new technology does, especially totally home-brew builds like this. The aptly named [NSA_listbot] has been putting a lot of work into his railgun, and this is but the most recent product of an iterative design cycle.

The principle is similar to other railguns we’ve featured before, which accelerate projectiles using rapidly pulsed electromagnets. The features list in the video below reads like a spec for a top-secret military project: field-augmented circular bore, 4.5kJ capacitor bank, and a custom Arduino Nano that’s hardened against the huge electromagnetic pulse (EMP) generated by the coils. But the interesting bits are in the mechanical design, which had to depart from standard firearms designs to handle the caseless 6 mm projectiles. The resulting receiver and magazines are entirely 3D printed. Although it packs a wallop, its cyclic rate of fire is painfully slow. We expect that’ll improve as battery and capacitor technology catches up, though.

Want to check out some more railgun builds? We’ve got them in spades — from one with $50,000 worth of caps to a wrist-mounted web-slinger.

Continue reading “Semi-Automatic Rail Gun Is A Laptop Killer”

Making A Coil Gun Without Giant Caps

Whenever we see a coil gun project on the Internet, it seems to involve a bank of huge capacitors. [miroslavus] took a different approach with his gun–he wanted his project to be built without those monster caps.

It’s powered by quadcopter LiPo batteries, 2x 1400 MaH drone batteries wired up in series and triggering 21SWG copper coils that [miroslavus] created with the help of a custom 3D-printed winding rig he designed. The rigs have ridges to help you lay the coils down neatly, and they also have mounts for photodiodes, ensuring the gun knows when it’s loaded.

When triggered, the Arduino Nano activates a pair of IRF3205 MOSFETS with logic signals stepped up to 20V, shooting lengths of 7mm or 8mm steel rod. The gun isn’t exactly creating plasma discharges with its launches, but it’s a fascinating project nonetheless.

Check out the disposable camera coil gun project and the coil guns for newbies posts we previously ran.

Continue reading “Making A Coil Gun Without Giant Caps”

DIY Coil Gun Redux: Life Really Is Easier With Arduino

A common complaint in the comments of many a Hackaday project is: Why did they use a microcontroller? It’s easy to Monday morning quarterback someone else’s design, but it’s rare to see the OP come back and actually prove that a microcontroller was the best choice. So when [GreatScott] rebuilt his recent DIY coil gun with discrete logic, we just had to get the word out.

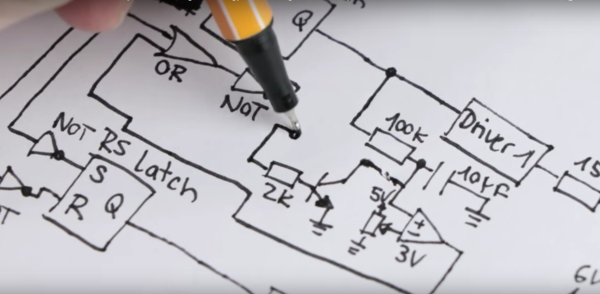
You’ll recall from the original build that [GreatScott] was not attempting to build a brick-wall blasting electromagnetic rifle. His build was more about exploring the concepts and working up a viable control mechanism for a small coil gun, and as such he chose an Arduino to rapidly prototype his control circuit. But when taken to task for that design choice, he rose to the challenge and designed a controller using discrete NAND and NOR gates, some RS latches, and a couple of comparators. The basic control circuit was simple, but too simple for safety — a projectile stuck in the barrel could leave a coil energized indefinitely, leading to damage. What took a line of code in the Arduino sketch to fix required an additional comparator stage and an RC network to build a timer to deenergize the coil automatically. In the end the breadboarded circuit did the job, but implementing it would have required twice the space of the Arduino while offering none of the flexibility.

Not every project deserves an Arduino, and sometimes it’s pretty clear the builder either took the easy way out or was using the only trick in his or her book. Hats off to [GreatScott] for not only having the guts to justify his design, but also proving that he has the discrete logic chops to pull it off.

Continue reading “DIY Coil Gun Redux: Life Really Is Easier With Arduino”

Coil Gun For Newbies: Learning Electromagnetic Propulsion

There’s something attractive about coil guns, especially big ones. It’s probably the danger; between the charge stored in banks of capacitors and the flying projectiles, big coil guns can be lethal to experiment with. But there is a lot to be learned from how coil guns work, especially if you build this 3D-printed entry-level coil gun.

For the coil gun newbie, [Great Scott] does a fantastic job of explaining the basics. Pulsing the coil at just the right time will suck a ferromagnetic projectile into the coil core and let momentum fling it out, and multiple coils used correclty improve performance.

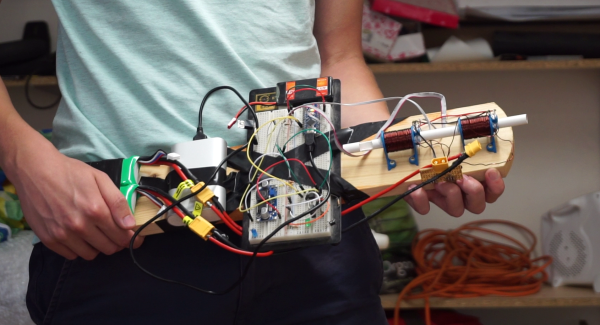
His gun is a simple pistol design with two coils, optical sensors to tell when the projectile is centered in each coil, and an Arduino to coordinate everything. The results are not spectacular — he uses only a modest amount of current — but the gun still works. [Great Scott] points out how a capacitor bank could be used to increase the current, but for the sake of keeping it simple he leaves that as an exercise for the builder.

Many coil gun and rail gun builds have made it to our pages over the years, including his ridiculously powerful gun that uses a capacitor bank so large it needs its own car. We like this build for its simplicity, its approachability, and the excellent explanation of its function.

Continue reading “Coil Gun For Newbies: Learning Electromagnetic Propulsion”