Hackaday Prize Entry: A CPU For Balloons

Launching a high altitude balloon requires a wide breadth of knowledge. To do it right, you obviously need to know electronics and programming to get temperature, pressure, and GPS data. You’ll have to research which cameras will take good pictures and are easily programmable. It’s cold up there, and that means you need some insulation to keep the batteries warm. If you ever want to find your payload, you’ll also need an amateur radio license.

There’s a lot of work that goes into launching high altitude balloons, and for his Hackaday Prize entry, [Jeremy] designed a simple embedded data recorder capable of flying over 100,000 feet.

This flight data recorder for balloons is based on the ever popular ATMega328, and includes humidity, temperature, pressure, accelerometer, gyroscope, and magnetometer sensors. All of this data is recorded to an SD card. The Real Engineers™ who are wont to criticize design decisions they disagree with might laugh at the use of a 7805 voltage regulator, but in this case it makes a lot of sense. The power wasted by a linear regulator isn’t. It’s turned into heat which keeps the batteries alive a little bit longer.

This balloon data recorder has already flown, and [Jeremy] got some great pictures out of it. It’s a great piece of the puzzle for an exceptionally multidisciplinary project, and a great entry for the Hackaday Prize.

MagicShifter 3000: An Over-Engineered POV Stick With A 15-Year Journey

3 hackers, 16 LEDs, 15 years of development, one goal: A persistence of vision display stick that fits into your pocket. That’s the magicShifter 3000. When waved, the little, 10 cm (4 inches) long handheld device draws stable images in midair using the persistence of vision effect. Now, the project has reached another milestone: production.

The design has evolved since it started with a green LED bargraph around 2002. The current version features 16 APA102 (aka DotStar) RGB LEDs, an ESP-12E WiFi module, an NXP accelerometer/magnetometer, the mandatory Silabs USB interface, as well as a LiPo battery and charger with an impressive portion of power management. An Arduino-friendly firmware implements image stabilization as well as a React-based web interface for uploading and drawing images.

After experimenting with Seeedstudio for their previous prototypes, the team manufactured 500 units in Bulgaria. Their project took them on a roundtrip through hardware manufacturing. From ironing out minuscule flaws for a rock-solid design, over building test rigs and writing test procedures, to yield management. All magicShifter enclosures are — traditionally — 3D printed, so [Overflo] and [Martin] are working in shifts to start the 500 prints, which take about 50 minutes each to complete. The printers are still buzzing, but assembled units can be obtained in their shop.

Over all the years, the magicShifter has earned fame and funding as the over-engineered open hardware pocket POV stick. If you’re living in Europe, chances are that you either already saw one of the numerous prototype units or ran into [Phillip Tiefenbacher] aka [wizard23] on a random hacker event to be given a brief demo of the magicShifter. The project always documented the status quo of hardware hacking: Every year, it got a bit smaller, better, and reflected what parts happened to be en vogue.

magicshifter-timeline

The firmware and 3D-printable enclosure are still open source and the schematics for the latest design can be found on GitHub. Although, you will search in vain for layout or Gerber files. The risk of manufacturing large batches and then being put out of business by cheap clones put its mark on the project, letting the magicShifter reflect the current, globalized status of hardware hacking once more. Nevertheless, we’re glad the bedrock of POV projects still persists. Check out the catchy explanatory video below.

Continue reading “MagicShifter 3000: An Over-Engineered POV Stick With A 15-Year Journey”

DIY Coil Gun Redux: Life Really Is Easier With Arduino

A common complaint in the comments of many a Hackaday project is: Why did they use a microcontroller? It’s easy to Monday morning quarterback someone else’s design, but it’s rare to see the OP come back and actually prove that a microcontroller was the best choice. So when [GreatScott] rebuilt his recent DIY coil gun with discrete logic, we just had to get the word out.

You’ll recall from the original build that [GreatScott] was not attempting to build a brick-wall blasting electromagnetic rifle. His build was more about exploring the concepts and working up a viable control mechanism for a small coil gun, and as such he chose an Arduino to rapidly prototype his control circuit. But when taken to task for that design choice, he rose to the challenge and designed a controller using discrete NAND and NOR gates, some RS latches, and a couple of comparators. The basic control circuit was simple, but too simple for safety — a projectile stuck in the barrel could leave a coil energized indefinitely, leading to damage. What took a line of code in the Arduino sketch to fix required an additional comparator stage and an RC network to build a timer to deenergize the coil automatically. In the end the breadboarded circuit did the job, but implementing it would have required twice the space of the Arduino while offering none of the flexibility.

Not every project deserves an Arduino, and sometimes it’s pretty clear the builder either took the easy way out or was using the only trick in his or her book. Hats off to [GreatScott] for not only having the guts to justify his design, but also proving that he has the discrete logic chops to pull it off.

Continue reading “DIY Coil Gun Redux: Life Really Is Easier With Arduino”

A PDP-11 On A Chip

If you entered the world of professional computing sometime in the 1960s or 1970s there is a high probability that you would have found yourself working on a minicomputer. These were a class of computer smaller than the colossal mainframes of the day, with a price tag that put them within the range of medium-sized companies and institutions rather than large corporations or government-funded entities. Physically they were not small machines, but compared to the mainframes they did not require a special building to house them, or a high-power electrical supply.

A PDP-11 at The National Museum Of Computing, Bletchley, UK.

One of the most prominent among the suppliers of minicomputers was Digital Equipment Corporation, otherwise known as DEC. Their PDP line of machines dominated the market, and can be found in the ancestry of many of the things we take for granted today. The first UNIX development in 1969 for instance was performed on a DEC PDP-7.

DEC’s flagship product line of the 1970s was the 16-bit PDP-11 series, launched in 1970 and continuing in production until sometime in the late 1990s. Huge numbers of these machines were sold, and it is likely that nearly all adults reading this have at some time or other encountered one at work even if we are unaware that the supermarket till receipt, invoice, or doctor’s appointment slip in our hand was processed on it.

During that over-20-year lifespan of course DEC did not retain the 74 logic based architecture of the earliest model. Successive PDP-11 generations featured ever greater integration of their processor, culminating by the 1980s in the J-11, a CMOS microprocessor implementation of a PDP-11/70. This took the form of two integrated circuits mounted on a large 60-pin DIP ceramic wafer. It was one of these devices that came the way of [bhilpert], and instead of retaining it as a curio he decided to see if he could make it work.

The PDP-11 processors had a useful feature: a debugging console built into their hardware. This means that it should be a relatively simple task to bring up a PDP-11 processor like the J-11 without providing the rest of the PDP-11 to support it, and it was this task that he set about performing. Providing a 6402 UART at the address expected of the console with a bit of 74 glue logic, a bit more 74 for an address latch, and a couple of  6264 8K by 8 RAM chips gave him a very simple but functional PDP-11 on a breadboard. He found it would run with a clock speed as high as 11MHz, but baulked at a 14MHz crystal. He suggests that the breadboard layout may be responsible for this. Hand-keying a couple of test programs, he was able to demonstrate it working.

We’ve seen a lot of the PDP-11 on these pages over the years. Of note are a restoration of a PDP-11/04, this faithful reproduction of a PDP-11 panel emulated with the help of a Raspberry Pi, and an entire PDP-11 emulated on an AVR microcontroller. We have indeed come a long way.

Thanks [BigEd] for the tip.

Impostor Syndrome And Individual Competence

When you attend a very large event such as EMF Camp, there is so much going on that it is impossible to catch everything. It’s easy to come away feeling that you’ve missed all the good stuff, somehow you wasted your time, everyone else had complete focus and got so much more out of the event.

In an odd twist, one of the EMF 2016 talks people have been raving about is very relevant to that fear of inability to take in a festival programme. [Jessica Rose] gave a talk about imposter syndrome. A feeling of inadequacy compared to your peers and a constant anxiety at being exposed as a fraud that will probably be very familiar to many readers. As she points out, it’s a particularly cruel affliction in that it affects those people who do have all the skills while the real impostors share an inflated competence in their abilities.

This has significant relevance to many in our community and for a single presentation to get so many people talking about it at an event like EMF Camp means it definitely hit the mark. The full video is embedded below the break. At about half an hour long it’s well worth a look.

Continue reading “Impostor Syndrome And Individual Competence”

Let’s Make Life A Little Better

Chances are you’ve spent a lot of time trying to think of the next great project to hit your workbench. We’ve all built up a set of tools, honed our skills, and set aside some time to toil away in the workshop. This is all for naught without a really great project idea. The best place to look for this idea is where it can make life a little better.

I’m talking about Assistive Technologies which directly benefit people. Using your time and talent to help make lives better is a noble pursuit and the topic of the 2016 Hackaday Prize challenge that began this morning.

Assistive Technology is a vast topic and there is a ton of low-hanging fruit waiting to be discovered. Included in the Assistive Technology ecosystem are prosthetics, mobility, diagnostics for chronic diseases, devices for the aging or elderly and their caregivers, and much more. You can have a big impact by working on your prototype device, either directly through making lives better and by inspiring others to build on your effort.

Need some proof that this is a big deal? The winners of the 2015 Hackaday Prize developed a 3D printed mechanism that links electric wheelchair control with eye movement trackers called Eyedrivomatic. This was spurred by a friend of theirs with ALS who was sometimes stuck in his room all day if he forgot to schedule a caregiver to take him to the community room. The project bridges the existing technologies already available to many people with ALS, providing greater independence in their lives. The OpenBionics Affordable Prosthetic Hands project developed a bionic hand with a clever whiffletree system to enable simpler finger movement. This engineering effort brings down the cost and complexity of producing a prosthetic hand and helps remove some of the barriers to getting prosthetics to those who need them.
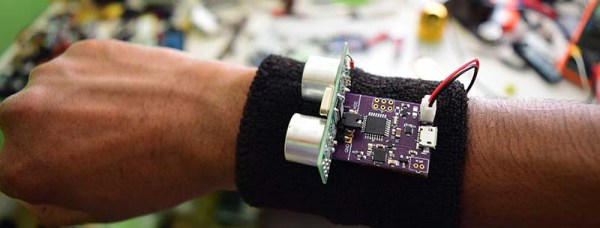
The Is the Stove Off project adds peace of mind and promotes safe independence through an Internet connected indicator to ensure the kitchen stove hasn’t been left on and that it isn’t turned on at peculiar times. Pathfinder Haptic Navigation reimagines the tools available to the blind for navigating their world. It uses wrist-mounted ultrasonic sensors and vibration feedback, allowing the user to feel how close their hands are to objects. Hand Drive is another wheelchair add-on to make wheeling yourself around a bit easier by using a rowing motion that doesn’t depend as much on having a strong hand grip on the chair’s push ring.

Assistive TechnologiesIn most cases, great Assistive Technology is not rocket science. It’s clever recognition of a problem and careful application of a solution for it. Our community of hackers, designers, and engineers can make a big impact on many lives with this, and now is the time to do so.

Enter your Assistive Technology in the Hackaday Prize now and keep chipping away on those prototypes. We will look at the progress all of the entries starting on October 3rd, choosing 20 entries to win $1000 each and continue onto the finals. These finalists are eligible for the top prizes, which include $150,000 and a residency at the Supplyframe Design Lab, $25,000, two $10,000 prizes, and a $5,000 prize.

Ask Hackaday: Calling All 68k Experts

This is a tale of old CPUs, intensive SMD rework, and things that should work but don’t.

Released in 1994, Apple’s Powerbook 500 series of laptop computers were the top of the line. They had built-in Ethernet, a trackpad instead of a trackball, stereo sound, and a full-size keyboard. This was one of the first laptops that looked like a modern laptop.

The CPU inside these laptops — save for the high-end Japan-only Powerbook 550c — was the 68LC040. The ‘LC‘ designation inside the part name says this CPU doesn’t have a floating point unit. A few months ago, [quarterturn] was looking for a project and decided replacing the CPU would be a valuable learning experience. He pulled the CPU card from the laptop, got out some ChipQuick, and reworked a 180-pin QFP package. This did not go well. The replacement CPU was sourced from China, and even though the number lasered onto the new CPU read 68040 and not 68LC040, this laptop was still without a floating point unit. Still, it’s an impressive display of rework ability, and generated a factlet for the marginalia of the history of consumer electronics.

Faced with a laptop that was effectively unchanged after an immense amount of very, very fine soldering, [quarterturn] had two choices. He could put the Powerbook back in the parts bin, or he could source a 68040 CPU with an FPU. He chose the latter. The new chip is a Freescale MC68040FE33A. Assured by an NXP support rep this CPU did in fact have a floating point unit, [quarterturn] checked the Mac’s System Information. No FPU was listed. He installed NetBSD. There was no FPU installed. This is weird, shouldn’t happen, and now [quarterturn] is at the limits of knowledge concerning the Powerbook 500 architecture. Thus, Ask Hackaday: why doesn’t this FPU work?

Continue reading “Ask Hackaday: Calling All 68k Experts”