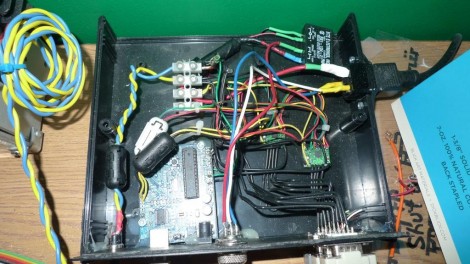
[Reza Naima] has been using an Arduino as the center of his CNC setup for quite some time now. It handles three stepper motors, limiting switches, e-stop, and spindle control. The sketch he’s using allows him to stream g-code to the popular prototyping platform, freeing him from needing a dedicated PC. It’s worked so well that he’s decided to clean up the code and develop a shield to help others get up and running. If you want to see his progress or lend a hand, check out the google group he started for the schematics, code, and forum discussions. There is already a CNC project for Arduino called Grbl but [Reza’s] approach uses the Arduino libraries in an effort to make the sketch more customizable for the average user.


i’m doing something similar with an xmega-based controller board, but instead of building a g-code parser, i’m piggybacking on the work of the reprap folks and their sanguino3g protocol, which is cheap to implement on the microcontroller side. plus replicatorg is pretty decent software, even if it is biased toward 3d printers.
Interesting.
Whats the volt/amp limit for stepper motor using the arduino? Or is that dependent on supporting hardware?
-Jacob
Did anyone find any actual schematics?
@xeracy
There’s a circuit layout about halfway down.
http://groups.google.com/group/rstep/browse_thread/thread/4b66f5c0c16738a7#
@jacob
You’d want an hbridge or a darlington array for the actual switching, arduinos only do a few mA.
Nice! more like this!
I believe the max current is about 40mA for the microcontroller pins.
It has been awhile since I read the datasheets though.
what is the max step rate using the Arduino.
for one axis to move at 100ipm with a lead-screw pitch of 5tpi and using a driver in 8th step it would require a pulse train of ~13khz. (100*5*200*8)/60
200 steps per revolution stepper motor
a fpga would be much faster despite the increced complexity
smooth stepper http://www.warp9td.com/
I know enough to know that this is quite impressive, even though I don’t yet know CNC coding.
Being able to implement this in a shop environment with a dedicated switching array could completely cut out another computer from the mix, and a possible choke point by infection.
This is very impressive- I really welcome further development of this.
Sweet, I’ve been thinking of doing something similar, this will really help.
@bud
The smoothstepper is pretty much dead. No software updates. Promised features never materialized. I have a small lathe with one.
Still the best bet is using the parallel port with Mach3 or EMC2. Sounds like the little microcontrollers have a hard time keeping up, lots of processing to do when doing circ int.
THis looks a lot like what the reprap project has been doing now for about 5 years. Yes, the reprap runs on an arduino and gcodes and stepper motors!
Hi all –
Thanks for the words of encouragement. The controller board is designed to handle 35V @ 2A per winding (2 winding per motor -> 16A total).
The firmware started from the reprap codebase, but 99% of it has been re-written (the only remaining part is how circles are computed). The biggest problem with the original code was that the steps were not spaced out equally and could cause badness (I can elaborate but it probably will not interest the majority here). I played around with a number of algorithms till I was able to get the timings evenly spaced (to within 1uS).
If possible, let me know if you would prefer having this designed as a shield or add an AVR+FTDI chip to make it self sufficient. Please post your response here and your reasoning.
https://spreadsheets.google.com/viewform?formkey=dEVkUGFIcVJITjNPSkdjcXNMalhYbXc6MQ
Thanks!
Thanks for posting I would really like to do something like this. I know more of the G code side of this than the electrical side so I think this might help.
Like the build! Nice and clean and easy to understand :)
@ Reza – Do both designs, then it gives the complete novice a buy once unit, whereas arduino enthusiasts would more than likely appreciate a shield and anyone more advanced can adapt the shield and add their own mcu configuration.
BTW, video in action: http://www.youtube.com/watch?v=SzFpiU6OSTQ
Hi Reza,
I’ve seen your video. Nice work! Did you build your DIY-CNC by yourself or based on an existing design on the web?
I’m just asking because I plan to build a 3d printer by myself but it should be good for milling pcbs as well!
BR
@BR It’s built form a kit from here: http://zentoolworks.com/
Hi Nice work indeed, any possibility to buy one of these Rstep boards in near future, i currently working on a couple of small and medium size 3 axis mills. this seems to be the perfect choice of controller. I already have almost ANY TYPE of Arduino in my stock + a couple of Sanguino as well. currently running 1 mill on EMC2 and a 3 axis Stepper Motor Driver Board Controller TB6560. works fine but i really love working with the Arduino, but sadly not an expert into soldering and components.