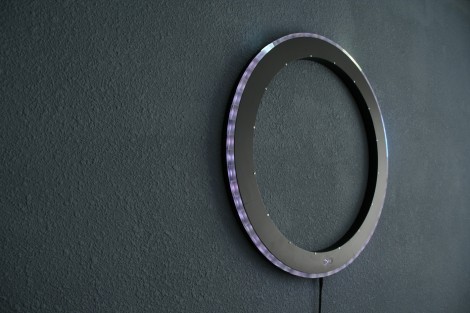
The Equinox clock is made up of simple parts but a combination of fine design and precision make it a gem of a timepiece. The guts are made up of an Arduino, a DS1307 real time clock, twelve LED drivers, and sixty RGB LEDs. These combine with a capacitive touch interface to tell the time using three lit blocks for the hours, one for the minutes, and a fading block for the seconds. See for yourself after the break.
To our delight, [Bram Knaapen] shared the specifics of the case. The black ring that makes up the body was laser cut and spray painted. He uses small blocks of acrylic that have been sandblasted to diffuse the light. This is also a great example of clean circuitry using interconnects between the different circuit boards.
We always enjoy seeing clocks no matter what level of finish is involved, but great design is something that makes us want to hang a project on the wall rather than stow it in a parts bin.
[youtube=http://www.youtube.com/watch?v=JNpjX5mobfI]
[Thanks Mowcius]


Wow. I dig it! A nice finishing touch would be to put the power adapter cord in the wall so there’s no cord coming out the bottom.
I like it. I find the abrupt change in the minute and hour “hands” a little distracting, though. A bit of fading might be nice.
Oooo, I like that. Cool looking project.
I’m with Luke and AP above. In fact, maybe even having a “face” on the clock to hide batteries would be a cool idea.
An elegant approach. Good job.
@AP, depending on how it’s set up that might merely be a matter of a few minutes’ programming. Along with any number of other modifications whenever you get bored with the current behavior.
Beautiful work and a definite winner.
When will it be in the stores? I want one!
“chevron 7 locked !”
where’s the n’quada power source?
@Lude & Daley: it’s just the right shape for inductive power.. :) it might not be too practical to try to mount the solenoid in the wall, though. it could go on the wall behind it.
I don’t know that I have the wherewithall to actually make something like this on my own…
..but I would be the first in line to buy one of these!
It’s functional, but more important, it’s gorgeous!
WOW man!
It looks like something Bang & Olufsen would create! Wow again…
Stunning. I wish I had access to them fancy laser cuttymajigs to make parts like this with.
that clock is absolutely beautiful. I would pay considerable money for one of those. A simply wonderful time piece that abundantly classic with a clean and crisp feel and look.
@sneakypoo you do!
ponoko.com/
SparkFun recently partnered with them!
-Taylor
Unique design and great build!
Absolutely love “dusk” it looks like coronal discharge during an eclipse, awesome!
wow! looks great
only if didn’t have power cable, but instead it could use batteries (i don’t know what’s consumption)
Put one of those Borg plasma things in the centre and you’ve got somthing.
That is amazing. You’ve inspired me to make one too.
You could always hide the power cable in the wall.
nice work. I had a similar idea, but to use ambient light sensors and time of day to PWM the LEDs so that at night (say between midnight and 6 am) the lights are off (since no one is looking at the clock anyway) and use the ambient light to adjust brightness so if I have a dim lights the clock does not overpower them. really like the idea of the RGB LEDs though. I had a different color for H, M, S but being able to set the mood with this is pretty neat.
Dammit! I’ve been working on-and-off on something similar for over a year. Right now I’m trying to figure out what to house the thing in, but whatever I do will be nowhere near as sexy as this!
Nice work but nothing to get overexcited. I like the idea. The execution is great too. One could save money and work with mono color leds as a basic project but would miss out on the fancy.
I just don’t like the attitude. From his website:
“I’m a 24 year old Industrial Designer, recently graduated (cum-laude) … Unfortunately, much of my work (for adidas, Tomtom & Philips) in the last 1,5 years is confidential and thus can not be showed [sic] yet.”
A bit cocky, isn’t he?
@Taylor Alexander: Nice one. I knew about the place but figured it was US only and never checked up on it, turns out I was wrong. I might make something pointless just to see what it looks like. Thanks.
@teabaggs:
The writeup says it does have a light sensor for just that purpose.
I like this a lot!
The video is keen to avoid showing how the HMS LED’s do (or don’t) disambiguate when they overlap. I watched the video specifically to see how this is being handled – and it wasn’t shown at all.
Hi!
Very nice project, but I would recommend anyone building something similar to use multiplexing for the colors. For 64 RGB Leds, you need only 4 TLCs, together with three p-channel mosfets.
Also, a very custom mistake is to forget a resistor between the sout and sin ports of the chained TLCs.
Where do I pre-order?
Tyro — way to mistake your jealousy for his arrogance.
Only one point — why does it have 16 screws along the inside circumference when 12 would be more logical? Oops :)
I want one, toooo!
Does he sell them at ponoko? I couldn’t find anything there…
I would like to see an endless mirror in the middle. You could hide the batteries and really freak people out at the same time. I have yet to do an endless mirror project. This may be it.
By endless I mean infinity.. Sorry its early.