Displaying The Time Is Elemental With This Periodic Table Clock

We see a lot of clocks here at Hackaday, so many now that it’s hard to surprise us. After all, there are only so many ways to divide the day into intervals, as well as a finite supply of geeky and quirky ways to display the results, right?

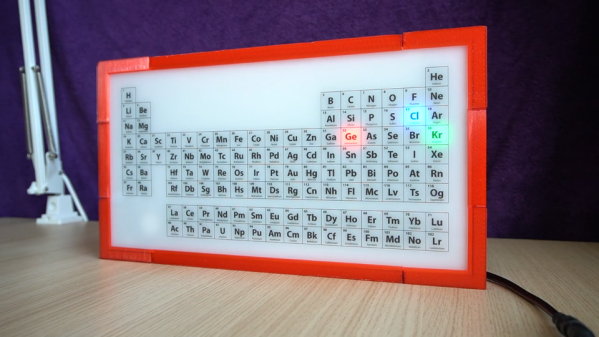
That’s why this periodic table clock really caught our eye. [gocivici]’s idea is a simple one: light up three different elements with three different colors for hours, minutes, and seconds, and read off the time using the atomic number of the elements. So, if it’s 13:03:23, that would light up aluminum in blue, lithium in green, and vanadium in red. The periodic table was designed in Adobe Illustrator and UV printed on a sheet of translucent plastic by an advertising company that specializes in such things, but we’d imagine other methods could be used. The display is backed by light guides and a baseplate to hold the WS2812D addressable LEDs, and a DS1307 RTC module gives the Arduino Nano a sense of time. The 3D printed frame of the clock has buttons for setting the time and controlling the clock; the brief video below shows it going through its paces.

We really like the attention to detail [gocivici] showed here; that UV printing really gave some great results. And what’s not to like about the geekiness of this clock? Sure, it may not be as action-packed as a game of periodic table Battleship, but it would make a great conversation starter.

Continue reading “Displaying The Time Is Elemental With This Periodic Table Clock”

Morse Code Clock For Training Hams

It might seem antiquated, but Morse code still has a number of advantages compared to other modes of communication, especially over radio waves. It’s low bandwidth compared to voice or even text, and can be discerned against background noise even at extremely low signal strengths. Not every regulatory agency requires amateur operators to learn Morse any more, but for those that do it can be a challenge, so [Cristiano Monteiro] built this clock to help get some practice.

The project is based around his favorite microcontroller, the PIC16F1827, and uses a DS1307 to keep track of time. A single RGB LED at the top of the project enclosure flashes the codes for hours in blue and minutes in red at the beginning of every minute, and in between flashes green for each second.

Another design goal of this build was to have it operate with as little power as possible, so with a TP4056 control board, single lithium 18650 battery, and some code optimization, [Cristiano] believes he can get around 60 days of operation between charges.

For a project to help an aspiring radio operator learn Morse, a simple build like this can go a long way. For anyone else looking to build something similar we’d note that the DS1307 has a tendency to drift fairly quickly, and something like a DS3231 or even this similar Morse code clock which uses NTP would go a long way to keeping more accurate time.

Continue reading “Morse Code Clock For Training Hams”

Choosing The Right RTC For Your Project

When it comes to measuring time on microcontrollers, there’s plenty of ways to go about things. For most quick and dirty purposes, such as debounce delays or other wait states, merely counting away a few cycles of the main clock will serve the purpose.  Accurate to the tens of milliseconds, they get the average utility jobs done without too much fuss.

However, many projects are far more exacting in their requirements. When you’re building a clock, or a datalogger, or anything that relies on a stable sense of passing time for more than a few minutes, you’ll want a Real Time Clock. So called due to their nature of dealing with real time, as we humans tend to conceive it, these devices take it upon themselves to provide timekeeping services with a high degree of accuracy. We’ve compiled a guide to common parts and their potential applications so you can get things right the first time, every time.

Continue reading “Choosing The Right RTC For Your Project”

Arduino Tachometer Clock Fires On All Cylinders

We’re certainly no strangers to unique timepieces around these parts. For whatever reason, hackers are obsessed with finding new and interesting ways of displaying the time. Not that we’re complaining, of course. We’re just as excited to see the things as they are to build them. With the assumption that you’re just as enamored with these oddball chronometers as we are, we present to you this fantastic digital tachometer clock created by [mrbigbusiness].

The multi-function digital gauge itself is an aftermarket unit which [mrbigbusiness] says you can get online for as little as $20 from some sites. All he needed to do was figure out how to get his Arduino to talk to it, and come up with some interesting way to hold it at an appropriate viewing angle. The mass of wires coming out of the back of the gauge might look intimidating, but thanks to his well documented code it shouldn’t be too hard to follow in his footsteps if you were so inclined.

Hours are represented by the analog portion of the gauge, and the minutes shown digitally were the speed would normally be displayed. This allows for a very cool blending of the classic look of an analog clock with the accuracy of digital. He’s even got it set up so the fuel indicator will fill up as the current minute progresses. The code also explains how to use things like the gear and high beam indicators, so there’s a lot of room for customization and interesting data visualizations. For instance, it would be easy to scrap the whole clock idea and use this gauge as a system monitor with some modifications to the code [mrbigbusiness] has provided.

The gauge is mounted to a small project box with some 3D printed brackets and bits of metal rod, complete with a small section of flexible loom to cover up all the wires. Overall it looks very slick and futuristic without abandoning its obvious automotive roots. Inside the base [mrbigbusiness] has an Arduino Nano, a DS1307 RTC connected via I2C, a voltage regulator, and a push button to set the time. It’s a perfectly reasonable layout, though we wonder if it couldn’t be simplified by using an ESP8266 and pulling the time down with NTP.

We’ve seen gauges turned into a timepiece before, but we have to admit that this is probably the most practical realization we’ve seen of the idea yet. Of course if you want to outfit the garage with something a bit more authentic, you can always repurpose a Porsche brake rotor.

Former Smoker Now Pats Pockets For Motivation

It’s hard to quit smoking. Trust us, we know. Half the battle is wanting to quit in the first place. Once you do, the other half is mostly fighting with yourself until enough time goes by that food tastes better, and life looks longer.

[Danko] recently quit smoking. And because idle hands are Big Tobacco’s tools, he kept himself busy through those torturous first few days by building a piece of pocket-sized motivation. This little board’s main purpose is to help him root for himself by showing the time elapsed since his final cigarette, the number of cigarettes he has avoided, and all the money he’s saved since then. At the press of a button, he can reflect on the exact moment he took the plunge into Cold Turkey Lake.

Sure, there are apps that’ll do the same thing. But anyone who’s ever tried to quit smoking knows how important it is to stay busy every minute while your brain deals with the lack of toxins. It runs on an ATtiny85 and a DS1307 RTC chip. Looks to us like [Danko] adapted a board from a different project, and we love it when that’s a possibility.

Not a smoker? Good for you. The next hardest thing humans motivate themselves to do is exercise. That’s a lifelong battle that can definitely be improved with some gamification.

Continue reading “Former Smoker Now Pats Pockets For Motivation”

Modernizing A 170 Year Old Antique Grandfather Clock

Frankly, we let out a yelp of despair when we read this in the tip line “Antique Grandfather clock with Arduino insides“! But before you too roll your eyes, groan, or post snark, do check out [David Henshaw]’s amazing blog post on how he spent almost eight months working on the conversion.

Before you jump to any conclusions about his credentials, we must point out that [David] is an ace hacker who has been building electronic clocks for a long time. In this project, he takes the antique grandfather clock from 1847, and puts inside it a new movement built from Meccano pieces, stepper motors, hall sensors, LEDs, an Arduino and lots of breadboard and jumper wires while making sure that it still looks and sounds as close to the original as possible.

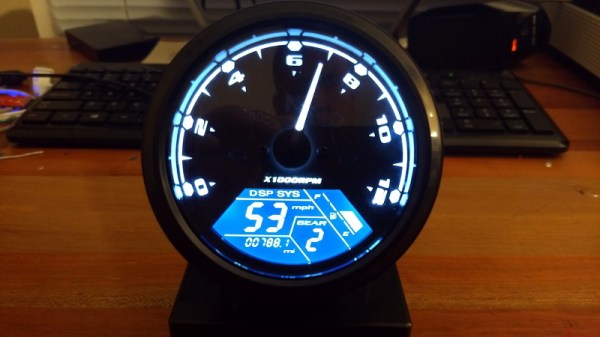
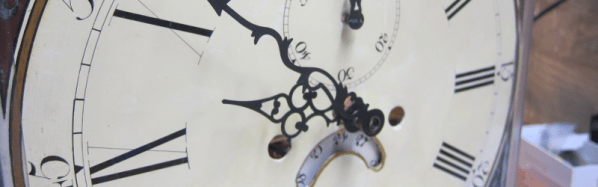
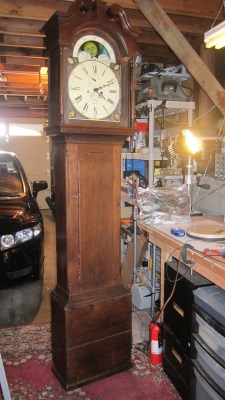
He starts off by building a custom electro-mechanical clock movement, and since he’s planning as he progresses, meccano, breadboard and jumper wires were the way to go. Hot glue helps preserve sanity by keeping all the jumper wires in place. To interface with all of the peripherals in the clock, he decided to use a bank of shift registers driven from a regular Arduino Uno. The more expensive DS3231 RTC module ensures better accuracy compared to the cheaper DS1307 or similar clones. A bank of RGB LEDs acts as an annunciator panel inside the clock to help provide various status indications. The mechanical movement itself went through several iterations to get the time display working with a smooth movement of the hands. Besides displaying time, [David] also added a moon phase indicator dial. A five-rod chime is struck using a stepper motor driven cam and a separate solenoid is used to pull and release three chime hammers simultaneously to generate the loud gong sounds.

And here’s the amazing part – he did all of this before laying his hands on the actual grandfather clock – which was shipped to him in California from an antique clock specialist in England and took two months to arrive. [David] ordered just the clock housing, dial/face and external parts, with none of the original inner mechanism. Once he received it, his custom clock-work assembly needed some more tweaking to get all the positions right for the various hands and dials. A clock like this without its typical “ticktock” sound would be pretty lame, so [David] used a pair of solenoids to provide the sound effect, with each one being turned on for a different duration to produce the characteristic ticktock.

At the end of eight months, the result – christened Judge – was pretty satisfying. Check the video below to judge the Judge for yourself. If you would like to see some more of [David]’s clockwork, check out Dottie the Flip Dot Clock and A Reel to Reel Clock.

Continue reading “Modernizing A 170 Year Old Antique Grandfather Clock”

Bluetooth Bedroom Clock!

When [decino]’s old bedroom clock finally bit the dust, he built himself a new one from scratch for fun and functionality.

Initially, he wanted to solder Adafruit NeoPixel lights onto four prototype boards, using a mini-USB for power and a DS1307 to keep the time. However, after soldering the board for the first digit and realizing that carrying on with the other three would be a huge pain, he switched to etching the boards instead — a far more efficient solution. In keeping with this time-saving mindset, he added a Bluetooth module that would allow him to update the clock from his phone whenever the DS1307 started dropping minutes or whenever daylight savings time is in effect.

Continue reading “Bluetooth Bedroom Clock!”