Wii Remote Controling The Vehicle You’re Riding In

Make sure your health insurance premiums are all paid up; if you decide to replicate this project you may need it. [Corey], [Kris], and [Jess] built their own go cart which is controlled with a Wii remote. The website has a poor navigation scheme, but if you hover over the horizontal menu bar you can get quite a bit of information about the build.

The cart has two motors which use a chain to drive each of the rear wheels. A pair of H-bridge controllers let the Arduino interface with them. It’s also has a Bluetooth module that makes it a snap to pull accelerometer data from the Wii remote. The front end looks like it uses rack and pinion steering, but you won’t find a pinion or a steering column. Instead, a linear actuator is mounted parallel to the rack, moving it back and forth at the command of the Arduino.

We can’t help but think back to silent movies where the steering wheel comes loose in the middle of a car chase. See if you get the same image while watching the demo after the break. This doesn’t seem quite as dangerous as adding remote control to a full-sized automobile, but we’ve played MarioKart Wii before and know how lousy the accelerator performance can be. Hopefully the firmware kills the motors if the batteries in the controller die.

Continue reading “Wii Remote Controling The Vehicle You’re Riding In”

Weekly Roundup 10/29/11

In case you missed them the first time, here are the most popular posts from this week:

Our most popular post this week was about how to use HTML5 to display sensor data. This is a pretty interesting demo of the new web technology.

Next up is a post about an animatronic zombie that can crawl around via remote control. It is surprisingly maneuverable and would definitely be creepy crawling towards you in the dark dark middle of the night.

After that is a post where our own [Kevin Dady] created a new charger for a cell phone that he recently acquired. This is a pretty comprehensive tutorial that could be of use to others who may have misplaced their charger and have some spare parts lying around.

Next we have a post about a new technology that has been created that lets you render objects into photos that have been previously taken.

Finally, there is a post about a research project that uses a Microsoft surface and a whole mess of proximity sensors to detect where people are located and which hand they are touching the surface with.

Ants Duke It Out In The AI Challenge

All of those orange, cyan, and yellow dots represent digital ants fighting for supremacy. This is a match to see who’s AI code is better in the Google backed programming competition: The AI Challenge. Before you go on to the next story, take a hard look at giving this a try for yourself. It’s set up as a way to get more people interested in AI programming, and they claim you can be up and running in just five minutes.

Possibly the best part of the AI Challenge is the resources they provide. The starter kits offer example code as a jumping off point in 22 different programming languages. And a quick start tutorial will help to get you thinking about the main components involved with Artificial Intelligence coding.

The game consists of ant hills for each team, water as an obstacle, and food collection as a goal. The winner is determined by who destroyed more enemy ant hills, and gathered more resources. It provides some interesting challenges, like how to search for food and enemy ant hills, how to plot a path from one point to another, etc. But if you’re interested in video game programming or robotics, the skills you learn in the process will be of great help later in your hacking exploits.

Upgrading A Solar Lamp To Charge An IPad

ikea_sunnan_upgrade

[Phillip] and the crew at Voltaic Systems took a look at the Sunnan solar powered desk lamp from IKEA a while back, and while they thought it was pretty useful, there were definitely some things they wanted to change.

First on their list of revisions was to increase the capacity of the stock battery pack. Taking the lamp apart and unscrewing the pack’s lid revealed a set of 3 AA cells, which they swapped out for higher-capacity models with more than double the watt-hour rating.

A beefed up battery is a good start, but the lamp’s tiny solar panel has no hope of topping off the batteries outside of Death Valley. To ensure that they get a nice full charge, a small jack was wired into to the battery pack, allowing the group to connect any size external solar panel they pleased.

Finally, [Phillip] and Co. wanted the ability to charge an iPad2 from the lamp’s battery pack. They hacked in a small USB connector and a slightly modified MintyBoost board to provide a little extra juice to their tablet.

While they are still testing the modifications, they say that everything is working nicely, citing that the extra battery capacity and charging abilities are a great addition.

Halloween Hacks: Arc Reactor Costume

Halloween is the time of year where you can dress up as a pirate, muppet, or superhero and no one will bat an eye. During this holiday of expanded social permissiveness, [Nbitwonder] decided that building an Arc Reactor from Iron Man would be appreciated by his engineering cohort.

The ‘body’ of the reactor was manufactured on the RepRap Mendel we covered from beginning to end. A few minutes with Google Sketchup was all that was needed to generate the files and send them to the printer. In a few short hours, [Nbitwonder] had the body of his Arc Reactor.

The board design was thrown together in Eagle and etched. 11 blue SMD LEDs were thrown into the mix along with some borrowed resistors. Pieces of a hard drive spindle and a little bit of wire rounded out the parts list, and everything was assembled with the DIYers favorite tool, the hot glue gun. Not a bad job for a few hours of work.

The files for the Arc Reactor are up on Thingiverse along with a Flickr photoset.

Motor Drivers: Half H-bridge With Brake And More

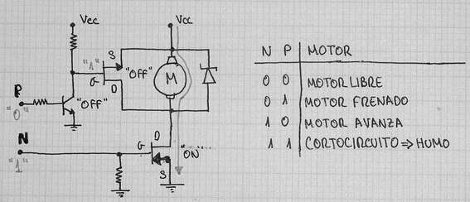
Here’s a nice little circuit that will drive a motor and allow you to stop its rotation, giving your robot a set of brakes. It’s part of [JM’s] post about the in’s and out’s of building microcontroller friendly motor controllers (translated).

This particular setup is a half H-bridge. It allows you to drive the motor in one direction only. The MOSFET used on the ground-side of the motor doesn’t actually need to be there. This is the brake which let you electronically stop the motor from spinning. Without it, the motor will keep turning under its own momentum when the half-bridge is shut off. Depending on the application this can be a big problem. There’s a great demonstration of the circuit braking a fast spinning motor in the video clip below the fold.

It is possible to use this driver with PWM, but [JM] has some warnings about inbuilt functions like FastPWM. Make sure you read his admonition, and if you need a refresher don’t miss this Hackaday video segment.

Continue reading “Motor Drivers: Half H-bridge With Brake And More”

The Basics Of Reading Data From Resistive Touchscreens

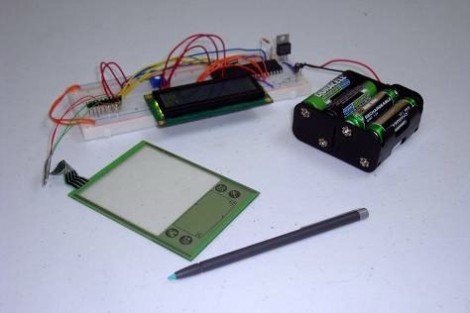
[Chris] just posted his latest tutorial which shows you how to read position data from a resistive touchscreen. These devices are fairly simple, and since they’re used in a lot of consumer electronics you can pick one up for a few bucks. This looks like it is overstock for an old Palm device.

The interface is simple, there’s just four conductors on the tab at the top of the overlay. But connecting to these is a bit of an issue since you can’t really solder directly to them. [Chris] ended up using scotch-tape to hold wires in place, with a paperclip to keep them presses against the conductors. Those conductors are used in pairs, with a positive and negative lead for the X and Y axis. To take a measurement you use I/O pins to connect voltage and ground, then read the voltage that makes it to the gound side using an ADC. This works because the point that’s being pressed on the screen acts as a variable resistor for the circuit. Data for the two axes must be read in separate operations so that the positive voltages don’t interfere with each other.

The nice thing is that once you’ve got it working with a small screen it is easily scaled up. In fact, the 23″ touchscreen used on this Android hack is just another 4-wire resistive device.

You can see a video demonstration of [Chris’] test rig embedded after the break.

Continue reading “The Basics Of Reading Data From Resistive Touchscreens”