Got Dead Bugs In Your Stereo?

It happens to the best of designers, spending untold amounts of time designing a complex device just to find out that you missed a trace, or you couldn’t rout something to something else. As time marches on its becoming a bit less common to pop open a commercially produced device and see a little jumper wire or 2 flying across a pcb, or a resistor straddling an IC.

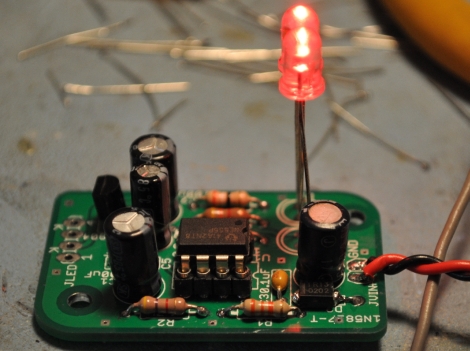
But when [Ilektron] opened up a Yamaha Dolby Pro Logic receiver to scavenge for parts he saw a very big “oops” and a even wilder fix. The maker took a pair of relays, flipped them “belly up” and hot glued them into place on top of a pair of ICs. Then the mess was “dead bug” wired to the circuit using insulated and uninsulated bus wire, contacts were then reinforced / insulated using more hot glue.

This is one of the most hacky fix we have seen in a commercially produced product, but we would love to hear your amusing horror stories of “WTH did they do?” So join us in the comments after the break.

Programming AVR I2C Interface

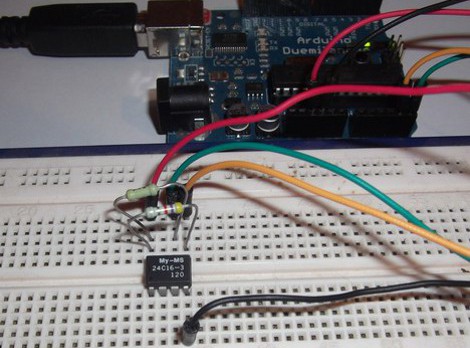
I2C as many of you know, is a simple serial interface for many peripheral devices to micro controllers, but it can quickly become confusing to people who may not be accustom to it. Because of that, I2C tutorials are always welcome, and this new tutorial by [Embedds] does an excellent job of how to use I2C with an AVR with a 24C16 2Kbyte EEPROM.

The first half of the tutorial provides a clear explanation of how I2C works, including its signal structure, addressing, and data packets. It then moves on to AVR territory showing how to setup the I2C in an AtMega micro controller. The author uses a pretty standard to most of us Arduino, with software written in AVR C and a nifty little GUI programming application which eases the hassle of dealing with AVRDude directly.

Plenty of code samples follow from twiddling registers to a full blown application reading and writing bits from the EEPROM to a serial terminal on a PC.

[Alex] Shows Us What Happens When Dance Dance Revolution Meets Simon

ddr-simon

[Alex] was digging through his closet and came upon an old PS2 game pad for Dance Dance Revolution. He hated the idea of throwing it out just slightly more than the idea of playing DDR again, so he decided to find a way to reuse it.

He was a big fan of the game Simon (aka Genius) as a kid and thought that the DDR pad would make a novel interface for the classic game. Using the PS2XLib by [Bill Porter], which allows an Arduino to easily communicate with a PS2 controller, [Alex] put his Simon replica together in no time flat.

He painted an empty ice cream container with the classic Simon colors, installing a small LED under each quadrant, then wrote the game’s code.

As you can see in the video below, his version of the game works nicely, and forces you to actually get up and move a bit, which we like.

Continue reading “[Alex] Shows Us What Happens When Dance Dance Revolution Meets Simon”

DIY Shade Finder Tool Takes The Tedium Out Of Solar Surveys

diy-shadefinder-tool

[Steven Dufresne] does a lot of tinkering with solar-powered applications, a hobby which can be very time consuming if done right. One process he carries out whenever building a solar installation is creating a sun chart to determine how much (or little) sun the target area will get.

The process requires [Steven] to take elevation and Azimuth measurements of many different points, which often consumes about half an hour of his time. While taking measurements recently, he started thinking about how he could improve the process, and came up with a stellar solution that reduces the process down to a one-minute task.

In short, his shade finder tool uses a pulley, a pair of rollerblade wheels, and a pencil to accomplish a full shade survey in under a minute. The science behind the tool is best explained by [Steven], so be sure to check out his site for plenty of details and diagrams.

We have to say that we’re extremely impressed by his shade finder – hopefully his work can help others maximize the efficiency of their solar solutions.

Stick around after the jump to see a short video of the shade finder in action.

Continue reading “DIY Shade Finder Tool Takes The Tedium Out Of Solar Surveys”

Rainbow Board Of Many Ping-pong Balls

[George] just finished his first project: an 8×8 matrix “Board of Many Ping-Pong Balls” with 64 RGB LEDs. He started this project when he was 14 years old and finished the build over this last Christmas break. We won’t make any presumptions about [George]’s age, but we couldn’t think of a better project to start out on.

For the build, [George] used a Colorduino LED driver shield for his Arduino. This made the wiring simple, but the finished product is where this project really shines. For the base, [George] got a board laser cut at his school and used ping-pong balls to diffuse the LEDs. We’ve seen this many times but with this build there’s a neat way to drill a hole in a ping-pong ball; simply put the drill into reverse. The friction is enough to open the ball up, and the chips of plastic come outside instead of remaining in.

We’re really impressed with [George] and his winter break project. He’s lucky enough to have access to a laser cutter at school, and from a look at his monitor, he’s reading the right websites. You can check out his demo rainbow pattern after the break.

Continue reading “Rainbow Board Of Many Ping-pong Balls”

Using 555 Timers To Add “free Play” Functionality To Classic Arcade Machines

freeplay-arcade-board

[John Zitterkopf] is in the middle of restoring a vintage Sega Star Trek Captain’s Chair arcade game for the upcoming 2012 Texas Pinball festival, though one prerequisite for the show is that the game supports some sort of free play mode. At this point he doesn’t have the option of tracking down a freeplay ROM for the device, so he had to come up with a solution of his own.

He did not want to alter the machine’s operation in any significant manner, and this meant preserving the functionality of the coin chutes. To do this, he put together a small circuit that uses a pair of cascaded 555 timers to provide the machine with the proper signaling to simulate coin insertion, while still accepting coins. You might initially think that this could be easily accomplished by shorting a pair of contacts in the coin chutes, but as [John] explains, the process is a tad more complex than that.

If you have some old arcade games kicking around and are looking for a non-invasive way to make them free to play, be sure to check out his site for schematics and a complete BoM.

Minimalist RGB LED Cube Has A Very Short BoM

charlieplexed-led-cube

[Asher Glick] wrote in to share a project he has been working on with his friend [Kevin Baker], a 4x4x4 RGB LED cube. The pair are students at Rensselaer Polytechnic Institute and also members of the newly-formed Embedded Hardware Club on campus. As their first collaborative project, they decided to take on the ubiquitous LED cube, trimming down the component count to nothing more than 64 LEDs, a protoboard, some wire, and a single Arduino.

Many cubes we have seen use shift registers or decade counters to account for all the I/O required to drive so many LEDs. Their version of the cube has none of these extra components, solely relying on 16 of the Arduino’s I/O pins for control instead. You might notice something a bit different about the structure of their cube as well. Rather than using a grid of LEDs like we see in most Charlieplexed cubes, they constructed theirs using 16 LED “spires”, tucking the additional wiring underneath the board.

The result looks great, as you can see in the videos below. The cube looks pretty easy to build, and with a cost around $60 it is a reasonably cheap project as well.

Nice job, we look forward to seeing all sorts of fun projects from the Embedded Hardware Club in the future!

Continue reading “Minimalist RGB LED Cube Has A Very Short BoM”