A Study Of GCC And The TI Stellaris

hard-look-at-stellaris-and-gcc

There are several things that we really like about the TI Stellaris. We think the peripheral library — called Stellarisware — has a pretty intuitive API that makes it easy to get into. But we’re also quite impressed that the software comes with makefiles that build the libraries and examples using your own GCC cross compiling toolchain. We spent quite a bit of time pawing through those makefiles and the makedefs settings file to figure out how TI was doing things. Now if you don’t want to do that sleuthing yourself you can head on over to the GCC with TI Stellaris Launchpad guide which [Brandon] just published.

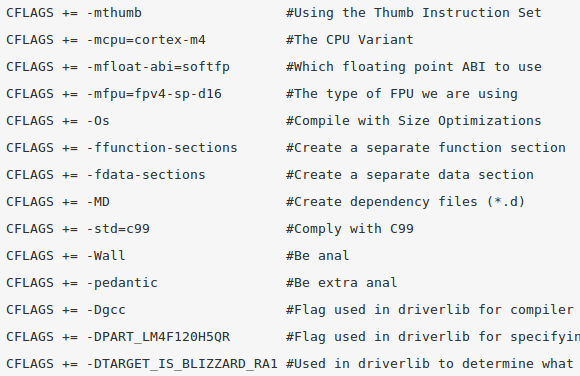
Shown above is the helpful chart of compiler flags which he pulled from the files with his added comments on what each does. He did the same for the linker flags, and then discusses the program calls made during compilation and linking. He then delves into how the driver library on the chip’s ROM can be accessed in code. This is just the first in a four-part series he plans to write. We can’t wait to see what he has to say about the hardware FPU as we haven’t had time to explore that for ourselves quite yet.

RS-485 Node Control For Arduino

rs-485-arduino-nodes

Wanting to control a split flap display that was not near a computer [Tom] looked to a common solution for communicating over distances not practical for I2C or SPI. He developed his own hardware and packet format using the RS-485 protocol.

This is part of a larger project he has been working on to feed data to a split flap display that he plans to hang on the wall. RS-485 is designed to work over long distances and overcome noise issues. The core of the communications system is the board seen on the left. It uses a MAX1483 chip, a pair of RJ45 jacks for Ethernet cables, and two terminal blocks for power and communications. There are a few nice things about this. The board acts as a pass-through making it easy to chain nodes together, and the data structure is completely independent of the hardware itself. Because of this [Tom] developed his own packet format that will be a bit more resilient than the Arduino networking scheme we looked at the other day.

Syncing Two Strands Of G35 Christmas Lights

Lights

For a few years now, the set of Christmas lights most wanted by hackers and makers the world over is the GE G35 color changing set. With 50 individual RGB LEDs controlled by a microcontroller, these light strings can display any pattern of lights with the help of something as simple as an Arduino. The stock light sequences are a little problematic, especially if you’re running more than one string.

[Todd] picked up two G35 strings, and even when they’re turned on at the same time the light sequences slowly go out of sync after a half hour or so. He came up with a great way to make sure these lights stay in sync that requires only a slight modification. To make two light strings stay in sync, it’s simply a matter of disconnecting the data line from one string’s controllers and bridging that connection with the other string.

It’s a very easy modification, but it won’t give you twice as many individually controllable LEDs – for that, you’ll have to use either multiple Arduinos or buy a longer RGB LED strip. Still, having two identical 7×7 LED panels is better than a single panel, so we’ll have to tip our hat to [Todd] for this one.

Cute Little Amplifier Has A Tube Pre

tube

While you won’t catch us in an argument with an audiophile regarding the sound quality of tube vs. solid state amps, there is a general consensus that tube amplifiers sound much better than their transistorized brethren. Actually building an all-tube amplifier, though, is a bit harder than one built around common ICs – there are transformers to deal with and of course very high voltages. One solution to get the sound of tubes easily but still retaining the simplicity of integrated circuits is a hybrid amp, or a tube preamplifier combined with a solid state power section. They’re easy enough to build as [Danilo] shows us with his hybrid tube amp design (Italian, translation).

[Danilo]’s design uses two ECC86 for the left and right channels powered by a 12 Volt supply. Each channel is sent through a tube and then amplified by a TDA2005 20 Watt power amplifier. After plugging in a CD player, the result is a clear, warm sound that can put a whole lot of power through a speaker.

Self Balancing Unicycle Built From Old Scooter

[Glenn] had an old electric scooter/motorcycle in his garage that had long ago given up the ghost. Without a working battery and motor controller this scooter wasn’t beyond repair, but [Glenn] thought he could use it to build something much, much cooler. What he came up with is a self-balancing unicycle that borrows inspiration from a Segway and other self-balancing robots.

After cutting the drive chain off his scooter, [Glenn] began work on installing a new motor controller and battery. To make this unicycle balance itself, he would need a few gyroscopes and accelerometers provided via an Arduino and Sparkfun IMU shield.

After tuning his PID loop, [Glenn] hopped on his new ride and took it for a spin with the help of a pair of ski poles. It’s much easier to ride than a traditional unicycle and [Glenn] says he’s getting better at riding it.

MSP430 Bit Banged USB 1.1

msp430-usb-hardware

Here’s a rather exciting development for those who work with MSP430 microcontrollers. [M-atthias] worked out a way to implement USB 1.1 on a MSP430G2452. He’s bit banging the communications as this hardware normally doesn’t support the Universal Serial Bus. This is much like using the V-USB stack for AVR micros.

The test hardware seen above uses an 18Mhz crystal to get the timings just right. As this squeezes the most out of the chip it should come as no surprise that the firmware is written in assembly. This is still quite early on in development but the core features are mostly there, having been implemented and debugged over several versions already. Currently the base functionality can be loaded using under 2k of flash memory. You can download the Mecrisp package from [M-atthias’] sourceforge page. If you want to lend a hand testing or developing it would be greatly appreciated.

[via 43oh blog]

ODROID-U2 Is Latest Barebones Board Begging To Be Used

odroid-u2

Oh hey, another barebones dev board. Well, that’s what we said to ourselves when we first saw this picture, but the way this is presented is like crack for geeks. It starts with this tiny board, which has a footprint smaller than a credit card. But once you start looking at the add-ons you’ll want to watch out or you’ll cover yourself in drool.

The name of the game here is speed. It’s running a quad-core Cortex-A9 chip with a Mali-400 graphics accelerator. There is no on-board storage, but the microSD slot is meant to be used for OS and storage. A faster option is to use a NAND add-on board offered in 8, 16, and 64 gig capacities ($25-$79). There is a micro type-D HDMI connector and the device is powered by a cellphone charger. It ships with a big heat sink that acts as a case for the board.

After the break you can see it booting Android and immediately loading into XBMC. The menu looks mighty snappy, making us think this is a great alternative to using Raspberry Pi as a media center. But you’ll pay for the faster speed and ability to run Android. The rig they’re showing off, plus the add-ons, comes out to about $132. There are also questions to be answered as to which video formats are supported through hardware decoding.

Continue reading “ODROID-U2 Is Latest Barebones Board Begging To Be Used”