Reliving 1977’s Cutting-edge Computer With The Pocket Mini Computer

Classic computers are just up [Jeff]’s alley, so when he looked for a new project for his Pocket Mini Computer, he looked at one of the earliest microcomputers available: the COSMAC VIP, a 1.76 MHz beast from 1977.

The COSMAC VIP was a single-board educational computer released by RCA in 1977. Priced at just a hair under $300, the COSMAC was much more affordable than infamous $1300 ‘fruit’ computer also released that year. To get young programmers up and running quickly, the COSMAC came bundled with the CHIP-8 programming language, making it very easy to generate graphics on-screen for all the eventual PONG and Breakout clones.

[Jeff]’s COSMAC VIP runs on a Pocket Mini Computer, a very cool Parallax Propeller-powered board we’ve seen before emulate other retro computers including the venerable Commodore SID synthesizer chip.

Because the COSMAC’s user interface was the very, very old-school 4×4 hexadecimal keypad, [Jeff] found it necessary to emulate this retro feature by soldering his own 4×4 keypad. After soldering 16 buttons into 8 columns and rows, [Jeff] connected this keyboard to a PFC8574a I2C I/O expander and connected this chip to the I2C bus on the Pocket Mini Computer.

The result is an emulated COSMAC VIP that’s just begging for an ‘introduction to microprocessors’ class or just a round of Tetris, Tic-tac-toe, Lunar Lander, or one of the several Breakout clones available for this very cool computer. A pretty awesome build, even if it is from the dawn of the computer age.

Dumpster Diving Nets 100 Arduino-powered Motor Controllers

Never one to pass up the recycle pile at work, [Scott] usually doesn’t find much. A few old hard drives, maybe a ancient laptop every once in a while, but on very rare occasions he finds something actually useful. This latest haul is a gaggle of stepper motor drivers that, with a bit of work, can be reverse engineered and turned into an Arduino.

After prying into one of the plastic-enclosed boards, [Scott] found a LED, a quartet of transistors for powering the motor, and an ATMega168 microcontroller. Interestingly, most of the pins for the 168 were already broken out on the DA15 connector on each controller. The only thing needed was to build a programmer to dump the Arduino bootloader onto these little widgets.

After much trial and error (and building a new programming interface), [Scott] now has 100 Arduinos with a single stepper motor controller built in. He’s already made a toy light cycle rotate on a small stepper (after the break) and blink a LED, but with this many widgets, we’re wondering what crazy contraption [Scott] will come up with.

Continue reading “Dumpster Diving Nets 100 Arduino-powered Motor Controllers”

Before You Throw Out That Pumpkin, Make A Dragon-o-lantern

Yes, it’s a little late for Halloween, but before you throw out that rotting gourd sitting outside your front door, how about planning for next year’s festivities with a dragon-o-lantern?

The first dragon-o-lantern that made its way into our tip line is a fire breathing dragon jack ‘o lantern built by [Aaron] for a pumpkin carving contest. The idea is simple; just carve a dragon head out of a pumpkin, insert candle, and spray the open flame with a can of Aquanet. Sure, it’s crude, but with a little engineering it could turn out to be a very, very cool build.

For a slightly more complex build, [Chris] built a fire-breathing jack ‘o lantern triggered by anyone saying the words, “trick or treat.” The key part of this build is a Microsoft Kinect, used for its voice recognition capabilities instead of its capacity to form a 3D depth cloud.

The fire portion of [Chris]’ build is controlled by an Arduino triggering a solenoid to dispense a small amount of fuel into the pumpkin shell. [Chris] doesn’t go over the construction of his ‘poofer,’ but any member of your local hackerspace should be able to show you how it’s done.

Videos after the break.

Continue reading “Before You Throw Out That Pumpkin, Make A Dragon-o-lantern”

7400 Frequency Counter

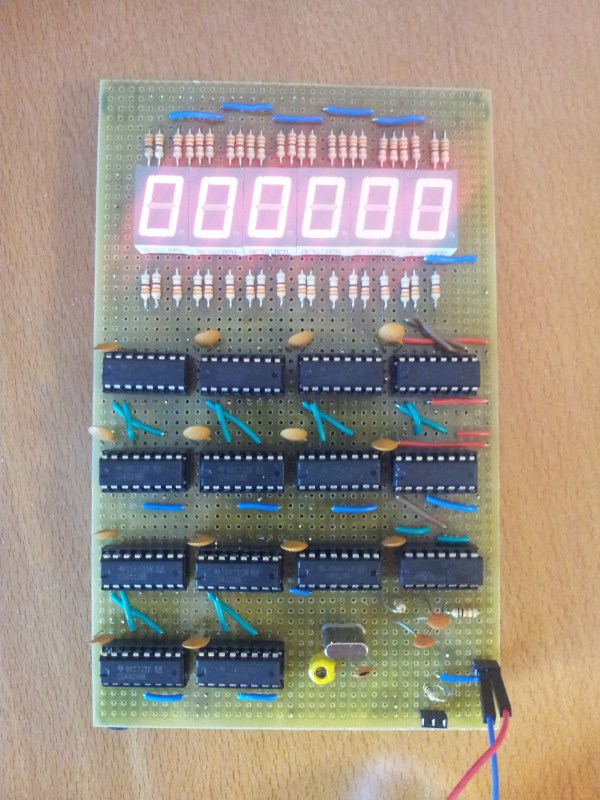
This frequency counter is [Miguel Pedroso’s] entry in the 7400 Logic contest. After looking at the design we think this is a perfect project for those who have not worked with logic ICs before. The concept is simple and [Miguel] does a great job of explaining his implementation.

At its heart the device simply counts the oscillations of an input signal for one second, then latches the total to the 7-segment displays before zeroing the counter block and starting over. Six 4029 decade counters give the device a range of 1MHz. A set of 4511 BCD to 7-segment decoders translate the count to the display. A 4521 frequency divider chip uses an on-board 4.194304 MHz crystal oscillator to time both the display latching and the counter clearing. [Miguel] mentions that tuning the load capacitors is a bit tricky. Since breadboards have their own capacitance issues it may be necessary to change the load capacitor values when moved to protoboard or the crystal won’t start oscillating. You can see those caps are not the same value, but the tests in the video after the break show that this is pretty much spot-on.

If you’d rather give this a try in HDL here’s an FPGA-based frequency counter from which you can draw some inspiration.

Continue reading “7400 Frequency Counter”

Custom Circuit Drives A Small Round CRT Display

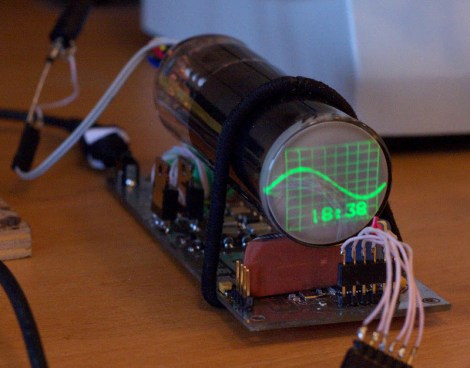
[Svofski’s] latest hack seeks to do no more than look cool on his desk. We’d say mission accomplished. He doesn’t even need anyone around to be proud of the small round CRT display unit he put together. Just having it hum away next to him will be more than enough to keep him going when regular work gets a bit tedious.

One of the biggest challenges when working with a cathode ray tube is the supply. He compares the requirements with that of Nixie tubes, and this is quite a bit more challenging since he wants to generate the 750V from a 12V DC source. To pull it off he hand wound his own transformer. There are two secondary coils, one for the cathode heater and the other as the supply. You can see a brief clip of the unit in action after the break.

Take note of the PCB section of his writeup. He took a meandering route through several different software packages before printing the board. It started with Eagle, moved to freerouting.net, which produced a Specctra file that he converted to gEDA using a Python script.

Continue reading “Custom Circuit Drives A Small Round CRT Display”

Two-player Tic-Tac-Toe From Logic Chips

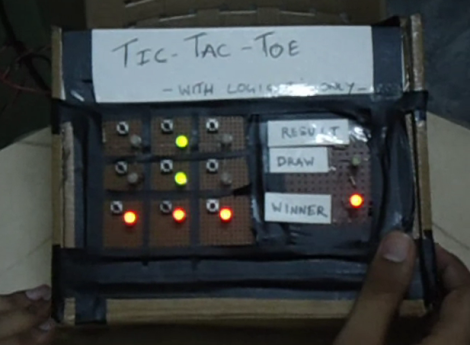
Here’s another entry in the 7400 Logic contest. [Circuitchef] used gates and a few flip-flops to build a two-player electronic Tic-Tac-Toe game. The full details or shared in the PDF file he links to in his post. We’ve also linked to it after the break in case the Dropbox he is using becomes unavailable.

He provides a nice block diagram which helps to understand the game’s design. The board is arranged in a 3×3 matrix of momentary push buttons and bi-color LEDs. Each player takes turns pushing the button in the square they’d like to claim. The input circuitry uses flip-flops to establish which player’s turn it is, illuminating the appropriate color for that square. A set of 3-input AND gates monitor all possible combinations of winning patterns. The outputs of those gates are OR’d down to just one output which is used to light up the ‘Winner’ LED with the right color. If all boxes are lit up and none of those combinations is satisfied the game is declared a draw. This can all be seen in the demo embedded below the fold.

Continue reading “Two-player Tic-Tac-Toe From Logic Chips”

Building Your Own Fusion Drive

We missed the original announcement, but Apple unveiled more than just the iPad Mini at their last event. They’ve got a new storage system called Fusion Drive which is supposed to combine the access speeds of solid state with the storage density of platter drives. When you look just under the surface what you’re really seeing is a disc drive with grossly enlarged cache in the form of an SSD drive. How about moving from the 64 MB or so of cache seen on many large hard drives today to something like 64GB?

Well you don’t have to wait for Apple to do it. [Patrick Stein] gave it a shot using command line tools to combine an SSD with a physical drive. Sure, it’s not an all-in-one solution, but it is a pretty good proof. The linchpin that will really make it possible is a low-level driver that can handle the caching on the SDD, while ensuring that the data eventually makes it to the platter for long-term storage.

[via Engadget]