The Hackaday Newsletter Is Growing!

NewsletterI’ve been having fun with the newsletter, and we have over 2500 people subscribed.  Up to this point they have mainly just been composed of information about the videos I’m making.  I’m going to change that this week.  The emails will now also have 10 random hacks, probably the most popular hacks that week. Maybe something from the past of hackaday. It all pretty much just depends on what people end up enjoying.  You’ll find the sign up form here, or over there –> in the side bar.

I’m going to keep this extremely informal. I’ll let you know what projects I’m working on, and share some hacks with you. Sign up if this sounds like something you’d enjoy! I plan on sending out 1 to 2 emails per week.

GoPro Hack Delivers Live Video Feed For Piloting Your Quadcopter

The GoPro line of HD cameras seem like they were specifically designed for use with quadcopters. We say that because the small, light-weight video devices present a payload which can be lifted without too much strain, but still have enough horse power to capture video of superb quality. Here’s a hack that uses the camera to provide a remote First Person View so that you may pilot the aircraft when it is out of your line of sight.

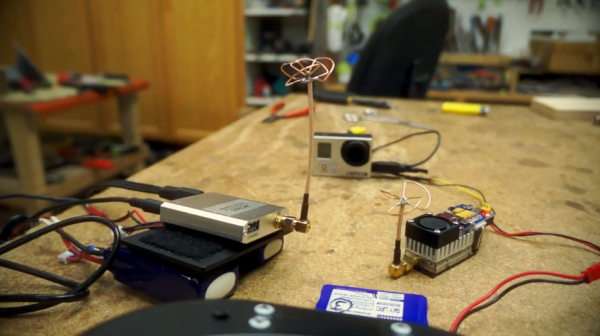
The camera in question is a GoPro Hero 3. It differs from its predecessors in that the composite video out port has been moved to a mini USB connector. But it’s still there and just a bit of cable splicing will yield a very clear signal. The image above shows the camera in the middle, connecting via the spliced cable to an FPV transmitter on the right. This will all be strapped to the quadcopter, with the signal picked up by the receiver on the left and piped to a goggle display worn by the pilot. You can see the cable being construction process in the clip after the break.

If you’re looking for other cool stuff to do with your GoPro camera check out the bullet-time work [Caleb] did with ours.

Continue reading “GoPro Hack Delivers Live Video Feed For Piloting Your Quadcopter”

Geiger Counter Tells You If Your Dishes Are Radioactive

geiger-counter-build

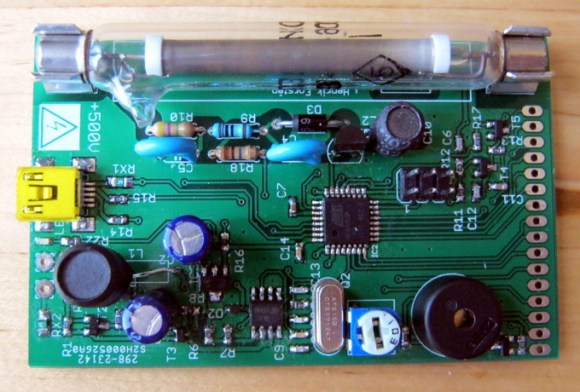
[Henrik] really turned out a nice little Geiger counter board based on a cold war era Geiger tube.

It works in much the same way as other projects along the same lines. It does run on batteries if needed, which is no small feat since the tube wants high voltage to operate correctly. And the video after the break shows it spitting out readings to a terminal window when connected to a computer via USB.

But what really caught our eye is the radioactive source material he used for testing. Since he didn’t have anything on hand he had to order something, and ended up going with a couple shards from a dinner plate. A radioactive dinner plate to exact and it’s a brand name you’ve probably heard of before. Red Fiesta Ware apparently used to be radioactive. It’s even mentioned in the intro to the Wikipedia article. Go figure!

One other thing we noticed was [Henrik’s] method of interfacing his multimeter with a breadboard. One of the project photos shows the probe with thin wire wrapped around the tip. We assume this is to make it easy to plug into the breadboard.

Despite this little digression away from the main project we did really enjoy learning about his build. And you can see him showing it off in the clip after the break.

Continue reading “Geiger Counter Tells You If Your Dishes Are Radioactive”

Clean And Minimal Self-balancing Robot

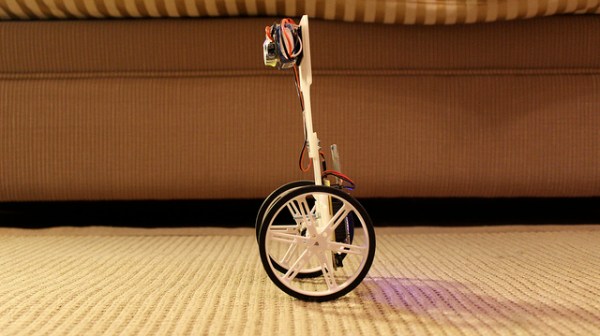
The VertiBOT is a self balancing robot project taken on for the purpose of exploring how the sensors work in conjunction with some PID algorithms.

[Miguel] didn’t roll any extras into the build. But you have to admit that makes it look interesting. There’s almost nothing to it and yet, as you can see in the clip after the break, he accomplished everything he set out to.

The body and wheels are 3D printed, with black bands for tires to help give it some traction. Note the connection in the center of the body which allowed him to make a longer part by printing in two stages. On the electronic side of things he’s using an Arduino Nano. A level converter lets it communicate with the 6 DOF IMU board which is used to detect movement. Three potentiometers provide a way for him to tweak the PID loop without having to bother with reflashing any code. And of course there’s an option to control it remotely thanks to a Bluetooth module also in the mix.

Continue reading “Clean And Minimal Self-balancing Robot”