Is A LEGO 3D Printer By Definition Self-replicating?

lego-3d-printer

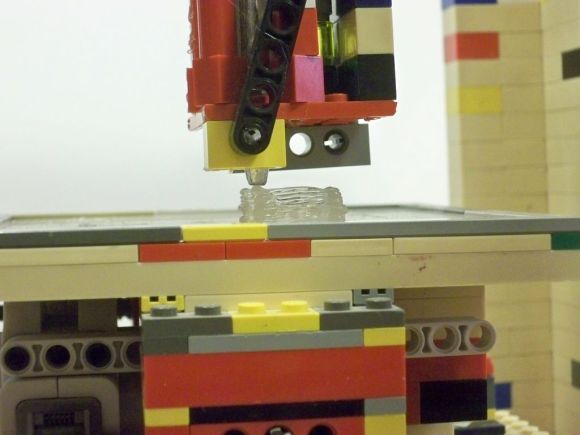
LEGO parts are plastic. 3D printers make parts out of plastic. So the transitive property tells us that a LEGO 3D printer should be able to recreate itself. This one’s not quite there yet, mostly because it doesn’t use plastic filament as a printing medium. Look close and you’ll probably recognize that extruder as the tip of a hot glue gun. If all else fails you can use the machine as a precision hot glue applicator.

The instructions to make your own version include the design reference and a few ideas for getting the most out of the glue dispenser. For the design phase [Matstermind] used LEGO Digital Designer. It’s basically CAD with the entire library of LEGO parts available as building blocks. from there he assembled the machine which is controlled by an NXT brick. He goes on to link to a few different printing mediums. There’s instructions for using crayons to make colored glue sticks, as well as a method of printing in sugar using the hot glue extruder.

We remember seeing one other LEGO 3D printer. That one didn’t use an extruder either. It placed blocks based on the design to be printed.

Continue reading “Is A LEGO 3D Printer By Definition Self-replicating?”

Wireless Toilet Occupancy Sensor

toilet-occupancy-sensor

It’s a bit awkward for all parties involved if someone is waiting right outside the bathroom door. This system helps to alleviate that issue by letting the next user know when the loo is available. [Akiba] has been working with the folks at Loftworks, a design company in Tokyo, to get the status beacons seen above up and running.

The staff is mostly women and there is just one single stall women’s toilet on each of the three floors. The boxes above represent the three stalls, using colored light to indicate if a bathroom is available or in use. Detection is based on a PIR motion sensor in each stall. They communicate back with the display units wirelessly, which initially presented quite a problem. The doors on the bathroom are steel, and when closed they effectively block communications. The 900 MHz radios used in the system are on the 802.15.4 protocol. But they can be set a couple of different ways by moving resistors. Each came configured for the fasted data throughput, but that’s not really necessary. By changing to a slower configuration [Akiba] was able to fix the communications problems.

We remember seeing a similar bathroom indicator in a links post some time ago.

Hacking Quiz Game Buttons To Add A Central Controller

hacking-quiz-game-hardware

The four colored buttons seen above are a product made by Learning Resources. They flash and make noise when pressed and are meant for quiz-show style games in the classroom. The problem is that they don’t use a central controller, so it’s up to the person running the game to judge who rang in first. [Kenny] fixed that issue by building his own controller which is housed in that black project box.

He went with an Arduino Uno board. It fits in the project box and has no problem monitoring all of the buttons and triggering their sound and lights when necessary. There are two telephone jacks (RJ11 connectors) on either side of the controller. He also cracked open each button, cutting some traces on the PCB in order to patch the signals into connectors he added to the housing.

The video after the break shows the system in action, In addition to illuminating the first button to ring in there are LEDs on the box that indicate who was 2nd, 3rd, and 4th in line.

If you don’t want to purchase buttons try making your own with some cheap plastic bowls.

Continue reading “Hacking Quiz Game Buttons To Add A Central Controller”

Cast Acrylic And Wood LED Light

LED-ring-light

The design for this LED ring lamp started off as a cross-section sketch. [Alex Jalland] envisioned a core that holds the parts and hides the circuitry, with two halves of a clear doughnut diffusing the light and covering everything up.

For the core itself he headed over to the lathe and turned a piece out of ash. He tooled the profile into one side, flipped it around to form the other, and finally cut the center out to form a ring. This may sound like a lot of work, but it pales in comparison to what went into the diffusers.

He cast the parts out of polyurethane resin. This required a mold which he made from scratch. The process used many materials, including a vacuum forming machine, a latex slug, and plaster to keep the thin mold from deforming when filled with resin.

The lamp provides a lot of light. But with this much work put into the enclosure we’d suggest going the extra mile to make it an Equinox Clock clone.

Make Your Own Electronic Children’s Toys

diy-childrens-toys

[Miria Grunick’s] son nephew is two years old. If you’ve ever looked at that age range in the toy aisle we sure you’ve noticed that there’s a mountain of cheap electronic stuff for sale. Manufactures are cramming LEDs and noise makers into just about all kids stuff these days. But [Miria] thought why not just make him something myself? She calls this the Blinky Box. It’s an acrylic enclosure stuffed with pretty LEDs that is controlled with a few buttons.

It’s driven by a Teensy 3 board which monitors a half dozen colorful buttons, a mode selector on the side, and an on/off switch. The device is powered by a Lithium battery that recharges via USB. And of course there’s a strip of individually addressable RGB LEDs inside.

The demo shows that one mode allows you to press a button color and have the LEDs change to it. But there are other features like fade and scroll. She also mentions that since it can be reprogrammed the toy can grow with hime. Maybe it’ll be a Simon Says game. But eventually she hopes he’ll use it to learn the basics of programming for himself.

Continue reading “Make Your Own Electronic Children’s Toys”

Angular Teardrop Camper Includes An Improvised Galley

01-vector-teardrop-camper


This teardrop camper is more about the angles than it is the curves. That makes construction quite a bit easier. But it’s not only the shape that catches our eye. This one’s built to last and has some nice amenities like a built-in sound system and a galley in the rear storage area. The project is quite old, but a good hack like this one is really timeless.

Head on over to the Desert Dawg website for a project overview. This proves to be quite a different build than the teardrop project from last week. The frame of the trailer started it’s life hauling around a boat. The long nose was cut and the cross pieces welded in place to form the final footprint for the camper which is large enough for a queen sized mattress. In addition to comfortable sleeping, the kitchenette revealed when you lift the back hatch will make cooking on the go a breeze.

[Thanks Doug]

Robot Theater Isn’t So Much For The Actors As The Stagehands

robot-theater

[Chris Rybitski] developed this low-profile robot to help move scenery on stage. The test footage shows it to be spry and able to move hundreds of pounds of cargo. The demo shows the addition of a wooden platform about twice the length of the metal chassis with casters at each end to support the extra weight. It seems to have no problem moving around with the weight of a couple of human passengers on board.

Crafty systems for changing huge sets has long made the theater a natural breeding ground for hacks. Balanced turn tables, rails systems, and the like are common place. But we think this has a ton of potential. Right now the electronics seem convoluted, as there is an Arduino running the motors which connects to the LAN using an Ethernet shield and that Linksys wireless router.

We think he should patch directly into the serial port of the router. If he loads DD-WRT or OpenWRT he can easily make the remote control a web interface. We also wonder about the possibility of making it a line-follower that can precisely position itself automatically using patterns on the floor.

Continue reading “Robot Theater Isn’t So Much For The Actors As The Stagehands”