Meet The Teensy 3.1

[Paul Stoffregen] just released an updated version of his Teensy 3.0, meet the oddly named Teensy 3.1. For our readers that don’t recall, the Teensy 3.0 is a 32 bit ARM Cortex-M4 based development platform supported by the Arduino IDE (using the Teensyduino add-on). The newest version has the same size, shape & pinout, is compatible with code written for the Teensy 3.0 and provides several new features as well.

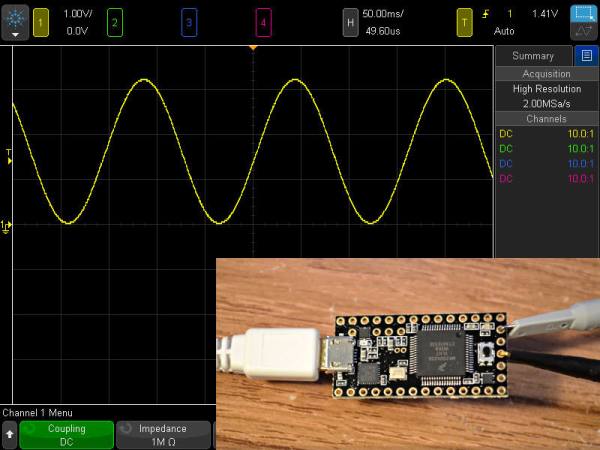
The Flash has doubled, the RAM has quadrupled (from 16K to 64K) allowing much more advanced applications. The Cortex-M4 core frequency is 72MHz (48MHz on the Teensy 3.0) and the digital inputs are 5V volts compatible. Pins 3 and 4 gained CAN bus functions. The new microcontroller used even has a 12 bits Digital to Analog Converter (DAC) so you could create a simple signal generator like the one shown in the picture above. Programming is done through the USB port, which can later behave as host or slave once your application is launched. Finally, the price tag ($19.80) is in our opinion very reasonable.

Embedded below is an interview with its creator [Paul Stroffregen].

Continue reading “Meet The Teensy 3.1”

$40 Lens Hack Gives Your FLIR Higher Clarity

[Josh Oster-Morris’s] FLIR camera can see a bit more clearly now that he’s hacked it to have its own makeshift “macro” mode. You may remember [Josh] from his power distribution Motobrain project. He’s still improving the Motobrain, and he wanted to better understand the thermal characteristics of the high current draws (upwards of 100amps!)

After reading that the FLIR 4  could be hacked into a better version, [Josh] immediately purchased his own. The FLIR is, however, limited at close-range imaging, because the resolution of the FLIR’s microbolometer is relatively low.  He had fortunately decided to stay tuned in to [Mike’s] YouTube channel and saw his follow-up video a few days later on refocusing the FLIR camera with an external lens. [Josh] hit up Amazon for a Gallium Arsenide lens normally used for CO2 lasers, and found one for around $40. He then mounted this lens into a simple paper frame held together by tape and staples, and fitted it onto the FLIR.

After you’ve checked out [Josh’s] blog for more examples of how astoundingly clear the images become, check out [Mike’s] video detailing the hack below.

Continue reading “$40 Lens Hack Gives Your FLIR Higher Clarity”

Boil Off Some White Gas In The Back Yard

Gas-still

[S Heath] is a Coleman lantern collector. Coleman lanterns can run from a variety of fuels, however they seem to run best with white gas, or Coleman fuel. Store bought Coleman fuel can cost upwards of $10USD/gallon. To keep the prices down, [S Heath] has created a still in his back yard to purify pump gas. We just want to take a second to say that this is not only one of those hacks that we wouldn’t want you to try at home, it’s also one that we wouldn’t try at home ourselves. Heating gasoline up past 120 degrees Celsius in a (mostly) closed container sounds like a recipe for disaster. [S Heath] has pulled it off though.

The still is a relatively standard setup. An electric hot plate is used to heat a metal tank. A column filled with broken glass (increased surface area for reflux) rises out of the tank. The vaporized liquid that does make it to the top of the column travels through a condenser – a pipe cooled with a water jacket. The purified gas then drips out for collection. The heart the system is a PID controller. A K-type thermocouple enters the still at the top of the reflux column. This thermocouple gives feedback to a PID controller at the Still’s control panel. The controller keeps the system at a set temperature, ensuring consistent operation. From 4000 mL of ethanol free pump gas, [S Heath] was able to generate 3100 mL of purified gas, and 500 mL of useless “dregs”. The missing 400 mL is mostly butane dissolved in the pump gas, which is expelled as fumes during the distillation process.

Continue reading “Boil Off Some White Gas In The Back Yard”

Oculus Rift Goes From Virtual To Augmented Reality

[William Steptoe] is a post-doctoral research associate at University College London. This means he gets to play with some really cool hardware. His most recent project is an augmented reality update to the Oculus Rift. This is much more than hacking a pair of cameras on the Rift though. [William] has created an entire AR/VR user interface, complete with dockable web browser screens. He started with a stock Rift, and a room decked out with a professional motion capture system. The Rift was made wireless with the addition of an ASUS Wavi and a laptop battery system. [William] found that the wireless link added no appreciable latency to the Rift. To move into the realm of augmented reality, [William] added a pair of Logitech C310 cameras. The C310 lens’ field of view was a bit narrow for what he needed, so lenses from a Genius WideCam F100 were swapped in. The Logitech cameras were stripped down to the board level, and mounted on 3D printed brackets that clip onto the Rift’s display. Shapelock was added to the mounts to allow the convergence of the cameras to be easily set.

Stereo camera calibration is a difficult and processor intensive process. Add to that multiple tracking systems (both the 6DOF head tracking on the Rift, and the video tracker built-in to the room) and you’ve got quite a difficult computational process. [William] found that he needed to use a Unity shader running on his PC’s graphics card to get the system to operate in real-time.  The results are quite stunning. We didn’t have a Rift handy to view the 3D portions of [William’s] video. However,  the sense of presence in the room still showed through. Videos like this make us excited for the future of augmented reality applications, with the Rift, the upcoming castAR, and with other systems.

Continue reading “Oculus Rift Goes From Virtual To Augmented Reality”