Impersonating FBI Agents And People Who Can Solder

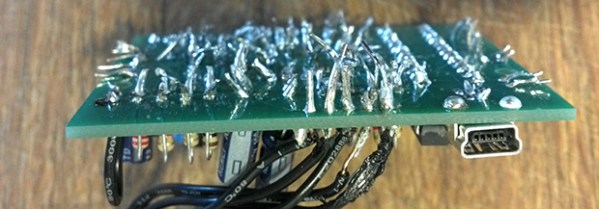
[Dale Botkin], [N0XAS], is a competent designer for the amateur radio crowd and has a part-time business on the side selling a few kits. As anyone who owns a business, works in retail, or simply interacts with the general population will know, eventually you’ll have to deal with one of those customers. [Dale]’s latest horror story (here’s the coral cache but that doesn’t seem to be working either) comes from someone who bought a little repeater controller. You’re looking at this customer’s handiwork above. It gets worse.

After this customer completely botched an assembly job, he contacted [Dale] for some technical assistance. [Dale] graciously accepted a return and received the above mess of solder, wires, and parts. Then an email disputing the Paypal charge arrived. The customer wanted a refund for the original kit and the cost of shipping it back.

Oh, but it gets better. After posting this story, [Dale] received yet another email from an FBI agent demanding that his original post be taken down. The email from the FBI came from a Czech domain, so of course this is a totally legit demand.

So there’s your, “worst customer ever” story from the world of kit electronics. The assembly is impressively bad, even for something that was ‘professionally installed by an electrician’, but mail fraud and impersonating federal officials just takes this over the top.


Quick note: any doxxing in the comments will be deleted, so just don’t do it.

An Even Larger Array Of Many LEDs And No Ping-Pong balls

Color Led Matrix

[George] has gone pro with his latest RGB LED panel. We’ve chronicled [George’s] journey toward the elusive land of LED nirvana for a couple of years now. He started with an 8×8 rainbow board of many ping-pong balls. When that wasn’t enough, he upped the ante to a 32×16 array of ping-pong balls. Still not satisfied, [George] has now increased the size to two 20×15 panels, for a total of 600 LEDs. While this is only a modest size increase from the previous incarnation, the major changes here have been in the design and construction of the array.

[George] found himself using his LED panels in some professional settings. The stresses of moving and rigging the panels revealed several design weaknesses. The point to point discrete LED design tended to short, leading to troubleshooting by poking at wires in a dark club. The control code was also a mixed bag of solderlab’s code, [George’s] code, and various scripts. Even the trademark ping-pong ball light diffusers were a problem, as they created a fire hazard. [George] took all the lessons from the first and second LED arrays and started a new design – the MX3. The panel frames were constructed by a professional metal shop. Starting with a square steel tube backbone, and aluminum panel shell was welded into place. The steel tube provides a hardpoint mount for any number of rigging options. The front panels are medium-density fibreboard, treated with a fire-retardant paint.

The electronics have also changed. Gone are the individual RGB LEDs. [George] has switched over to the common WS2812 LED strings. Panel mounted Raspberry Pis control the LED strings. Communication is via Art-Net, an Ethernet implementation of the common DMX512 protocol commonly used in stage lighting. The final result looks great.  We’re impressed with how much [George] has accomplished at such a young age (He was 16 last June).

Continue reading “An Even Larger Array Of Many LEDs And No Ping-Pong balls”

Ambient Computer Noise Leaks Your Encryption Keys

[Daniel, Adi, and Eran], students researchers at Tel Aviv University and the Weizmann Institute of Science have successfully extracted 4096-bit RSA encryption keys using only the sound produced by the target computer. It may sound a bit like magic, but this is a real attack – although it’s practicality may be questionable. The group first described this attack vector at Eurocrypt 2004. The sound used to decode the encryption keys is produced not by the processor itself, but by the processor’s power supply, mainly the capacitors and coils. The target machine in this case runs a copy of GNU Privacy Guard (GnuPG).

During most of their testing, the team used some very high-end audio equipment, including Brüel & Kjær laboratory grade microphones and a parabolic reflector. By directing the microphone at the processor air vents, they were able to extract enough sound to proceed with their attack. [Daniel, Adi, and Eran] started from the source of GnuPG. They worked from there all the way down to the individual opcodes running on the x86 processor in the target PC. As each opcode is run, a sound signature is produced. The signature changes slightly depending on the data the processor is operating on. By using this information, and some very detailed spectral analysis, the team was able to extract encryption keys. The complete technical details of the attack vector are available in their final paper (pdf link).

Once  they had the basic methods down, [Daniel, Adi, and Eran] explored other attack vectors. They were able to extract data using ground fluctuations on the computers chassis. They even were able to use a cell phone to perform the audio attack. Due to the cell phone’s lower quality microphone, a much longer (on the order of several hours) time is needed to extract the necessary data.

Thankfully [Daniel, Adi, and Eran] are white hat hackers, and sent their data to the GnuPG team. Several countermeasures to this attack are already included in the current version of GnuPG.

DIY Laser Cutter

[Jens] decided he wanted to try building his own laser cutter to see just how much you can actually cut with a fairly low power 300mW laser diode.

He was inspired by a similar project from earlier this year, and chose to use the same LPC-826 laser diode, which you can find online for about $10-30. The cutter itself is has a wooden frame and uses drawer slides on both axes. Threaded M6 rods and NEMA17 stepper motors provide the actuation, and the whole thing is controlled by an Arduino Nano with Easy Driver stepper motor drivers.

So what can it cut? In his experiments he was able to cut through adhesive plastics (sticker paper), EVA foam, and black paper. He was also able to engrave wood and ABS plastic, although the plastic didn’t play too nicely with the laser. He also found it useful for laser cutting stencils, which he then used to create rusty art using hydrochloric acid and hydrogen peroxide.

Considering how cheap you could make one of these, it’s not a bad tool to have. Stick around after the break to see it laser cut a shark!

Continue reading “DIY Laser Cutter”

Fubarino Contest: A Dutch Word Clock

dutchclock

[Gerben] started on his adventure into the world of electronics about a year ago. His first big project is this magnificent word clock. It’s Dutch, if you’re wondering.

As a web developer, the first thing [Gerben] did was build a web-based mockup of this clock. After that, he went crazy with power tools crafting the wooden frame. Perhaps too crazy, as he forgot the space for the electronics. This oversight was solved by making his own PCBs, first using peroxide and vinegar, then giving up and moving to peroxide and HCl.

The easter egg for this word clock is a scrolling URL when the time is 13:37. A clever egg that is really completely original.

From the looks of the video, the fit and finish of this word clock is beyond anything we’ve seen before. The entire front of the clock is glass, with capacitive touch buttons down by the four-LED ‘minute’ display.

Video below, Pics over here, and all the code and board files are here.


This is an entry in the Fubarino Contest for a chance at one of the 20 Fubarino SD boards which Microchip has put up as prizes!

Continue reading “Fubarino Contest: A Dutch Word Clock”

Moody Useless Machine

If you ever get bored of trolling the internet seeking inspiration for your next big project, try a YouTube search of “useless machine”. After a few hours of watching these pointless, yet hilarious creations, we’re sure you’re going to want to build one. Luckily for us, [Arvid] documented the design of his moody useless machine to get you started.

Why is [Arvid’s] machine moody? Well, to fully appreciate the emotional sensitivity of a useless machine, you first need to understand what it is they do don’t do. A one sentence explanation is all that is needed here; you flip a switch and the machine flips the switch back… that’s it. [Arvid] implemented a two servo system with a stand-alone Arduino, which allowed him to give his machine a “personality”. Sometimes the switch is thrown back quickly without argument, other times the machine throws a fussy tantrum.

Although the machine is useless, the electronics inside are anything but. To keep everything clean and innocuous looking, the machine is powered by batteries, so [Arvid] places the Arduino into a ‘sleep’ mode until the switch is toggled. The switch is configured as an interrupt on the Arduino, which when toggled, wakes the Arduino.  Once the Arduino is awake, it enables power to the servos via a power MOSFET, then everything’s ready to go; the machine makes its response and goes back to ‘sleep’. This was a great project, but believe it or not, things can get more useless, like with this advanced useless machine.

Continue reading “Moody Useless Machine”

Addressable RGB LED Coffee Table

WP_20131219_004

[Alexander] has just put the finishing touches on his Addressable RGB LED Coffee Table and it looks amazing!

Making use of his local hackerspace, Sector67 in Madison, Wisconsin, he learned how to use woodworking equipment to build the table out of nice curly maple wood sheet.

Next up he purchased two 4’x8′ pieces of 2.8mm bamboo plywood — even had to rent a U-Haul just to get it back to the space. Talk about dedication to a project! Having never used a laser cutter before either, [Alexander] was quickly fed up with the crappy laser interface software, so instead, he hand wrote the shapes as SVGs in notepad and then converted them to DXFs. That sounds like a rather slow way to do it, but he thinks it ended up being quicker since it’s all straight lines. Two hours of laser time later, and he had a series of slotted strips to create the grid for the LEDs.

To really light up his project, he’s using nice big 12mm RGB LEDs that he’s ordered off of eBay — they came in four strands of 50 which made it super easy to wire. A beefy 5V 12A PSU provides the juice, and an Arduino takes care of the addressing. He’s even hidden the main power cord through one of the legs!

It’s a gorgeous build, and an impressive project for being a first-timer on most of the equipment used. See for yourself in the short video after the break.

Continue reading “Addressable RGB LED Coffee Table”