Addressable RGB LED Coffee Table

WP_20131219_004

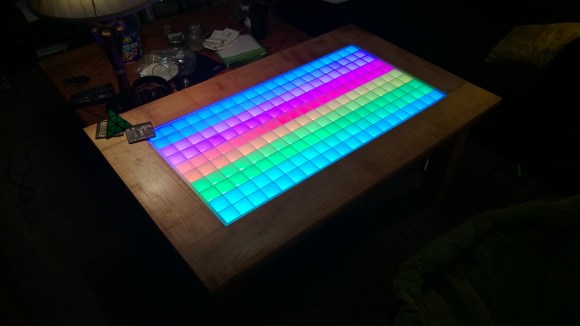
[Alexander] has just put the finishing touches on his Addressable RGB LED Coffee Table and it looks amazing!

Making use of his local hackerspace, Sector67 in Madison, Wisconsin, he learned how to use woodworking equipment to build the table out of nice curly maple wood sheet.

Next up he purchased two 4’x8′ pieces of 2.8mm bamboo plywood — even had to rent a U-Haul just to get it back to the space. Talk about dedication to a project! Having never used a laser cutter before either, [Alexander] was quickly fed up with the crappy laser interface software, so instead, he hand wrote the shapes as SVGs in notepad and then converted them to DXFs. That sounds like a rather slow way to do it, but he thinks it ended up being quicker since it’s all straight lines. Two hours of laser time later, and he had a series of slotted strips to create the grid for the LEDs.

To really light up his project, he’s using nice big 12mm RGB LEDs that he’s ordered off of eBay — they came in four strands of 50 which made it super easy to wire. A beefy 5V 12A PSU provides the juice, and an Arduino takes care of the addressing. He’s even hidden the main power cord through one of the legs!

It’s a gorgeous build, and an impressive project for being a first-timer on most of the equipment used. See for yourself in the short video after the break.

Continue reading “Addressable RGB LED Coffee Table”

Touching Conversations: Email Snippets Scroll By On Electro-Embroidery Piece

electroembroidery

[Wei Chieh Shih] really moves the needle when it comes to wearable technology. His textile design project entitled I Am Very Happy I Hope You Are Too is a striking marriage of masterful hand embroidery, delicate circuitry, and careful programming.

[Wei] is using an Arduino micro to drive a matrix of surface-mount LEDs in the Hello, World video, which is a ramp-up to the scrolling text version that’s in progress now finished. That full version is part of his residency project at Arquetopia in Oaxaca, Mexico and displays snippets of emails from his past relationships. It’s huge, with multiple matrices as large as 8×25 pixels!

No build notes could be found for this or any of [Wei]’s similar projects, like this awesomely dangerous 200 laser diode jacket or this eerily beautiful light installation on Taiwan’s north beach. Based on the pictures, our speculation is that he is using ordinary 6-strand embroidery floss to make stem or half cross-stitches on all the paths. He then runs very thin, flexible conductor underneath the channel of stitches and solders the wires to the component pads.

If [Wei] wants another way to wear his heart on his sleeve, he could investigate these dynamic LED clothing hacks.

Update: [Wei] has completed this project, and has more information available at his Behance site.

Continue reading “Touching Conversations: Email Snippets Scroll By On Electro-Embroidery Piece”

A Balancing, Walking Cube Named Cubli

Meet Cubli! Cubli is a 15 x 15 x 15cm robotic cube that can roll around and balance on its corners using a series of gyroscopes.

The project has been going strong since February 2011 at the Institute for Dynamic Systems and Control in Zurich, where it is starting to get quite impressive. We first shared Cubli earlier this year, when it was just a wee 2-dimensional and corded 3-dimensional prototype.

Since then, it has become a fully enclosed wireless cube capable of jumping up on its end, balancing, and controlled falling — it can walk and roll! To do this, it has three large reaction wheels on each axis which can impart their angular velocity on the entire cube when the braked, allowing it to move in any direction.

According to the video after the break, the team is just building the cube “because they can”, however other researchers are interested in the technologies applications in self-assembling robots, and even planetary exploration.

Continue reading “A Balancing, Walking Cube Named Cubli”

Staff Update And Philanthropy

staff-update-and-philanthropy

It is my pleasure to welcome two new members of the Hackaday team. [Kevin Darrah] and [Kristina Panos] both have electronics backgrounds, and following in the tradition of the entire team they are long-time readers of Hackaday. Both are already hard at work. You can learn a bit more about them on the Staff Page.

While I have your attention the writers, editors and I would like to thank our parent company. We frequently refer to them as the “Evil Overlords” (actually, they started it!) but it’s turning out to be a really great relationship. I asked them to make a donation to Wikipedia in Hackaday’s name and they were happy to do so. Not only do we often link to Wikipedia in our articles, our writers use it constantly when researching for posts. Thanks SupplyFrame!

Fail Of The Week: Baby Monitor Hack Ends In Facepalm

fotw-baby-monitor-repaired-the-hard-way

Editor’s Note: This was the last Fail of the Week tip we had stored up. If you want to see the series continue on a weekly basis we need help finding more documented fails! Please look back through your projects and document the ones that didn’t go quite right. We also encourage you to send in links to other fails you’ve found. Just drop the links in our tips line. Thanks!

Now on with business. This is a baby monitor which [Eric] cleverly repaired, only to realize that he more than likely did it the hard way. The monitor was broken and went unused until his son figured out how to climb out of the crib, so he figured it was time to start monitoring again. Pulling the unit from the brink of the parts bin he set to work repairing the broken power connector.

Further inspection of the power adapter showed that it was spec’d to put out 5V at 1A. This falls in line with USB power, so he clipped the end off of a USB-B cable and used a hunk of proto-board to inject the 5V lines into the device. It was when it came time to reassemble the case that he flipped the board over and discovered an existing USB-B port. He could have just cut a hole in the case to get at the connector and plugged the un-altered cable in directly. Oh well… we’re sure it was fun figuring out his own custom solution!


2013-09-05-Hackaday-Fail-tips-tileFail of the Week is a Hackaday column which runs every Wednesday. Help keep the fun rolling by writing about your past failures and sending us a link to the story — or sending in links to fail write ups you find in your Internet travels.

A Weird Kind Of Printer

printer

[Benjamin] is just putting the finishing touches on his home-made, paper-stabbing, needle-printer!?

From a distance, it looks like the bare bones of a regular inkjet printer, but it’s not. Instead of an ink-head it features a needle — It’s kind of like a dot-matrix (hole-matrix?) printer. He’s using it for silk-screening masks, which we have to admit, must be pretty handy — it certainly makes soldering SMT’s less scary! It could also be used for embossing or even braille printing.

The frame of the printer is laser cut out of clear plastic, and two Nema 17 steppers drive the X & Y axes. A simple solenoid actuator provides the needle-stabby action. He’s controlling the whole thing using an Arduino, and sending the data to it using a call-and-response protocol to avoid any data losses. It was built for just shy of $200, which was his original goal for the project.

Check it out after the break!

Continue reading “A Weird Kind Of Printer”

From CT Scans To 3D Prints

[the_digital_dentist] had a CT Scan done back in 2007 for treatment using orthodontics. Some how, he managed to get a copy of the CT Scan data from the lab, and has been playing around with it lately.

Since he has a 3D printer, the obvious end goal was to print his face using some of the data extracted from the CT Scan. This required a lot of manipulation to get it to the finished model you see above. He used an open source software called DeVIDE to process the data and export the STL. Not much information on this is given on his site, but in our research we managed to find another video documenting the process in DeVIDE on extracting the STL model from DICOM CT scan data.

5each
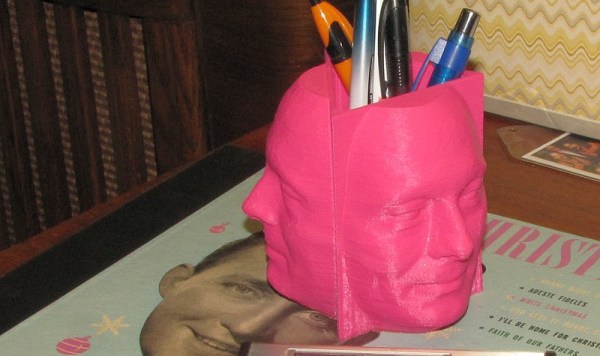
Unfortunately, the STL is far from being ready to print after being extracted; there is a lot of extraneous data that needs to be cleaned up. He used mesh editing software to help blow away the unnecessary details. We don’t know for sure what software [the_digital_dentist] used, but MeshLab is a good one.

After that, it was just a matter of printing the STL file. But the really cool thing about using data from CT scans is the amount of detail it captures… Stick around after the break to see an animated GIF demonstrating this.

Anyone want to print a copy of their own skull? It’d look great with a plating of Adamantanium…