Compliant Robot Gripper Won’t Scramble Your Eggs

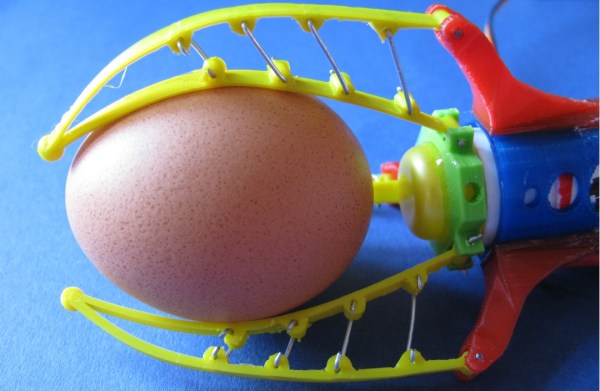
[Chiprobot] has created an amazing compliant gripper.  Designing robot hands (or end effectors) can be a perilous task. It is easy to give robots big, good, strong hands. Strong grippers have to be controlled by sensors. However, sensors can’t always be relied upon to ensure those hands don’t crush anything they touch. Hardware fails, software has bugs. Sometimes the best solution is a clever mechanical design, one which ensures a gripper will conform to the object it is gripping. We’ve seen “jamming” grippers before. (so named for their use of a granular substance which jams around the object being gripped).

[Chiprobot’s] gripper is something entirely different. He designed his gripper in blender, and printed it out with his Ultimaker 3D printer. The material is flexible PLA. Three plastic “fingers” wrap around the object being gripped. The fingers are made up of two strips of printed plastic connected by wire linkages. The flexible plastic of the fingers create a leaf spring design. The fingers are attached to a linear actuator at the center point of the gripper. The linear actuator itself is another great hack. [Chiprobot] created it from a servo and an empty glue stick.  As the linear actuator is pulled in, the fingers pull around  any object in their grip. The end result is a grip strong enough to hold an egg while shaking it, but not strong enough to break the egg.

We would like to see the gripper gripping other objects, as eggs can be surprisingly strong. We’ve all seen the physics trick where squeezing an egg with bare hands doesn’t break it, yet squeezing an egg while wearing a ring causes it to crack much… like an egg.

Continue reading “Compliant Robot Gripper Won’t Scramble Your Eggs”

Advice About Over-Driving LEDs

advice-about-overdriving-leds

We usually stay within the recommended Amperage with LEDs, but multiplexed displays provide an interesting opportunity to push them outside of that range. Because multiplexing scans a set of LEDs, they are not on all of the time. If your multiplexing setup allows you to remain within a certain time frame and duty cycle they can be driven past the constant current specifications. [Bryanduxbury] decided to take a look at the best way to overdrive LEDs.

The example that he gives is that his 30 mA constant current rated parts can accept up to 185 mA but only for 0.1ms with a duty cycle of 10%. If you know how to apply these figures you can get them to shine much brighter. This becomes especially useful when your multiplexed display already has the light off for the majority of the time because the resulting average luminosity will be much higher. His side-by-side test is shown above. With a current limited LED on the left of each color group, a multiplexed LED driven at normal voltage in the middle, and multiplexing with overdrive on the right.

The biggest drawback that [Bryan] mentions is that if your firmware hangs for more than the spec’ed time you’ll definitely fry these diodes.

Cellphone Charging Inductive Purse

projects_cell-phone-charging-purse-00

For whatever reason, cell phone companies really don’t seem to care about giving you a good battery for your phone. Here’s a great hack if you happen to have a purse — turn it into an inductive charger! Manpurses count too, we’re not judging.

[Becky] from Adafruit came up with a great idea for this wearable hack. If your phone is sitting in your purse for long periods of time, why not charge it? It’s a pretty simple hack that makes use of a pair of inductive charging loops. One is hidden inside the bottom of your bag of choice, and the other mounted to a fixture at work or home. She’s using magnets to snap her purse into place on a shelf at work — this ensures the coils line up so the full rated charge can be transmitted.

Another option is to put the entire inductive charging circuit inside your purse, then use a battery pack with a special pocket for you phone — that way the phone is always charging while it’s safely put away!

Stick around after the break to see the complete how-to video.

Continue reading “Cellphone Charging Inductive Purse”

Repairing And Adding Bluetooth Control To An Induction Cooker

When his 6 years old induction cooker recently broke, [Johannes] decided to open it in an attempt to give it another life. Not only did he succeed, but he also added Bluetooth connectivity to the cooker. The repair part was actually pretty straight forward, as in most cases the IGBTs and rectifiers are the first components to break due to stress imposed on them. Following advice from a Swedish forum, [Johannes] just had to measure the resistance of these components to discover that the broken ones were behaving like open circuits.

He then started to reverse engineer the boards present in the cooker, more particularly the link between the ‘keyboards’ and the main microcontroller (an ATMEGA32L) in charge of commanding the power boards. With a Bus Pirate, [Johannes] had a look at the UART protocol that was used but it seems it was a bit too complex. He then opted for an IOIO and a few transistors to emulate key presses, allowing him to use his phone to control the cooker (via USB or BT). While he was at it, he even added a temperature sensor.

Energy Harvesting Peltier Ring

[Sean] is by no means an electrical engineer, but when he discovered the magic of Peltier plates he knew he had to make a project with them. This is his Energy Harvesting Peltier Ring.

The effect he is harnessing is called the SeeBeck Effect — the process of generating electricity through temperature differentials. He has shown how peltier plates work to many people, and, as you can guess, most people think they are amazing (free energy wow!). Unfortunately, most peltier plates are rather large and bulky, so [Sean] decided he wanted to try to design something small enough that could fit on a ring. Just a proof of concept, to light a tiny SMD LED.

The tiny Peltier plate he found generates about 0.3V with a temperature differential of about 20C — not bad, but it won’t light up any standard LEDs at that voltage! He started looking into voltage steppers and discovered Linear Technology’s 3108 Ultralow Voltage Step-up converter and Power Manager — a surface mount chip capable of scaling 0.3V to 5V. The only problem? [Sean’s] never done surface mount soldering.

His first circuit was built on a prototyping board, and after it worked successfully, he designed a PCB using Fritzing. Another success! Prototyping complete, it was now time to try to downsize the PCB even more to fit on a ring. Realizing there was no way he was going to fit it on a single ring, he decided to make a double ring out of CNC machined aluminum. He made use of his school’s CNC shop and the ring came out great. It works too! The room has to be fairly cool for the LED to light, but [Sean] definitely proved his concept. Now to make it even smaller!

Adding A SIM Card To The Photon Q 4G LTE

[Charles] is a big fan of phones that have physical keyboards. He thinks they are better suited for writing lengthy emails, but unfortunately his HTC Desire Z was getting old so he had to replace it. [Charles] therefore decided to import the Motorola Photon Q from the USA which exposed one major problem. The Verizon phone uses CDMA so there is nowhere to put a GSM SIM. But a bit of hacking allowed him to add a SIM card slot to it. Even though he’s not the one who originally found this hack (XDA thread here), his write-up is definitely an interesting read. To perform this modification, he needed a hot air reflow station, a soldering iron, a Dremel with the appropriate cutting wheel and several SIM card slot assemblies from the Galaxy S3 (as the first ones usually get burned during the disassembly process).

Obviously the first steps involved opening the phone, which may have taken a while. Using hot air, [Charles] removed the EMI shield covering the SIM card IC . He then extracted the latter using the same technique. Finally, he removed another EMI shield covering the contacts to which the SIM card slot should be connected. A few minutes/hours of delicate soldering and case modding later, [Charles] could use his SIM card on his brand new phone.

Hacking And Philosophy: Crackdown Part IV

h&pcrackdown4

This week we conclude our discussion of The Hacker Crackdown with the final chapter, which covers the rise of the EFF. In early 1990, the idea of civil liberties online was little more than a notion in [John Barlow’s] head, but by the end of the same year, the EFF had formed to not only keep Phrack editor [Knight Lightning] out of prison, but to also successfully challenge the Secret Service on behalf on Steve Jackson Games.

[Sterling] details [Knight Lightning’s] trial in this chapter and it’s worth reading. Had the EFF lost the case, online publications would have suffered serious setbacks in terms of freedom of speech, and sites like ours would likely be considered illegal. Read on, dear reader.

Continue reading “Hacking And Philosophy: Crackdown Part IV”