3D Printed Wind Turbine Has All The Features, Just Smaller

For anyone with even the slightest bit of engineering interest, wind turbines are hard to resist. Everything about them is just so awesome, in the literal sense of the word — the size of the blades, the height of the towers, the mechanical guts that keep them pointed into the wind. And as if one turbine isn’t enough, consider the engineering implications of planting a couple of hundred of these giants in a field and getting them to operate as a unit. Simply amazing.

Unfortunately, the thing that makes wind turbines so cool — their enormity — can make them difficult to wrap your head around. To fix that, [3DprintedLife] built a working miniature wind turbine that goes a bit beyond most designs of a similar size. The big difference here is variable pitch blades, a feature the big turbines rely on to keep their output maximized over a broad range of wind conditions. The mechanism here is clever — the base of each blade rides in a bearing and has a small cap head screw that rides in a hole in a triangular swash block in the center of the hub. A small gear motor and lead screw move the block back and forth along the hub’s axis, which changes the collective pitch of the blades.

Other details of full-sized wind turbines are replicated here too, like the powered nacelle rotation and the full suite of wind speed and direction sensors. The generator is a NEMA 17 stepper; the output is a bit too anemic to actually power the turbine’s controller, but that could be fixed with gearing changes. Still, all the controls worked as planned, and there’s room for improvement, so we’ll score this a win overall.

Looking for a little more on full-size wind turbines? You’re in luck — our own [Bryan Cockfield] shared his insights into how wind farm engineers deal with ice and cold.

Continue reading “3D Printed Wind Turbine Has All The Features, Just Smaller”

Multiband Crystal Radio Set Pulls Out All The Stops

Most crystal radio receivers have a decidedly “field expedient” look to them. Fashioned as they often are from a few turns of wire around an oatmeal container and a safety pin scratching the surface of a razor blade, the whole assembly often does a great impersonation of a pile of trash whose appearance gives little hope of actually working. And yet work they do, usually, pulling radio signals out of thin air as if by magic.

Not all crystal sets take this slapdash approach, of course, and some, like this homebrew multiband crystal receiver, aim for a feature set and fit and finish that goes way beyond the norm. The “Husky” crystal set, as it’s called by its creator [alvenh], looks like it fell through a time warp right from the 1920s. The electronics are based on the Australian “Mystery Set” circuit, with modifications to make the receiver tunable over multiple bands. Rather than the traditional galena crystal and cat’s whisker detector, a pair of1N34A germanium diodes are used as rectifiers — one for demodulating the audio signal, and the other to drive a microammeter to indicate signal strength. A cat’s whisker is included for looks, though, mounted to the black acrylic front panel along with nice chunky knobs and homebrew rotary switches for band selection and antenna.

As nice as the details on the electronics are, it’s the case that really sells this build. Using quarter-sawn oak salvaged from old floorboards. The joinery is beautiful and the hardware is period correct; we especially appreciate the work that went into transforming a common flat washer into a nickel-plated escutcheon for the lock — because every radio needs a lock.

Congratulations to [Alvenh] for pulling off such a wonderful build, and really celebrating the craftsmanship of the early days of radio. Need some crystal radio theory before tackling your build? Check out [Greg Charvat]’s crystal radio deep dive.

Copper: Rectifying AC A Century Ago

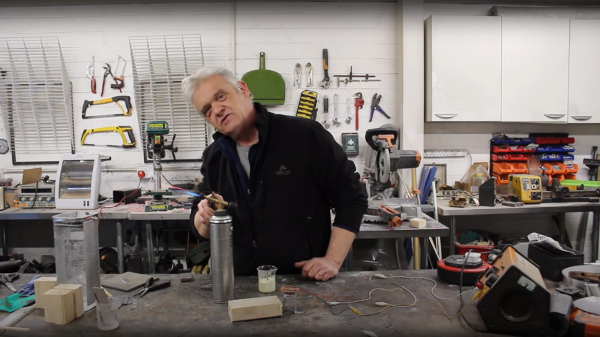
[Robert Murray-Smith] presents for us an interesting electronic device from years gone by, before the advent of Silicon semiconductors, the humble metal oxide rectifier. After the electronic dust had settled following the brutal AC/DC current wars of the late 19th century — involving Edison, Tesla and Westinghouse to name a few of the ringleaders — AC was the eventual winner. But there was a problem. It’s straightforward to step down the high voltage AC from the distribution network to a more manageable level with a transformer, and feed that straight into devices which can consume alternating current such as light bulbs and electrical heaters. But other devices really want DC, and to get that, you need a rectifier.

It turns out, that even in those early days, we had semiconductor devices which could perform this operation, 
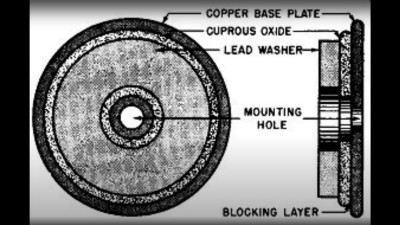
based not upon silicon or germanium, but copper. Copper (I) Oxide is a naturally occurring P-type semiconductor, which can be easily constructed by heating a copper sheet in a flame, and scraping off the outer layer of Copper (II) Oxide leaving the active layer below. Simply making contact to a piece of steel is sufficient to complete the device.

Obviously a practical rectifier is a bit harder to make, with a degree of control required, but you get the idea. A CuO metal rectifier can rectify as well as operate as a thermopile, and even as a solar cell, it’s just been forgotten about once we got all excited about silicon.

Other similar metallic rectifiers also saw some action, such as the Selenium rectifier, based on the properties of a Cadmium Selenide – Selenium interface, which forms an NP junction, albeit one that can’t handle as much power as good old copper. One final device, which was a bit of an improvement upon the original CuO rectifiers, was based upon a stack of Copper Sulphide/Magnesium metal plates, but they came along too late. Once we discovered the wonders of germanium and silicon, it was consigned to the history books before it really saw wide adoption.

We’ve covered CuO rectifiers before, but the Copper Sulphide/Magnesium rectifier is new to us. And if you’re interested in yet more ways to steer electrons in one direction, checkout our coverage of the history of the diode.

Continue reading “Copper: Rectifying AC A Century Ago”

Magnetic Bearings Put The Spin On This Flywheel Battery

[Tom Stanton] is right about one thing: flywheels make excellent playthings. Whether watching a spinning top that never seems to slow down, or feeling the weird forces a gyroscope exerts, spinning things are oddly satisfying. And putting a flywheel to work as a battery makes it even cooler.

Of course, using a flywheel to store energy isn’t even close to being a new concept. But the principles [Tom] demonstrates in the video below, including the advantages of magnetically levitated bearings, are pretty cool to see all in one place. The flywheel itself is just a heavy aluminum disc on a shaft, with a pair of bearings on each side made of stacks of neodymium magnets. An additional low-friction thrust bearing at the end of the shaft keeps the systems suitably constrained, and allows the flywheel to spin for twelve minutes or more.

[Tom]’s next step was to harness some of the flywheel’s angular momentum to make electricity. He built a pair of rotors carrying more magnets, with a stator of custom-wound coils sandwiched between. A full-wave bridge rectifier and a capacitor complete the circuit and allow the flywheel to power a bunch of LEDs or even a small motor. The whole thing is nicely built and looks like a fun desk toy.

This is far from [Tom]’s first flywheel rodeo; his last foray into storing mechanical energy wasn’t terribly successful, but he has succeeded in making flywheels fly, one way or another.

Continue reading “Magnetic Bearings Put The Spin On This Flywheel Battery”

Modified Tombstone Welder Contains A Host Of Hacks

State-of-the-art welding machines aren’t cheap, and for good reason: pushing around that much current in a controlled way and doing it over an entire workday takes some heavy-duty parts. There are bargains to be found, though, especially in the most basic of machines: AC stick welders. The familiar and aptly named “tombstone” welders can do the business, and they’re a great tool to learn how to lay a bead.

Tombstones are not without their drawbacks, though, and while others might buy a different welder when bumping up against those limits, [Greg Hildstrom] decided to hack his AC stick welder into an AC/DC welder with TIG. He details the panoply of mods he made to the welder, from a new 50 A cordset made from three extension cords where all three 12 gauge wires in each cord are connected together to make much larger effective conductors, to adding rectifiers and a choke made from the frame of a microwave oven transformer to produce DC output at the full 225 A rating. By the end of the project the tombstone was chock full of hacks, including a homemade foot pedal for voltage control, new industry-standard connectors for everything, and with the help of a vintage Lincoln “Hi-Freq” controller, support for TIG, or tungsten inert gas welding. His blog post shows some of the many test beads he’s put down with the machine, and the video playlist linked below shows highlights of the build.

This isn’t [Greg]’s first foray into the world of hot metal. A few years back we covered his electric arc furnace build, powered by another, more capable welder.

Continue reading “Modified Tombstone Welder Contains A Host Of Hacks”

Rewound And Rewired BLDC Makes A Half-Decent Generator

What’s the best way to turn a high-powered brushless DC motor optimized for hobby use into a decent low-RPM generator? Do you take a purely mechanical approach and slap a gearbox on the shaft? Or do you tackle the problem electrically?

The latter approach is what [GreatScott!] settled on with his BLDC rewinding and rewiring project. Having previously explored which motors have the best potential as generators, he knew the essential problem: in rough terms, hobby BLDCs are optimized for turning volts into RPMs, and not the other way around. He started with a teardown of a small motor, to understand the mechanical challenges involved, then moved onto a larger motor. The bigger motor was stubborn, but with some elbow grease, a lot of scratches, and some destroyed bearings, the motor was relieved of both its rotor and stator. The windings were stripped off and replaced with heavier magnet wire with more turns per pole than the original. The effect of this was to drive the Kv down and allow better performance at low RPMs. Things looked even better when the windings were rewired from delta to wye configuration.

The take-home lesson is probably to use a generator where you need a generator and let motors be motors. But we appreciate [GreatScott!]’s lesson on the innards of BLDCs nonetheless, and his other work in the “DIY or buy?” vein. Whether you want to make your own inverter, turn a hard drive motor into an encoder, or roll your own lithium battery pack, he’s done a lot of the dirty work already.

Continue reading “Rewound And Rewired BLDC Makes A Half-Decent Generator”

Wind Turbine Pushes Limits Of Desktop 3D Printing

There was a time, not so long ago, when hype for desktop 3D printing as so high that it seemed you could print anything. Just imagine it, and your handy dandy magical 3D printer could manifest it into reality. But now that more people have had first hand experience with the technology, the bubble has burst. Reality has sobered us up a bit, and today we’ve got a much better idea of what can and cannot be printed on a traditional desktop 3D printer.

But that doesn’t mean we aren’t surprised from time to time. As a perfect example, take a look at this almost entirely 3D printed wind turbine designed and built by [Nikola Petrov]. Outside of the electronics, the pole it’s mounted to, and some assorted bits and bobs, he produced all the parts on his own large-format TEVO Black Widow printer. He mentions there are a few things he would do differently if he was to build another one, but it’s hard to find much to complain about with such a gorgeous build.

To be sure, this one isn’t for the 3D printing novice. First of all, you’ll need a printer with a bed that’s at least 370 mm wide just to print the blades. [Nikola] also recommends printing the parts in ABS and coating them with acetone to smooth and harden the outside surfaces. We’d be surprised if you could print such large objects in ABS without a heated enclosure as well, so plan on adding that to your shopping list.

On the flip side though, the electronics are about as simple as they come. The blades are spinning a standard NEMA 17 stepper motor (through a 1:5 gearbox) to produce AC power. This is then fed into two W02M rectifiers and a beefy capacitor, which gives him DC with a minimum of fuss. In theory it should be capable of producing 1A at 12V, which is enough to light LEDs and charge phones. In this design there’s no battery charging circuit or anything like that, as [Nikola] says it’s up to the reader to figure out how to integrate the turbine into their system.

If you don’t think your 3D printing skills are up to the task, no worries. In the past we’ve seen wind turbines built out of ceiling fans, and occasionally, even less.