A Speaking Ultrasonic Distance Sensor

speak

[Klaus] wanted some sort of aid for parking his car, and after running across a $4 ultrasonic sensor, decided to build his own speaking distance sensor (.de, Google Translation).

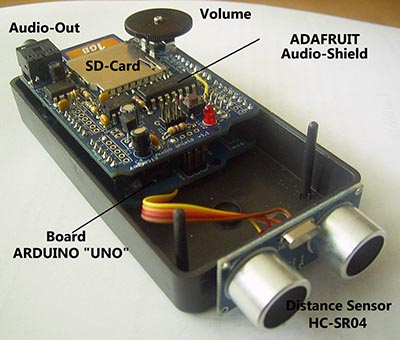
Inside [Klaus]’ device is an Arduino Uno, an HC-SR04 ultrasonic distance sensor, and an Adafruit Wave Shield. Originally, this parking/distance sensor used a small TFT to display the distance to an object, but after a few revisions, [Klaus] redesigned the device to speak the current distance, courtesy of an SD card and a soothing female voice.

Right now, the voice is set up to speak the distance from an object to the sensor from 10 cm to 1 m in 5cm increments. This isn’t the limit of the sensor, though, and the device can be easily reconfigured to sense a distance up to four meters.

The board doesn’t have an amplifier or speaker, but with the addition of a small amplifier, [Klaus]’ device is loud enough to be heard in even the noisiest environments.

Video demo below.

Continue reading “A Speaking Ultrasonic Distance Sensor”

Fabricate Your Own 7-Segment Displays

We see more and more projects that use custom molds and casting materials. The latest is this custom seven segment display which [Ray74] put together. The idea of making your own LED displays couldn’t be much easier than this — everything but the LEDs and wire is available at the craft store.

He started by making models of each segment out of pink erasers. The lower left image of the vignette above shows the eraser segments super glued to some poster board. The decimal is a pencil eraser, with a fence of wood to contain the molding material. Amazing Mold Putty was mixed and pressed into place resulting in the mold shown in the upper right.

From there, [Ray] cast the clear epoxy three times. Once dried the clear pieces were sanded, which will shape them up physically but also serves to diffuse the light. They were then placed inside of another mold form and an epoxy pour — this time doped with black enamel paint — finishes the 7-segment module. The final step is to glue the LEDs on the back side and wire them up.

This definitely trumps the build which Hackaday Alum [Kevin Dady] pulled off using hot glue sticks as light pipes.


Retrotechtacular: An Ax Factory Of Yore

When your mind’s eye thinks of an ax factory you may envision workers loading blanks into a machine that refines the shape and profile before heading to an annealing furnace. But this is Retrotechtacular, and we’re tickled to feature a look at a different time in manufacturing history. This ax factory tour looks at every step in the manufacturing process at a factory in Oakland, Maine. It was shot on film in 1965 just a few months before the factory shut down. [Peter Vogt] did a great job of shooting and editing the reel, and an equally fine job of converting it to digital so that we can enjoy it on his YouTube channel.

Above you can see the automatic hammer — known as a trip hammer — that is driven by cam action. At this point a lot of work has already been done. Blanks were cut from steel bars by two workers. These were shaped on the trip hammer before being bent in half to create the loop for the ax handle. From there a piece of high-carbon steel was added to form the cutting surface. This brings us to the step above, shaping the two glowing-hot pieces into one.

We don’t want to undermine the level of craftsmanship, and the labor-intensive process shown off here. But we can’t end this write-up without at least mentioning the kitsch that is smoking cigarettes and pipes on the job. At one point a worker actually lights his pipe using a the glowing-hot ax head.

To give you an idea of how this contrasts with modern manufacturing, here’s How It’s Made episode on axes (although we think whats being made would more appropriately be called hatchets).

Continue reading “Retrotechtacular: An Ax Factory Of Yore”

Stealing $100 Million In Bitcoins

In early October of this year, online Bitcoin marketplace and ‘the eBay of drugs’ The Silk Road was taken down by the FBI. Just after the black vans took Silk Road head honcho [Dread Pirate Robberts] away, a new Bitcoin marketplace came onto the scene called Sheep Marketplace. Sheep Marketplace closed after revealing that 5400 bitcoins – or $5.8 million USD were stolen by the user EBOOK101 by exploiting a bug in the Sheep site.

Over this last weekend, it was revealed this bug in the Sheep Marketplace site wasn’t responsible for the loss of 5,400 coins, but instead 96,000 BTC, or $100 million USD, making this one of the largest thefts of all time.

Whoever was responsible for this theft didn’t make a clean getaway. Because the Bitcoin block chain records the history of every transaction, laundering bitcoins is harder than it seems. The most common method is to ‘tumble’ the bitcoins – sending them through multiple wallets, combining and recombining them, until tracking groups of bitcoins just becomes too hard.

[sheeproadreloaded2] over on Reddit managed to track these bitcoins to this bitcoin address, an amazing feat that also means there are 96,000 coins in a wallet somewhere that can’t be spent or cashed out without the thief telling the world who he is.

As far as crimes of the century go, this one is at least in the top ten. Unless the thief behind this heist is extraordinarily smart, though, his identity will most likely be found out eventually.

New Contest: Win One Of 20 Microchip Fubarino SD Boards

We had a blast with the Trinket Contest in October and November and can’t wait to see what you can come up with for this month’s competition. Microchip Technology is one of our advertisers and they offered us 20 Fubarino SD boards to give away as prizes. The challenge for you is to add our URL as an Easter Egg in your own microcontroller project. Rise to the top of our seemingly arbitrary system for picking winners and one will be delivered to your door for your future hacking pleasure.

Obviously we mean http://hackaday.com when we say URL, but what constitutes an Easter Egg? We figure it’s anything that is not apparently obvious in a piece of hardware. We built a quick example to get you thinking. Shown off in the clip after the break is a clock that displays our web address every day at 1:37pm. What did we pick that time? Because our clock displays in 24-hour time format and 13:37 is leet. See the code we used in our repo.

We thought of a few others, like making an embedded gaming that uses the Konami Code to reveal the Easter Egg, or a man-in-the-middle device that attaches to your keyboard and redirects your feeble attempts to load Facebook by closing the tab and opening Hackaday. The sky’s the limit with how creative these things can be!

Follow these rules to submit your qualifying entry:

  • You must somehow hide http://hackaday.com in your microcontroller project (embedded Linux doesn’t count unless you do some type of bare-metal programming)
  • Preference will be given to projects that are both clever and well documented. Notice we made a video, and posted code and an explanation of our project.
  • Write an email that has “[Fubarino]” in the title, includes the information on your documented entry, and lists your name and mailing address. Your name and mailing address will be used for shipping only and NOT for anything else. Emails should be sent to: contests@hackaday.com
  • Entries must be received before 12:00am Pacific time on 12/19/2013.
  • Employees and their families of Hackaday, SupplyFrame, and Microchip Technology are not eligible to win.

What are you waiting for? Dust off those chips and get hacking!

Continue reading “New Contest: Win One Of 20 Microchip Fubarino SD Boards”

Compliant Robot Gripper Won’t Scramble Your Eggs

[Chiprobot] has created an amazing compliant gripper.  Designing robot hands (or end effectors) can be a perilous task. It is easy to give robots big, good, strong hands. Strong grippers have to be controlled by sensors. However, sensors can’t always be relied upon to ensure those hands don’t crush anything they touch. Hardware fails, software has bugs. Sometimes the best solution is a clever mechanical design, one which ensures a gripper will conform to the object it is gripping. We’ve seen “jamming” grippers before. (so named for their use of a granular substance which jams around the object being gripped).

[Chiprobot’s] gripper is something entirely different. He designed his gripper in blender, and printed it out with his Ultimaker 3D printer. The material is flexible PLA. Three plastic “fingers” wrap around the object being gripped. The fingers are made up of two strips of printed plastic connected by wire linkages. The flexible plastic of the fingers create a leaf spring design. The fingers are attached to a linear actuator at the center point of the gripper. The linear actuator itself is another great hack. [Chiprobot] created it from a servo and an empty glue stick.  As the linear actuator is pulled in, the fingers pull around  any object in their grip. The end result is a grip strong enough to hold an egg while shaking it, but not strong enough to break the egg.

We would like to see the gripper gripping other objects, as eggs can be surprisingly strong. We’ve all seen the physics trick where squeezing an egg with bare hands doesn’t break it, yet squeezing an egg while wearing a ring causes it to crack much… like an egg.

Continue reading “Compliant Robot Gripper Won’t Scramble Your Eggs”

Advice About Over-Driving LEDs

advice-about-overdriving-leds

We usually stay within the recommended Amperage with LEDs, but multiplexed displays provide an interesting opportunity to push them outside of that range. Because multiplexing scans a set of LEDs, they are not on all of the time. If your multiplexing setup allows you to remain within a certain time frame and duty cycle they can be driven past the constant current specifications. [Bryanduxbury] decided to take a look at the best way to overdrive LEDs.

The example that he gives is that his 30 mA constant current rated parts can accept up to 185 mA but only for 0.1ms with a duty cycle of 10%. If you know how to apply these figures you can get them to shine much brighter. This becomes especially useful when your multiplexed display already has the light off for the majority of the time because the resulting average luminosity will be much higher. His side-by-side test is shown above. With a current limited LED on the left of each color group, a multiplexed LED driven at normal voltage in the middle, and multiplexing with overdrive on the right.

The biggest drawback that [Bryan] mentions is that if your firmware hangs for more than the spec’ed time you’ll definitely fry these diodes.