Reverse Engineering Candle Flicker LEDs, Again

Flickering candle LEDs are seemingly everywhere these days, and like all fads, someone has to take a very close look at the engineering behind them.

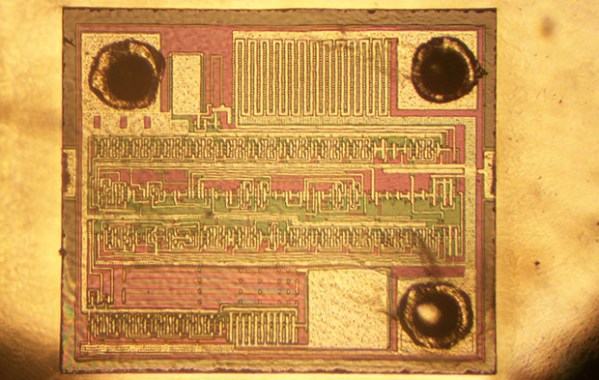
[cpldcpu] had earlier taken a look at the controller chip in these candle flicker LEDs by measuring the current used and developing a statistical model of how these LEDs flicker. That’s math, of course, and much more fun can be had by decapsulating one of these flicker LED controller chips. It’s not very advanced tech; the LED controller is using a 1 or 2um process and a pair of RC oscillators, but it appears there could be a hardware random number generator in the silicon of this chip.

Earlier, [Cpldcpu] had taken a look at the tiny controller in these flickering LEDs and determined they used a linear feedback shift register to generate pseudorandom LED intensities. The new teardown seems to confirm that a linear feedback shift register is being used to drive the flickering LED.

Custom chips are only one way to skin a cat, or flicker a LED, and PICatout used the the tiniest PIC microcontroller (French, translation) to create his own flickering LED. Seems like making a few custom flickering LED throwies shouldn’t be too hard.

This Desktop Air Conditioner Is Really Cool!

[Mike] works in a 50+ year old building with unreliable air conditioning. It often reaches 80°F inside during the summer, and he once measured it at 98°F. Rather than burn sick days, he became the envy of the office when he built this awesome desktop air conditioner.

The problem with knocking holes in the office walls and installing window units is that they must vent heat somewhere. [Mike] has overcome adversity and harnessed the power of the heatsink, only in reverse. His desktop a/c unit is made from two 28oz cans plus a 20oz can for the ice bucket. [Mike] used a side-vented CPU fan, which is vital to his design. He secured the heatsink to the base of one 28oz can with a self-tapping screw. This can is the upper chamber. [Mike] made a base from the other 28oz can, drilling holes for the CPU fan wires, the power cord, and a sweet light-up rocker switch. He used Gorilla Glue to affix the CPU fan to the base can.

Hot, stale office air is drawn through the ice in the 20oz can, which is nestled in aluminum foil to maximize heat transfer to the heatsink. The heat in the air gets absorbed by the heatsink, and the CPU fan kicks out cool air in 20-30 seconds.

Software USB On The STM8

STM8

Thanks to V-USB, software-based USB is all the rage now, with a lot of uses for very small and low power microcontrollers.[ZiB] wondered if it would be possible to implement a USB controller on the STM8 microcontroller (Google translation) in software and succeeded.

The STM8 is a bit of a change from the usual 8-bit micros we see like AVRs and PICs. [ZiB] chose the STM8S103F3, although any chip in the STM8 family will work with this project when a 12MHz crystal is attached.

The build began by generating USB signals with the help of a whole lot of NOPs. This code doesn’t take up much space – only 300 bytes, and the receiving code (Google translation) is similarly sized.

The code isn’t quite there yet, but [ZiB] has proven a software-based USB implementation on the STM8 is possible. All the code is available for download (comments in Russian) and a video demoing the project available below. If anyone cares to translate this project to English, we’ll post a link to your work here.

Continue reading “Software USB On The STM8”

Microcontroller Speech Synthesis Lets Your Project Be Heard

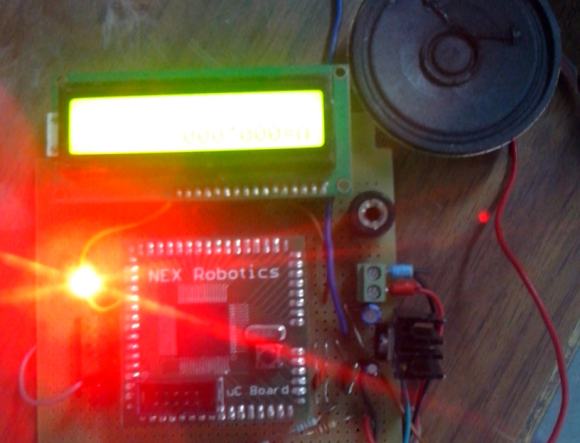
[Aditya] had a project that called for spoken output. He admits that he could have built a PC-based solution, but he found that adding speech by using a microcontroller was not only a cheap and portable alternative, it was also a fun and easy build.

His design uses an ATMega128. Many microcontrollers would work, but his major requirements were PWM generation and plenty of memory to store the file(s). The output is cleaned up in a simple low pass filter before going to the 8Ω speaker.

[Aditya] lays his tracks in WAV format and then compresses it to 8-bit/8kHz. He found a C++ function that converts the track data into a huge arrays and then digitizes it. He uses two timers, one to generate the waveform and second one to time the square wave. [Aditya] has a zip of samples available on his site that will speak the digits 0-9.

Turning A Tiny CRT Into A Monitor

TV

[GK] picked up a few tiny 2″ CRTs a while back and for the longest time they’ve been sitting in a box somewhere in the lab. The itch to build something with these old tubes has finally been scratched, with a beautiful circuit with Manhattan style construction.

[GK] has a bit of a fetish for old oscilloscopes, and since he’s using an old ‘scope tube, the design was rather simple for him; there aren’t any schematics here, just what he could put together off the top of his head.

Still, some of [GK]’s earlier projects helped him along the way in turning this CRT into a monitor. The high voltage came from a variable output PSU he had originally designed for photomultiplier tubes. Since this is a monochrome display, the chrominance was discarded with an old Sony Y/C module found in a part drawer.

It’s a great piece of work that, in the words of someone we highly respect is, “worth more than a gazillion lame Hackaday posts where someone connected an Arduino to something, or left a breadboard in a supposedly “finished” project.” Love ya, [Mike].


Photosphere’ing Made Easy And Cheap

photosphere

Android phones have a cool function called Photo Sphere — unfortunately, unless you’re very steady and can manipulate the phone around its camera’s axis… the results aren’t that amazing. Unless you make a cheap 360 degree panorama head for your tripod that is!

[Oliver Krohn] designed this super simple adapter which you can mount on any tripod. It’s a U-shaped bent piece of aluminum, a bottle cap with a 1/4-20 nut, a thick piece of wire, and a cellphone case. The wire is bent with a notch to sit just below the camera’s lens on the cellphone — it is also placed directly above the tripods panning axis. This puts the nodal point in the perfect place, which allows for a great photo sphere every time.

To see how it works (and the amazing results!) stick around for the following video.

Continue reading “Photosphere’ing Made Easy And Cheap”

Hackaday Retro Edition: AppleTalk

retro

If you do a survey of what makes and models of classic computers manage to pull off a Retro Success by loading our Web 1.0 retro site, you’ll notice a disproportionate number of classic Macintosh computers, the cute, small all-in-one boxes with a nine-inch black or white screen. Part of this is the nigh indestructible nature of these boxes, and part of this is the networking built into every classic Mac – AppleTalk.

The physical connections for AppleTalk is just a small breakout box with two Mini-DIN connectors (or RJ11 phone jacks for PhoneNet) attached to one of the serial ports on the Mac. This isn’t just a null modem connection, though. An AppleTalk network can support up to 32 nodes, file transfer, networked printers, and in later updates booting an Apple IIGS from a networked drive. Whenever you have a few classic Macs in one room, an AppleTalk network is bound to appear at some point, especially considering the limitations of an 800kB disk drive for sneakernetting and the fact the AppleTalk software is supplied with every version of the operating system.

[Chris] had an old dual disk Macintosh SE he had brought back from the dead, but his modern expectations of Internet On Every Computer meant this cute little compy was severely lacking. Yes, SCSI to Ethernet adapters exist, but they’re surprisingly expensive. Modems are right out because of landlines. How did he solve this problem? With AppleTalk, of course.

After picking up a pair of PhoneNet adapters, [Chris] plugged one into a PowerPC mac running OS 9. MacTCP, the Apple TCP/IP control panel for classic Mac operating systems, is able to encapsulate IP traffic into AppleTalk Packets. After turning the PowerPC mac into a router, [Chris] managed to get his all-in-one SE on the internet.

The only problem with this setup is the browser. NCSA Mosaic doesn’t have the ability to send traffic to a proxy server, but another classic Mac browser, MacWeb 2.0c does. This allowed him to load up our retro site using forgotten and long unsupported technologies.


If you have an old computer sitting around, try to load our retro site with it. Take a few pictures, and we’ll put it up in one of our Retro Roundups