Adventures In Hackerspacing: Hackyard Athens, Part I

Hackyard Athens

It’s funny how quickly it can all come together. If there’s a hackerspace or makerspace in your area, I hope you’ve gone by to see what it’s like. If there isn’t, you can always start your own…

That notion seems so simple, doesn’t it? Round up a few like-minded folks, find a space—any space—shove them and some equipment into it. Two years of attempted round-ups and shove-ins, however, is enough to discourage the most passionate of would-be hackerspacers. By all predictions, the effort to start a hackerspace in Athens, GA was a marathon, a gradual advance culminating in a hard-earned workspace. But that’s not what happened. Hackyard Athens erupted into being.

In only one week.

Continue reading “Adventures In Hackerspacing: Hackyard Athens, Part I”

Open Source Electric Car, CarBEN, Produces No Carbon

Raise your hand if you have designed and built a full size car…. Nobody? Doing so would be a huge task considering car manufactures have thousands of people involved with designing and building a car model. Eager beaver [Neil] has stepped up and taken on that challenge. He’s started an open source project he’s calling the CarBEN.

The plan is for the car to hold 5 people comfortably while being just a tad larger than a Scion xA. The body is made of foam and will be covered with fiberglass. The car is designed in a shape that tapers in towards the rear of the car and has features like a smooth underside and covered wheels to create a low coefficient of drag. The goal is for this beauty to get 300-400 miles per charge with an Miles Per Gallon Equivalent of over 224.

Continue reading “Open Source Electric Car, CarBEN, Produces No Carbon”

Bicycle Wheel Bow Has Plenty Of Kick

Here’s a clever way to recycle and reuse an old bicycle wheel! [Darren] came up with this idea a while ago, and unable to find any mention of it on the internet, he decided to make his own — He calls it the Bike Wheel Bow.

Now technically it may look like a bow, but it’s actually more of a bow-like-sling-shot, as it relies on stretch of the string (which is rubber tubing) instead of the bow itself — regardless though, it’s a cool piece of kit.

[Darren] chopped up a bicycle wheel, removed the spokes, and was left with a nice semi circle. Using regular old eyelets he installed them around the perimeter giving it a bit of a compound bow look. He’s using rubber medical tubing with a section of bicycle inner-tube in the middle which provides a fold, allowing you to shoot arrows without knocks. You can use the inner-tube for the whole thing, but it’s not as powerful.

For a bow made out of almost entirely recycled parts, it’s pretty good — he’s even made an arrow rest using the hub and a bent spoke. The only caveat to the design is the rubber tends to stick on the eyelets — it’s best to lube them up a bit before shooting. Alternatively a few $1 pulleys might work even better!

If you’re looking for a more traditional home-made bow build, why not use a pair of cross country skis? Or if you’re alone in the woods, make one completely from scratch!

Digital Pinball With Force Feedback

pinball 
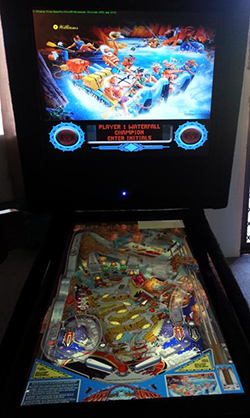
Hang around Hackaday long enough and you’ll hear about MAME, and all the other ways to emulate vintage arcade machines on a computer. The builds are usually fantastic, with real arcade buttons, MDF cabinets, and side graphics with just the right retro flair to make any connoisseur of ancient video games happy. MAME is only emulating old video games, though, and not physical systems like the digital pinball system [ronnied] put up on the Projects site.

[ronnied] was inspired by a real life, full-size White Water pinball machine at his previous job, and decided it was high time for him to acquire – somehow – a pinball machine of his own. He had a spare computer sitting around, an old 16:9 monitor for the main playfield, and was donated a smaller 4:3 monitor for the backglass. With an MDF cabinet, PinMAME, and a little bit of work, [ronnied] had his own machine capable of recreating hundreds of classic machines.

The build didn’t stop at just a few arcade buttons and a screen; [ronnied] added a 3-axis accelerometer for a tilt mechanism, solenoids and a plunger torn from a real pinball machine for a more realistic interface, and a Williams knocker for a very loud bit of haptic feedback. We’ve seen solenoids, buzzers, and knockers in pinball emulators before, and the vibrations and buzzing that comes with these electromechanical add ons make all the difference; without them, it’s pretty much the same as playing a pinball emulator on a computer. With them, it’s pretty easy to convince yourself you’re playing a real machine.

Videos of the mechanisms below.

Continue reading “Digital Pinball With Force Feedback”

Give Aging Technology A Chance

Robot Arm with PDA Brain

In our rush to develop new projects, a lot of the time we jump the gun and order new Arduinos and microprocessors, when with a bit of ingenuity you can recycle old tech for new purposes. [Eric Wiemers] has a Lynxmotion robot arm and needed a way to control it — sure he could use an Arduino or something… or he could try to make use of his trusty PDA that never left his side, well, 10 years ago anyway!

In 2001, Handspring released the Visor Neo — an affordable PDA competitor to the Palm Pilot. It had a super fast 33MHz processor, a whole 8MB of RAM and a 16 bit grayscale screen with a whopping 160 x 160 pixels. [Eric] was lucky enough to get his hands on one a year after it came out. Fast forward today and PDA’s are pretty much obsolete due to smart phones — but [Eric] didn’t want to just chuck it, it still worked after all!

At first he thought of just practicing coding and writing some apps for it — but let’s be honest, he’d never use it instead of his smart phone. He dug a bit deeper and discovered it was actually capable of serial output — this realization opened up a world of possibilities! Using a spare charging cradle, he tapped into the serial connections and added a Molex connector to allow him to hook it up to his Lynxmotion. He wrote his own control app with a GUI which means he can now control the robot arm without needing to drag around his laptop — success!

Think twice before throwing out your old tech. Perhaps that disused piece of junk can have a second chance in your next DIY project.

640×480 VGA On An Arduino

There are dozens, if not hundreds of examples around the Intertubes of an Arduino generating a VGA video output. The Arduino isn’t the fastest chip by far, and so far, all of these VGA generation techniques have peaked out at lower resolutions if you want to control individual pixels.[PK] has an interesting technique to generate 640×480 VGA at 60 frames per second without overclocking. It’s hacky, it’s ugly, but surprisingly, it actually works.

The VGA standard of 640×480 @ 60 fps requires pixels to be clocked out at 25.175 MHz, and the ATMega chips found in Arduinos top out at 20 MHz. [PK] wanted to generate VGA signals without overclocking, He did this by doubling the clock frequency with digital logic. The ATMega generates a clock, an inverter delays that clock so it is 90 degrees out of phase, and the two clocks are XORed, doubling clock output of the micro. It produces a very ugly square wave at 32 MHz – an error of 27% compared to the VGA spec. Somehow it still works.

With a hilariously out of spec clock, the rest of the project was pulled together from [Nick Gammon]’s VGA library, a 16×16 font set, and a project from [lft]. Video below.

Continue reading “640×480 VGA On An Arduino”

Stuff Wireless Charging Into A Nook’s Crannies

Qi receiver for Nook
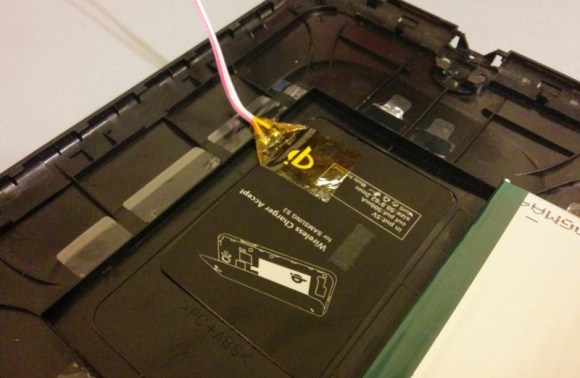
Many technologies that come about for one type of product make us want to extend it to other things. For instance, we’d like the ability to remotely unlock our front door when it’s raining or our hands are full. Once [MS3FGX] experienced Qi wireless charging with his Nexus 5, he wanted the ability to wirelessly charge all the things. The first gadget on the list was his Nook Simple Touch eReader, which he successfully retrofit with a Qi receiver.

Space is at a premium inside of most modern technology. As it turns out, there is a burgeoning market for shoving inductive charging receivers into things. [MS3FGX] decided to try a Qi receiver meant for a Samsung S3, and it actually fits very well behind the battery. He glued it down and then cut a channel in the battery tray for the wires.

[MS3FGX] went full hack with this one and wired it to the Nook’s USB port on the inside. He would have preferred a thinner wire, but used some from a 40-pin IDE cable with little trouble. After the operation was complete, he put it on the Qi pad and it started charging right away. To his delight, the battery increased 20% after an hour. And yes, he can still charge the Nook the traditional way without any issues.

If you want to add wireless charging to any phone cheaply and easily, we’ve got you covered.