[Apachexmd] wanted to do something fun for his three-year-old son’s birthday party. Knowing how cool race cars are, he opted to build his own Hot Wheels drag race timer. He didn’t take the easy way out either. He put both his electronics and 3D printing skills to the test with this project.
The system has two main components. First, there’s the starting gate. The cars all have to leave the gate at the same time for a fair race, so [Apachexmd] needed a way to make this electronically controlled. His solution was to use a servo connected to a hinge. The hinge has four machine screws, one for each car. When the servo is rotated in one direction, the hinge pushes the screws out through holes in the track. This keeps the cars from moving on the downward slope. When the start button is pressed, the screws are pulled back and the cars are free to let gravity take over.
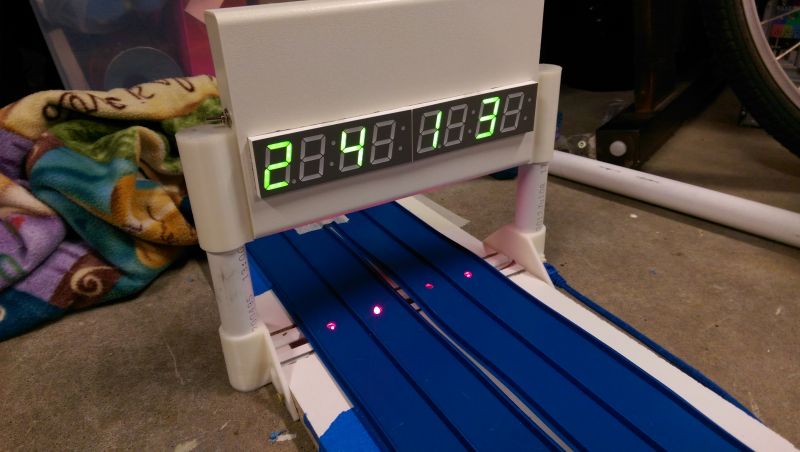
The second component is the finish line. Underneath the track are four laser diodes. These shine upwards through holes drilled into the track. Four phototransistors are mounted up above. These act as sensors to detect when the laser beam is broken by a car. It works similarly to a laser trip wire alarm system. The sensors are aimed downwards and covered in black tape to block out extra light noise.
Also above the track are eight 7-segment displays; two for each car. The system is able to keep track of the order in which the cars cross the finish line. When the race ends, it displays which place each car came in above the corresponding track. The system also keeps track of the winning car’s time in seconds and displays this on the display as well.
The system runs on an Arduino and is built almost exclusively out of custom designed 3D printed components. Since all of the components are designed to fit perfectly, the end result is a very slick race timer. Maybe next [Apachexmd] can add in a radar gun to clock top speed. Check out the video below to see it in action.


Are lasers safe enough to use around 3 year olds? I would have thought it would be safer using LEDs in the top and the photoresistors under the track.
Those look like the el cheapo laser modules you can get on ebay for $3 for 10. They are incredibly low power hence safe. No kid is gonna stick his head in the wedge of the track for 10 minutes staring at the beam.
I dont know… I have seen 3 year old boys laughing while banging their heads against walls for fun. 3 year old girls? yes they have enough sense…. but Boys….
now you have mentioned it … I am going to try, and I’m 53!
Probably. But when I did a slot car timer for Boy Scouts, which also had more than enough space to shove a head in the sensor area, I decided to play it safe. The top had a row of LEDs transmitting a coded IR signal at 38Khz. And IR receiver modules were used under the track. Use of modulated signals inherently made it robust against sunlight, since outdoor use was in the spec.
Nice project, but encasing a whole arduino is quite a waste :/
http://arduino.cc/en/Tutorial/ArduinoToBreadboard
Depends how much you value your time.
If you suggest using an actual solderless breadboard as in your posted link it will end up costing more in total compared to a cheap clone. Especially if a DIP Mega328 is used as they are horrendously expensive.
A complete Pro Mini (328) clone can be had for less than $2.50 including shipping, so building one yourself would be a ridiculous waste of time and money.
He’s not using a Pro Mini (328) clone :)
And hell – time :D It’s just popping out the atmega and do some wiring, sheesh :)
Well, you complained about the waste of using a whole Arduino and implied that it would be better to build one yourself from a hip and some parts.
But why? Why not use a whole cheap Arduino and reduce both the costs and labor? Using pre-made modules in a project is not a bad thing especially if they can reduce cost/time/debugging. Maybe it’s not as “fun” and “hacker-worthy”, but it’s more practical in many instances.
There’s too many people with the knee-jerk reaction “Waaaah! An Arduino, it’s not optimized!”. That might be a valid point if doing mass production or even a smaller batch of them. But for a one-off project that is a stupid point of view.
It’s not me complaining, it’s the environment :)
Use lesser parts whereever you can.
I’m not talking about mass production, I’m speaking about common sense, why waste a whole (development) board for a single project? That’s stupid :>
It’s not wasted… after a few weeks, the kid gets bored playing with it and the board can be re-used
If you know the distance, and you know the time, you can calculate velocity. Local boyscout troop have been using a timer for years that does this. Has a serial output so you can keep track of everything inside a race management program.
Track length/race time gives you average speed. If you need speed at finish, you can measure car length and then car length/gate obstruction time will give you speed at finish line.
Well i thought it was cool
Color me impressed!
Nice work, really well done.
I like it.
It’s only as complex as it needs to be, well packaged and cleanly built, and above all, the kid seems to be enjoying it.
I recently made a device using similar (or the same) LED displays. I discovered that to improve readability and contrast, you can cover the display with a colored piece of plastic, but the color matters. For a RED display, cover it with a translucent red cover. For a GREEN display, cover it with a smoked/tinted piece. (Use Red on red, but Green on green doesn’t work like you think it would.)
Example: http://i.imgur.com/9wfUldS.jpg?1
I recently made a device using similar (or the same) LED displays. I discovered that to improve readability and contrast, you can cover the display with a colored piece of plastic, but the color matters. For a RED display, cover it with a translucent red cover. For a GREEN display, cover it with a smoked/tinted piece. (Use Red on red, but Green on green doesn’t work like you think it would.)
Example of using the colored filters on the displays (compare with the images without): http://i.imgur.com/9wfUldS.jpg?1
Awesome! I’m totally jealous! I’m throwing a Lego Race Car party for son’s birthday and I would love to have a track like this at the party. Well done! I really can’t stand it when people write negative comments! Seriously people, stop it! This track is awesome and I’m sure all the kids loved it!
Totally agree. Was just thinking the same thing. I cannot believe the number of critical and crappy comments on here. This thing is awesome.
Can this be made into 8 lanes?
I dunno about my technical ability enough to be able to build this, but I’d definitely pay someone if they want to build one and ship it to me hahah
Here’s a webserver based one that is cheap to make ~$4 per lane.
https://create.arduino.cc/projecthub/user2107733/hotwheels-speed-trap-and-electronic-finish-line-judge-ee24f6