Getting Started With ARM Using Mbed

Even though the Arduino was hardly the first 8 bit microcontroller board to support a bootloader and the C/C++ language, it quickly became the de facto standard for hobby-level microcontrollers as well as a common choice for one-off or prototype projects. I’m sure there are a lot of reasons why this occurred, but in my mind there were three major reasons: price, availability of lots of library and sample code, and the existence of a simplified GUI IDE that you could install in a few minutes. The build process is simple, too, even though if you ever have to actually figure it out, it is quite ugly. For most people, it works, and that makes it not ugly.

I like the ATMega chips. In fact, I had boards based around the ATMega8 and a bootloader way before there was an Arduino. However, they are fairly small parts. It is true that the Arduino infrastructure has grown to support more ATMega chips, many with more memory and I/O and clock speeds. However, 32-bit processors are getting inexpensive enough that for all but the simplest or highest volume projects, you should be thinking about using 32-bit.

If you’ve tried to go that route before, you’ve probably been daunted by the price, especially the price of development tools. Your alternative is to roll your own tool chain which is very doable (and there are some nice scripts out there that will help you). You also need to worry about libraries and how to integrate them. Not to mention, many of the advanced processors require a lot of setup to get, say, an A/D converter turned on. Most processors keep things they aren’t using turned off, and each pin requires setup to select the 4 or 5 things shared on that pin.

All of this has been a barrier to entry. The vendors have all figured this out, though, and many have tried to build tools aimed at breaking up the Arduino market ranging from inexpensive development boards to code-generating wizards, to full blown IDEs. I want to tell you (and show you, in the video below) how you can make the jump from 8-bit to 32-bit much easier than you might think.

Continue reading “Getting Started With ARM Using Mbed”

Segway Build You Can Do Yourself

We’ve seen lots of Segway variants on Hackaday, but they don’t always have detailed instructions on how they made it… Well lucky for us, [Bob] from [Making Stuff] just finished his extensive Segway project with tons of videos of the build!

Inspired by other self-balancing scooter projects he had seen online, [Bob] wanted to try his hand at building one. So he took bits and pieces from designs he liked, and came up with his own solid looking Segway clone design. Using Google Sketchup he drew up the frame, and from there it was all hands on deck. A bit of TIG welding later and it was time for the components.

Some small slight mechanical hiccups aside, the longest part of the project was the electronics and software — getting it to work like a real Segway. After writing his own code he ran into a few roadblocks, but luckily he was able to get some help from someone at his local Maker meetup which saved a lot of troubleshooting on his end.

Continue reading “Segway Build You Can Do Yourself”

Simple, Cheap Nitrate Tester Is Open Source

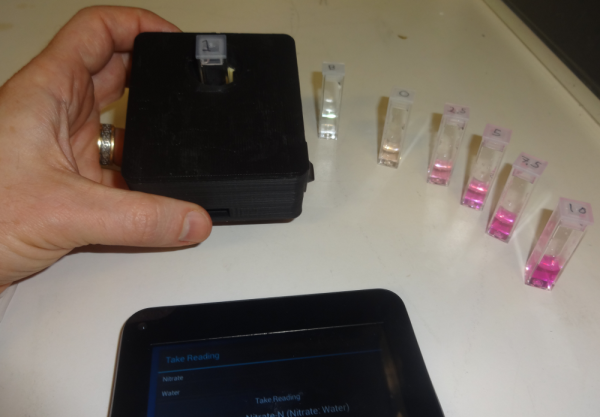
Too much of a good thing can be a bad thing, and nitrate pollution due to agricultural fertilizer runoff is a major problem for both lakes and coastal waters. Assessing nitrate levels commercially is an expensive process that uses proprietary instruments and toxic reagents such as cadmium. But [Joshua Pearce] has recently developed an open-source photometer for nitrate field measurement that uses an enzyme from spinach and costs a mere $65USD to build.

The device itself is incredibly simple – a 3D printed enclosure houses an LED light source and a light sensor. The sample to be tested is mixed with a commercially available reagent kit based on the enzyme nitrate reductase, resulting in a characteristic color change proportional to the amount of nitrate present. The instrument reads the amount of light absorbed by the sample, and communicates the results to an Android device over a Bluetooth link.

Open-source instruments like this can really open up educational opportunities for STEM groups to get out into the real world and start making measurements that can make a difference. Not only can this enable citizen scientists and activists, but it also opens the door for getting farmers involved in controlling nitrate pollution at its source – knowing when a field has been fertilized enough can save a farmer unnecessary expense and reduce nitrate runoff.

There are a lot of other ways to put an open-source instrument like this to use in biohacking – photometery is a very common measuring modality in the life sciences, after all. We’ve seen similar instruments before, like a DIY spectrophotometer, or this 2015 Hackaday Prize entry medical tricorder with a built-in spectrophotometer. Still, for simplicity of build and potential impact, it’s hard to beat this instrument.