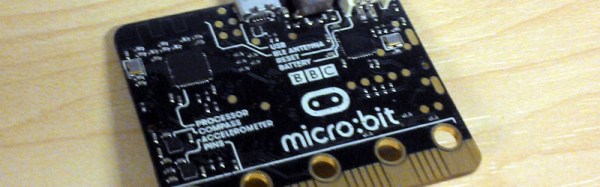
The little board that has at times seemed so plagued with delays as to become the Duke Nukem Forever of small computers has finally shipped. A million or so British seventh-grade schoolchildren and their teachers will today start receiving their free BBC micro:bits.
Announced early last year, the plan was to rekindle the learning of code in schools through handing out a powerful and easy to program small computer to the students. The hope is that it will recapture the spirit of the 1980s, when school computing meant programming Acorn’s BBC Micro rather than learning how to use Microsoft Word.
Sadly the project has been delayed multiple times, the original target of last October was missed, and a revised estimate from January suggested they might ship at half-term (about four weeks ago). With only a few days to go before the Easter school holidays the kids will have to try them out at home, but at least they’re arriving. Continue reading “British Kids Finally Get Their Micro:Bits”→
3D printing is obviously best used in printing three-dimensional objects. Laser cutters, jig saws, and CNC routers are obviously well-equipped to machine flat panels with intricate shapes out of plastic sheets, plywood, or metal, but these devices have one drawback: they’re subtractive manufacturing, and 3D printers add material. What good is this? [Jason Preuss] demonstrated a very interesting 3D printing technique at this year’s Midwest RepRap Festival. He’s producing 2D paintings with a 3D printer, with results that look like something between very intricate inlay work and a paint by numbers kit.
[Jason Preuss]’ multicolor 2D print. Notice the toolpaths in the reflection of the upper left hand corner. Click to embiggen.[Jason] is using a 3D printer, a series of very specialized techniques, and a software stack that includes a half-dozen programs to print multicolor 2D scenes. This isn’t pigment, paint, dye, or ink; the artwork becomes a single piece of plastic with individual colors laid down one at a time.
The best example of [Jason]’s work is a copy of a paint by numbers scene. Here, [Jason] makes an outline of all the shapes, separates onto different layers by color, and prints each color, one layer at a time. It’s an incredibly labor-intensive process to even get models into a slicer. Actually printing the model is even more difficult. [Jason]’s paint by numbers scene uses about twelve different colors.
[Jason]’s 3D printed paint by numbers scene. About a dozen different colors were used for this print.We’ve seen [Jason]’s work at MRRF before, including last year’s exhibition of a fantastic chocolate clock that was a 3D printed version of an old scroll saw pattern. Taking what is normally a 2D design and translating that into something that can be built with a 3D printer seems to be [Jason]’s forte, and the results are remarkable. If you don’t know what you were looking at, you would just think these art pieces are a strange industrial fabrication process. Once you look closer, you have an immediate respect for the artistry and craftsmanship that went into a sheet of plastic only a few millimeters thick and no bigger than a piece of paper.
[Jason] hasn’t documented his build process for these 2D pictures on a 3D printer quite yet. There’s a reason for that: it’s supposedly very complicated, and it’s going to take a while to get all the documentation together. Eventually, the process will be documented and a tutorial will pop up on [Jason]’s website. He’s also on Thingiverse, with a few semi-related designs available for download.
From what we’ve seen at MRRF, in the next few years, a dual extrusion printer will be a necessity. While dual extrusion won’t be able to recreate such colorful pictures, it will make the creation of these 2D plastic panels much easier, and they will surely be popular. We can’t wait to see what [Jason] comes up with next.
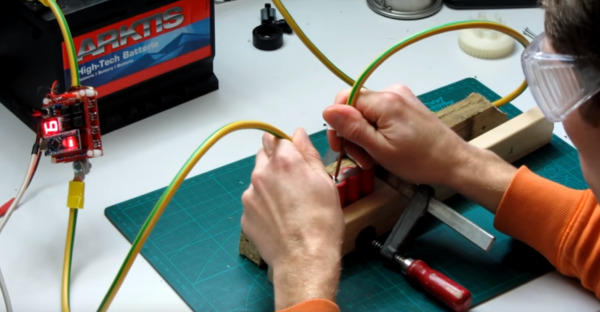
Soldering might look like a tempting and cheap alternative when building or repairing a battery pack, but the heat of the iron could damage the cell, and the resulting connection won’t be as good as a weld. Fortunately, though, a decent spot welder isn’t that tough to build, as [KaeptnBalu] shows us with his Arduino-controlled battery spot welder.
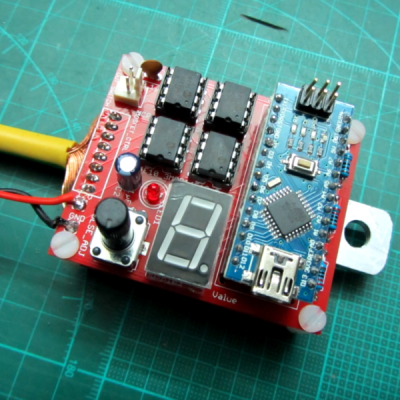
When it comes to delivering the high currents necessary for spot welding, the Arduino Nano is not necessarily the first thing that comes to mind. But the need for a precisely controlled welding pulse makes the microcontroller a natural for this build, as long as the current handling is outsourced. In [KaeptnBalu]’s build, he lets an array of beefy MOSFETs on a separate PCB handle the welding current. The high-current wiring is particularly interesting – heavy gauge stranded wire is split in half, formed into a U, tinned, and each leg gets soldered to the MOSFET board. Welding tips are simply solid copper wire, and the whole thing is powered by a car battery, or maybe two if the job needs extra amps. The video below shows the high-quality welds the rig can produce.
Spot welders are a favorite on Hackaday, and we’ve seen both simple and complicated builds. This build hits the sweet spot of complexity and functionality, and having one on hand would open up a lot of battery-hacking possibilities.

![[Jason Preuss]' multicolor 2D print. Notice the toolpaths in the reflection. Click to embiggen.](https://hackaday.com/wp-content/uploads/2016/03/p2pchristmastree.jpg)
![[Jason]'s 3D printed paint by numbers scene. About a dozen different colors were used for this print.](https://hackaday.com/wp-content/uploads/2016/03/pppaintbynumber.jpg)
 When it comes to delivering the high currents necessary for spot welding, the Arduino Nano is not necessarily the first thing that comes to mind. But the need for a precisely controlled welding pulse makes the microcontroller a natural for this build, as long as the current handling is outsourced. In [KaeptnBalu]’s build, he lets an array of beefy MOSFETs on a separate PCB handle the welding current. The high-current wiring is particularly interesting – heavy gauge stranded wire is split in half, formed into a U, tinned, and each leg gets soldered to the MOSFET board. Welding tips are simply solid copper wire, and the whole thing is powered by a car battery, or maybe two if the job needs extra amps. The video below shows the high-quality welds the rig can produce.


