The Internet Enabled Kill-A-Watt

The Internet of Things has been applied to toasters, refrigerators, Christmas lights, Barbies, and socks. Unsurprisingly, the Internet of Things has yet to happen – that would require a useful application of putting the Internet in random devices. One of the best ideas is a smart electric meter, but the idea behind this is to give the power company information on how much electricity you’re using, not give you an idea of how much power you’re pulling down. The answer to this is the Internet-enabled Kill-A-Watt, and that’s exactly what [Solenoid] is building for his entry into the Hackaday Prize.

Modern power meters have an LED somewhere on the device that blinks every time a Watt is used. This is the data [Solenoid]’s creation is pushing up to the Internet to relay power consumption to himself or anyone else in the world.

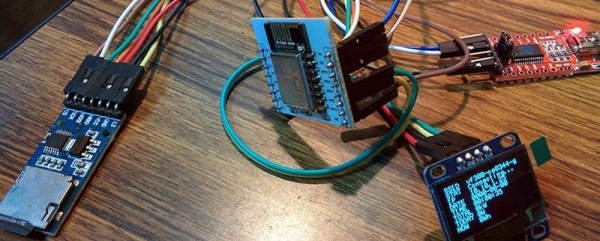
The hardware, like many upcoming Hackaday Prize entries, we’re sure, is based on the ESP8266 WiFi module, with a light sensor, SD card reader, and OLED display. It’s meant to mount directly to a power meter, recording power consumption and pushing that data up the network. It’s simple, but it also allows for very granular monitoring of [Solenoid]’s power consumption, something the electric company’s smart meters can’t compete with.

The HackadayPrize2016 is Sponsored by:

Oscillator Design By Simulation

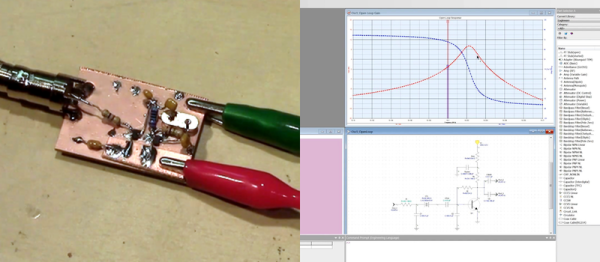
[Craig] wanted to build a 19.2 MHz crystal oscillator. He knew he wanted a Pierce oscillator, but he also knew that getting a good design is often a matter of trial and error. He used a 30-day trial of a professional simulation package, Genesys from Keysight, to look at the oscillator’s performance without having to build anything. He not only did a nice write up about his experience, but he also did a great video walkthrough (see below).

The tool generates a sample schematic, although [Craig] deleted it and put his own design into the simulator. By running simulations, he was able to look at the oscillator’s performance. His first cut showed that the circuit didn’t meet the Barkhausen criteria and shouldn’t oscillate. Unfortunately, his prototype did, in fact, oscillate.

Continue reading “Oscillator Design By Simulation”

Converting A GameCube Controller To USB

The GameCube controller is a favorite among the console enthusiasts new and old, and with Nintendo’s recent release of the Smash Bros. edition of this controller, this is a controller that has been in production for a very, very long time. [Garrett] likes using the GameCube controller on his PC, but this requires either a bulky USB adapter, or an off-brand GameCube ‘style’ controller that leaves something to be desired. Instead of compromising, [Garrett] turned his GameCube controller into a native USB device with a custom PCB and a bit of programming.

First, the hardware. [Garrett] turned to the ATtiny84. This chip is the big brother of the ubiquitous 8-pin ATtiny85. The design of the circuit board is just under a square inch and includes connections for the USB differential pairs, 5V, signal, and ground coming from the controller board.

The software stack includes the micronucleus bootloader for USB firmware updates and V-USB to handle the USB protocol. There are even a few additions inspired by [Garrett]’s earlier shinewave controller mod. This controller mod turns the GameCube controller into a glowing hot mess certain to distract your competitors while playing Super Smash Bros. It’s a great mod, and since [Garrett] kept the board easily solderable, it’s something that can be easily retrofitted into any GameCube controller.

Quick And Easy Pressure Forming Makes Plexiglas Domes

Thermoplastics are amazingly versatile materials. Apply some heat, add a little force, and within seconds you’ve got a part. It’s not always quite that simple, but as [maxelrad] discovered, sometimes thermoforming can be as easy as blowing up a balloon.

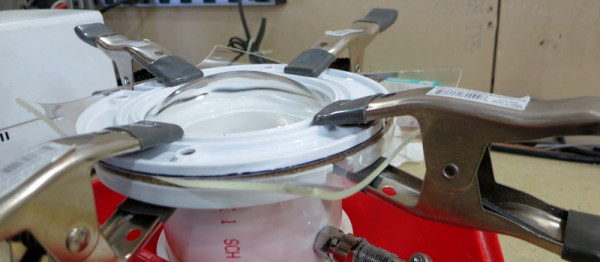
In need of a cowling for an exterior light fixture on an experimental aircraft, [maxelrad] turned to pressure forming of Plexiglas for the hemispherical shape he needed. His DIY forming rig was a plumbing-aisle special: PVC pipe and caps, some air hose and fittings, and a toilet flange for the pressure chamber. The Plexiglas was softened in a toaster oven, clamped over the business end of the chamber, and a few puffs of air inflated the plastic to form a dome. [maxelrad] points out that a template could be applied over the plastic sheet to create the streamlined teardrop shape he needs, and he notes that the rig would likely work just as well for vacuum forming. Of course, a mold could be substituted for the template to make this a true blow-molding outfit, but that would take away from the simplicity of this solution.

There have been a fair number of thermoforming projects featured on Hackaday before, from this DIY vacuum former to a scratch-built blow molder. And while we really like the simplicity of [maxelrad]’s technique, what we’d really love to see is some details on that airplane build.

Embed With Elliot: ARM Makefile Madness

To wrap up my quick tour through the wonderland of make and makefiles, we’re going to look at a pair of possible makefiles for building ARM projects. Although I’m specifically targeting the STM32F407, the chip on a dev board that I have on my desk, it’s reasonably straightforward to extend these to any of the ST ARM chips, and only a bit more work to extend it to any ARM processor.

If you followed along in the first two installments of this series, I demonstrated some basic usages of make that heavily leveraged the built-in rules. Then, we extended these rules to cross-compile for the AVR series of microcontrollers. Now we’re going to tackle a more complicated chip, and that’s going to mean compiling with support libraries. While not required, it’s a lot easier to get an LED blinking on the ARM platforms with some additional help.

One of the main contributions of an IDE like Arduino or mbed or similar is the ease of including external libraries through pull-down menus. If you’ve never built a makefile-based project before, you might be surprised how it’s not particularly more difficult to add libraries to your project.
Continue reading “Embed With Elliot: ARM Makefile Madness”

Electric Compass For A Plasma Cutter

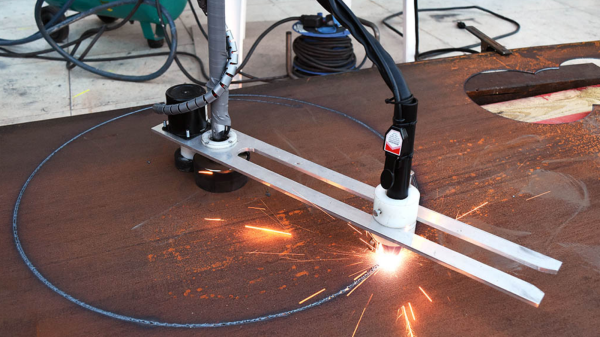
If you are a Maker space or individual lucky enough to own a Plasma Cutter, this electric protractor compass could be handy. The folks over at [MakeItExtreme] built this circle cutting tool to help cut circles and rings in thick metal sheets using their plasma cutter.

The whole thing is built around an electro-magnet, so the jig will only work with magnetic metals. There are not a lot of design details, but it’s possible to infer how to build one looking at the video and the photos on their blog. There’s a couple of nice hacks along the way. Since the electro-magnet is stationary while the rest of the jig rotates, the main mounting bolt had a hole drilled through it to help route the cable. The rotating protractor arm is made from a slab of aluminium and holds all the other parts together – the drive motor, the central hub and the plasma head. The motor used appears to be a 60rpm AC synchro motor. These types usually have an RC phase shifting network between the two coils to allow direction reversal. Friction drive is used to rotate the jig, with the friction coming from a pair of rubber tube bands attached to the electro-magnet and the motor drive hub. The plasma head holder has a rod-end with a roller bearing attached, acting as a caster wheel, ensuring the arc gap is maintained as the jig rotates. A few switches to activate the electro-magnet, motor forward / reverse and plasma enable complete the setup.

Their blog, and YouTube channel has a lot of other interesting projects that they keep building. Check it out.

Continue reading “Electric Compass For A Plasma Cutter”

Enzymes From The Deep – The Polymerase

Our bodies rely on DNA to function, it’s often described as “the secret of life”. A computer program that describes how to make a man. However inaccurate these analogies might be, DNA is fundamental to life. In order for organisms to grown and replicate they therefore need to copy their DNA.

dna-replication
DNA structure and replication

Since the discovery of its structure in 1953, the approximate method used to copy DNA has been obvious. The information in DNA is encoded in 4 nucleotides (which in their short form we call A,T,G, and C). These couple with each other in pairs, forming 2 complimentary strands that mirror each other. This structure naturally lends itself to replication. The two strands can dissociate (under heat we call this melting), and new strands form around each single stranded template.

However, this replication process can’t happen all by itself, it requires assistance. And it wasn’t until we discovered an enzyme called the DNA polymerase that we understood how this worked. In conjunction with other enzymes, double stranded DNA is unwound into 2 single strands which are replicated by the polymerase.

Continue reading “Enzymes From The Deep – The Polymerase”