Hackaday Dictionary: Software Defined Radio (SDR)

We are entering a new era of radio technology. A new approach to building radios has made devices like multi-band cell phones and the ubiquitous USB TV receivers that seamlessly flit from frequency to frequency possible. That technology is Software Defined Radio, or SDR.

A idealized radio involves a series of stages. Firstly, an antenna receives the radio signal, converting it into an electrical signal. This signal is fed into a tuned resonator which is tuned to a particular frequency. This amplifies the desired signal, which is then sent to a demodulator, a device which extracts the required information from the carrier signal. In a simple radio, this would be the audio signal that was encoded by the transmitter. Finally, this signal is output, usually to a speaker or headphones.

A replica foxhole crystal set. Photo: Bill Jackson

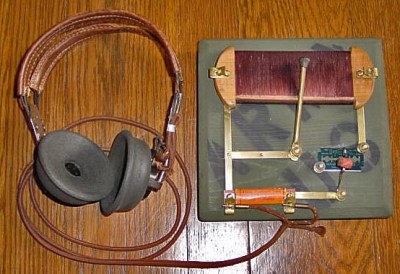
That’s how your basic crystal radio works: more sophisticated radios will add features like filters that remove unwanted frequencies or additional stages that will process the signal to create the output that you want. In an FM radio, for example, you would have a stage after the demodulator that detects if the signal is a stereo one, and separates the two stereo signals if so.

To change the frequency that this radio receives, you have to change the frequency that the resonator is tuned to. That could mean moving a wire on a crystal, or turning a knob that controls a variable capacitor, but there has to be a physical change in the circuit. The same is true of the additional mixing stages that refine the signal. These circuits may be embedded deeply in the guts of the radio, but they are still there. This is the limitation with normal receivers: the radio can’t receive a signal that is outside the range that the resonator circuit can tune to, or change the way it is demodulated and processed. If you want to receive multiple frequency bands or different types of signals, you need to have separate pathways for each band or type of signal, physically switching the signal between them. That’s why you have physical AM/FM switches on radios: they switch the signal from an AM radio processing path to an FM one.

Software Defined Radios remove that requirement. In these, the resonator and demodulator parts of the radio are replaced by computerized circuits, such as analog to digital converters (ADCs) and algorithms that extract the signal from the stream of data that the ADCs capture. They can change frequencies by simply changing the algorithm to look for another frequency: there is no need for a physical change in the circuit itself. So, an SDR radio can be tuned to any frequency that the ADC is capable of sampling: it is not restricted by the range that a resonator can tune to. Similarly, the demodulator that extracts the final signal you want can be updated by changing the algorithm, changing the way the signal is processed before it is output.

This idea was first developed in the 1970s, but it didn’t really become practical until the 1990s, when the development of flexible field-programmable gate array (FPGA) chips meant that there was enough processing power available to create single chip SDR devices. Once programmed, an FPGA has no problem handing the complex tasks of sampling, demodulating and processing in a single device.

Most modern SDRs don’t just use a single chip, though. Rather than directly converting the signal to digital, they use an analog front end that receives the raw signal, filters it and converts it down to a fixed frequency (called the intermediate frequency, or IF) that the ADCs in the FPGA can more easily digitize. This makes it cheaper to build: by converting the frequency of the signal to this intermediate frequency, you can use a simpler FPGA and a cheaper ADC, because they don’t have to directly convert the maximum frequency you want to receive, only the IF. As long as the front end can convert a band of signals down to an intermediate frequency that the FPGA can digitize, the SDR can work with it.

bladerf
The BladeRF, a modern SDR device that can receive and transmit signals between 300 MHz and 3 GHz

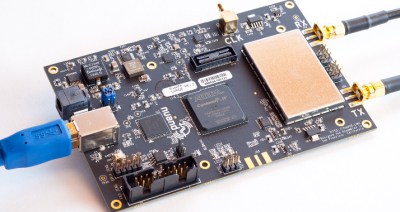
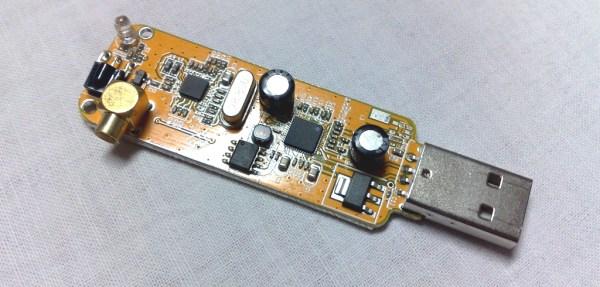
This flexibility means that SDR devices can handle a huge range of signals at relatively low cost. The $420 BladeRF, for instance, can receive and transmit signals from 300 MHz to 3.8 GHz at the same time, while the $300 HackRF One can work with signals from 1 MHz up to an incredible 6 GHz. The ability of the BladeRF to both receive and transmit means that you can use it to build your own GSM phone network, while the low cost of the HackRF One makes it a favorite of radio hackers who want to do things like make portable radio analyzers. Mass produced models are even cheaper: by hacking a $20 USB TV receiver that contains an SDR, you can get a radio that can, with a suitable antenna, do things like track airplanes or receive satellite weather images. And all of this is possible because of the idea of Software Defined Radio.

[Main image source: DVB dongle by Dsimic on Wikipeda CC-BY-SA]

An Arcade Bar And Hackerspace, All In One

Hamvention was last weekend, and just like Hackaday’s expedition to Maker Faire, it was only fitting to find a bunch of Hackaday fans and take over a bar. This was in Dayton, Ohio, and you would think the nightlife for Hamvention would be severely lacking. Not so, as downtown Dayton is home to Proto BuildBar, a bar, arcade, and hackerspace all wrapped into one.

We’ve heard about Proto BuildBar a few years ago when it first opened. The idea is relatively simple; instead of having a hackerspace, with alcohol and video games on the side, Proto BuildBar is first and foremost a bar, with 3D printing services, a few workstations for soldering, and a few arcade games. It’s the perfect place for an impromptu meetup.

Continue reading “An Arcade Bar And Hackerspace, All In One”

Hackaday Prize Needs You: Build For Citizen Scientists

Humanity is better when we work together. Nowhere is this more true than when it comes to Citizen Scientists — the concept that scientific advancement isn’t reserved to the trained professionals, but benefits when a larger population of thinkers collaborates with the community of trained researchers. This is the goal of the Citizen Scientist challenge round for the Hackaday Prize. Let’s build something that enables citizens to be scientists.

We’ll divide $20,000 evenly between twenty projects that target Citizen Scientists. Enter now and build your prototype by July 11th for your chance to win. Even better, if you are selected as one of those 20 finalists you’ll compete for the top prizes, $150k and a residency at the Supplyframe Design Lab in Pasadena. Second through fifth place finishers will get $25k, $10k, $10k, and $5k.

ramanPi You love design challenges and this one has powerful potential. We’ve seen builds like this in the finals during previous years of the Hackaday Prize. In 2014, RamanPi was recognized as the 5th place winner. The project seeks to reduce the expense of acquiring a Raman Spectrometer which is used for analyzing chemical substances. The design used parametric models for the optic jigs used by the machine. The idea is that a university could buy their own optics, adjust the models for the properties of those lenses and mirrors, then 3D print the parts to build the apparatus.

open-science-tricorderAlso a winner in 2014, the Open Science Tricorder was recognized as the fourth place finisher. Based on the form factor and functionality of the iconic Star Trek technology, the Open Science Tricorder combines three or more sensor technologies with a user interface. It provides a hands-on experience for students learning about the properties of the world around them, and a handheld sensor suite to anyone interested in undertaking their own research projects.

The Citizen Scientist challenge round begins right now. Get started on your build today and show us what you can do to solve a technology problem with your prototyping skills. Good luck!

The HackadayPrize2016 is Sponsored by:

Radio Shack Returns

In February 2015, Radio Shack–an icon in American malls and towns–filed for bankruptcy. You could say a lot of critical things about Radio Shack, but in many parts of the country, it was the only place you were going to go find electronic components on short notice. A lot of people of a certain age got their exposure to electronics via Radio Shack kits and parts.

Radio Shack did close a lot of stores. In fact, from 4,000 stores they are down to about 1,700. A New York hedge fund named Standard General bought all the Radio Shack assets and formed a new company (also called, oddly enough, Radio Shack). They just named [Dene Rogers] as CEO. He’s a veteran at retail sales, having been with Target in Australia and Sears in Canada.

Continue reading “Radio Shack Returns”

OpenThread, A Solution To The WiFi Of Things

The term ‘Internet of Things’ was coined in 1999, long before every laptop had WiFi and every Starbucks provided Internet for the latte-sucking masses. Over time, the Internet of Things meant all these devices would connect over WiFi. Why, no one has any idea. WiFi is terrible for a network of Things – it requires too much power, the range isn’t great, it’s beyond overkill, and there’s already too many machines and routers on WiFi networks, anyway.

There have been a number of solutions to this problem of a WiFi of Things over the years, but none have caught on. Now, finally, there may be a solution. Nest, in cooperation with ARM, Atmel, dialog, Qualcomm, and TI have released OpenThread, an Open Source implementation of the Thread networking protocol.

The physical layer for OpenThread is 802.15.4, the same layer ZigBee is based on. Unlike ZigBee, the fourth, fifth, and sixth layers of OpenThread look much more like the rest of the Internet. OpenThread features IPv6 and 6LoWPAN, true mesh networking, and requires only a software update to existing 802.15.4 radios.

OpenThread is OS and platform agnostic, and interfacing different radios should be relatively easy with an abstraction layer. Radios and networking were always the problem with the Internet of Things, and with OpenThread – and especially the companies supporting it – these problems might not be much longer.

Hackaday Prize Entry: Raspberry Pi Zeros And Drones

How do you get eyeballs on a blog post? Put Raspberry Pi Zero in the headline. How do you get even more eyeballs? Put the word drone in there too. Lucky for us, there’s one very special project in the Hackaday Prize that combines both. It’s the Pi0drone from [Victor], and it’s exactly what it looks like: a flying Raspberry Pi Zero.

[Victor] has been working on the PXFmini, a ‘shield’ or ‘hat’ for the Raspberry Pi that integrates a barometer, IMU, and a few PWM outputs into a very small form factor that is just a shade larger than the Raspberry Pi Zero itself. It comes with standard connector ports for UART and I2C to attach GPS and on screen display for FPV flying.

Of course, there are dozens of flight controllers for drones and quads out there, but very few are running Linux, and even fewer platforms are as well supported as the Raspberry Pi. To leverage this, [Victor] is running Dronecode on the Pi for mission planning, real autopilot, and everything else that turns a remote controlled quadcopter into a proper drone. It works, and it’s flying, and you can check out the video proof below.

Continue reading “Hackaday Prize Entry: Raspberry Pi Zeros And Drones”

Making Springs At Home

[This Old Tony] teaches us how to make springs on a lathein this video done in the style of How It’s Made. Mixed in with snark, in his usual style, is a lot of useful information.

The Machinery’s Handbook certainly has all the information one would need to design the basic spring shapes, but it’s not always necessary. [Tony] points out that cheating is entirely acceptable. For example, if you need a spring that’s close to the dimensions of a standard spring, simply copy over the values from the standard spring. He explains all the terminology needed to decrypt the pages in your engineering tome of choice.

He shows the basics of winding a spring on a mandrel (or that round metal thing, if you want to use the industry term). First wind the inactive coils, then set your lathe to the desired spring pitch. Engage it as if threading, then disengage and wind the final inactive coils. A quick trip to the sander squares the ends of a standard coil spring. However, the tools can also be used to make torsion springs, or even exotic combination springs.

For a good… educational laugh, watch the whole video after the break.

Continue reading “Making Springs At Home”