We love to pretend like our components are perfect. Resistors don’t have capacitance or inductance. Wires conduct electricity perfectly. The reality, though, is far from this. It is easy to realize that wire will have some small resistance. For the kind of wire lengths you usually encounter, ignoring it is acceptable. If you start running lots of wire or you are carrying a lot of current, you might need to worry about it. Really long wires also take some time to get a signal from one end to the other, but you have to have a very long wire to really worry about that. However, all wires behave strangely as frequency goes up.
Of course there’s the issue of the wire becoming a significant part of the signal’s wavelength and there’s always parasitic capacitance and inductance. But the odd effect I’m thinking of is the so-called skin effect, first described by [Horace Lamb] in 1883. [Lamb] was working with spherical conductors, but [Oliver Heaviside] generalized it in 1885.
Put simply, when a wire is carrying AC, the current will tend to avoid traveling in the center of the wire. At low frequencies, the effect is minimal, but as the frequency rises, the area in the center that isn’t carrying current gets larger. At 60 Hz, for example, the skin depth for copper wire — the depth where the current falls below 1/e of the value near the surface — is about 0.33 inches. Wire you are likely to use at that frequency has a diameter less than that, so the effect is minimal.
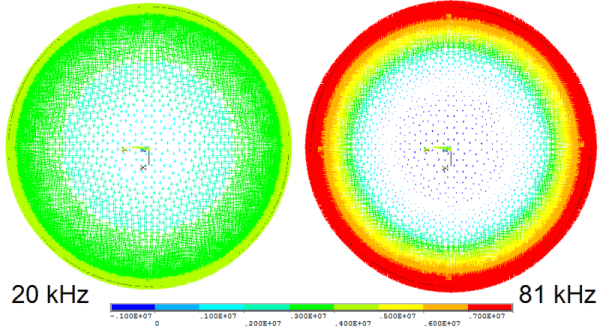
 However, consider a 20 kHz signal — a little high for audio unless you are a kid with good ears. The depth becomes about 0.018 inches. So wire bigger than 0.036 inches in diameter will start losing effective wire size. For a 12-gauge wire with a diameter of 0.093 inches, that means about 25% of the current-handling capacity is lost. When you get to RF and microwave frequencies, only the thinnest skin is carrying significant current. At 6 MHz, for example, copper wire has a skin depth of about 0.001 inches. At 1 GHz, you are down to about 0.000081 inches. You can see this (not to scale) in the accompanying image. At DC, all three zones of the wire carry current. At a higher frequency, only the outer two zones carry significant current. At higher frequencies, only the outer zone is really carrying electrons.