Functioning Technic SLJ900 Bridge Builder

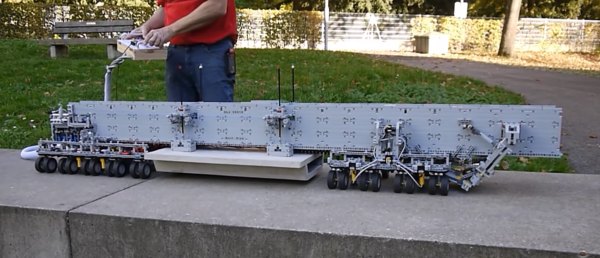
There is definitely a passion for detail and accuracy among LEGO builders who re-create recognizable real-world elements such as specific car models and famous buildings. However, Technic builders take it to a level the regular AFOLs cannot: Not only must their model look like the original, it has to function the same way. Case in point, [Wolf Zipp]’s version of a massive bridge-building rig. The Chinese-built SLJ900 rolls along the tops of bridges and adds ginormous concrete spans with the aplomb found only in sped-up YouTube videos. It is nevertheless a badass robot and a worthy target for Technicization.

[Wolf]’s model is 2 meters long and weighs 10.5kg, consisting of 13 LEGO motors and a pneumatic rig, all run by a handheld control box. The rig inserts LEGO connectors to a simulated bridge span, lifts it up, moves it over the next pier, then drops it down into place. The span weighs 2.5kg by itself — that ain’t no styrofoam! There are a lot of cool details in the project. For instance, the mechanism that turns the wheels for lateral movement consists of a LEGO-built pneumatic compressor that trips pneumatic actuators that lift the wheels off the ground and allows them to turn 90 degrees.

Sometimes it blows the mind what can be built with Technic. Check out this rope-braiding machine and this 7-segment display we’ve posted. Continue reading “Functioning Technic SLJ900 Bridge Builder”

Teardown Of A Cheap Glue Gun

A hot glue gun is one of those standard tools of the hardware hacker’s bench, called upon to provide adhesion between an astonishing range of materials, and to provide a handy filler and strain relief in the form of blobs of polymer glue. We’ve all got one, but how many of us have taken a look inside it?

[Andrew Lorimer] bought a super-cheap eBay glue gun, and subjected it to a teardown. As you might expect, he found it to be a pretty simple device with only a trigger mechanism and a dumb heating element, but his write-up is of passing interest because he’s characterised its heating element. It has a positive temperature coefficient, which means that its resistance increases from around 2.5 kΩ at room temperature to about 7 kΩ at its 150 ºC operating temperature. This limits the current, and provides a very simple thermostat action.

The build quality is surprisingly good for such a cheap appliance, and he notes a surfeit of screws holding its shell together. But the quality of the insulation and strain relief leaves a lot to be desired, and he wonders whether it truly qualifies for its double-insulated logo. The LED pilot light is simply fed from the 240 V mains supply through a 250 kΩ resistor which he replaces with a 12 kΩ component for a brighter result.

We cover plenty of teardowns here at Hackaday. Often they are of extremely expensive and complex devices, but sometimes they are of much simpler subjects.

Digital Panel Meter Tear Down

[Big Clive] had some 22mm digital AC voltmeters, made to put in a panel. There was a time when this would have been a significant pain, since it required you to make a large square hole. Of course, in a world of CNC and 3D printers that isn’t as big a deal as it used to be, but the ones [Clive] has are nice because having a round footprint you can drill a hole for them with a hole saw or a stepped bit. Of course, he wasn’t satisfied to just use these inexpensive meters. He had to tear one apart to look inside. You can see his review and teardown in the video below. The meters are available in a range of AC voltages, although [Clive] didn’t think the ones he had would safely handle their rated maximum.

Inside, the modules reminded us of cordwood construction in a way. Most of the electronics are on a small round board. But several components connect to the board and the bottom cap in a vertical orientation. The meters are available in several colors, but [Clive] likes the red ones as they appear brighter than the others. The voltage reading compared favorably to a Fluke meter.

Continue reading “Digital Panel Meter Tear Down”

Trinket Chills Your Drinks

Who wants warm drinks? Well, coffee drinkers, we guess. Other than them, who wants warm drinks? Tea drinkers, sure. How about room temperature drinks? No one, that’s who. It’s silly to buy a refrigerator to cool down a single drink, so what option are you left with? Ice cubes? They’ll dilute your drink. Ice packs and a cooler? Sure, they’ll keep your drinks cold, but they’re hardly cool are they? No, if you want a cold drink the cool way, you build a thermoelectric cooler. And if you want to build one, you’re in luck, because [John Park] has a tutorial to do just that up on AdaFruit.

The parts list includes an AdaFruit Trinket M0, a more powerful version of AdaFruit’s Trinket line. The Trinket is used to control the main part in this build, a Peltier thermoelectric cooler, as well as the temperature display and switches. The other part controlled by the microcontroller is a peristaltic pump, which is used to do the dispensing of the liquid. The code to control everything is written in Python as the Trinket M0 comes with AdaFruit’s CircuitPython by default. Also included in the tutorial are the files for the stand, should you want to 3D print it or cut it with a CNC or laser cutter.

After the break, you can watch as [John] goes over the project and builds it, or go to the AdaFruit website and follow the instructions to build your own. As [John] says, there might be better ways to chill your drinks, but this is “definitely one of the more science-y and interesting ones.” For more projects using the Peltier Effect, try this one that uses the effect in sous-vide cooking, or this one, a Peltier cooled micro-fridge!

Continue reading “Trinket Chills Your Drinks”

A Passion For The Best Is In Mechanical Keyboards

There is an entire subculture of people fascinated by computer keyboards. While the majority of the population is content with whatever keyboard came with their computer or is supplied by their employer — usually the bottom basement squishy membrane keyboards — there are a small group of keyboard enthusiasts diving into custom keycaps, switch mods, diode matrices, and full-blown ground-up creations.

Ariane Nazemi is one of these mechanical keyboard enthusiasts. At the 2017 Hackaday Superconference, he quite literally lugged out a Compaq with its beautiful brominated keycaps, and brought out the IBM Model M buckling spring keyboard.

Inspired by these beautiful tools of wordcraft, [Ariane] set out to build his own mechanical keyboard and came up with something amazing. It’s the Dark Matter keyboard, a custom, split, ergonomic, staggered-columnar, RGB backlit mechanical keyboard, and at the 2017 Hackaday Superconference, he told everyone how and why he made it.

Continue reading “A Passion For The Best Is In Mechanical Keyboards”

Radio Apocalypse: The GWEN System

Recent developments on the world political stage have brought the destructive potential of electromagnetic pulses (EMP) to the fore, and people seem to have internalized the threat posed by a single thermonuclear weapon. It’s common knowledge that one bomb deployed at a high enough altitude can cause a rapid and powerful pulse of electrical and magnetic fields capable of destroying everything electrical on the ground below, sending civilization back to the 1800s in the blink of an eye.

Things are rarely as simple as the media portray, of course, and this is especially true when a phenomenon with complex physics is involved. But even in the early days of the Atomic Age, the destructive potential of EMP was understood, and allowances for it were made in designing strategic systems. Nowhere else was EMP more of a threat than to the complex web of communication systems linking far-flung strategic assets with central command and control apparatus. In the United States, one of the many hardened communications networks was dubbed the Groundwave Emergency Network, or GWEN, and the story of its fairly rapid rise and fall is an interesting case study in how nations mount technical responses to threats, both real and perceived. Continue reading “Radio Apocalypse: The GWEN System”

Fail Of The Week: Cheap Chips Cause Chaos

We all know the old saw: if it’s too good to be true, it probably is. But nowhere does this rule seem to break down as regularly as when we order parts. Banggood, AliExpress, and eBay are flooded with parts ready to be magically transported across the globe to our doorsteps, all at prices that seem to defy the laws of economics.

Most of these transactions go off without a hitch and we get exactly what we need to complete our Next Cool Thing. But it’s not always so smooth, as [Kerry Wong] recently discovered with an eBay order that resulted in some suspicious chips. [Kerry] ordered the AD633 analog multiplier chips as a follow-up to his recent Lorenz Attractor X-Y recorder project, where he used an Arduino to generate the chaotic butterfly’s data set as a demo for the vintage instrument. Challenged in the comments to do it again in analog, [Kerry] did his homework and found a circuit to make it happen. The needed multipliers were $10 a pop on DigiKey, so he sourced cheaper chips from eBay. The $2 chips seemed legit, with the Analog Devices logo and everything, but the circuit didn’t work. [Kerry]’s diagnosis in the video below is interesting, and it’s clear that the chips are fakes. Caveat emptor.

Here’s hoping that [Kerry] sources good chips soon and regales us with a successful build. Until then, what are your experiences with cheap chips? Have you been burned by overseas or domestic suppliers before? Does any single supplier seem like a better bet to you, or is it all hit or miss? Sound off in the comments below.

Continue reading “Fail Of The Week: Cheap Chips Cause Chaos”