It is February of 2018. Do you remember what you were doing in December of 2012? If you’re [juppiter], you were starting your CNC Embroidery Machine which would not be completed for more than half of a decade. Results speak for themselves, but this may be the last time we see a first-generation Raspberry Pi without calling it retro.
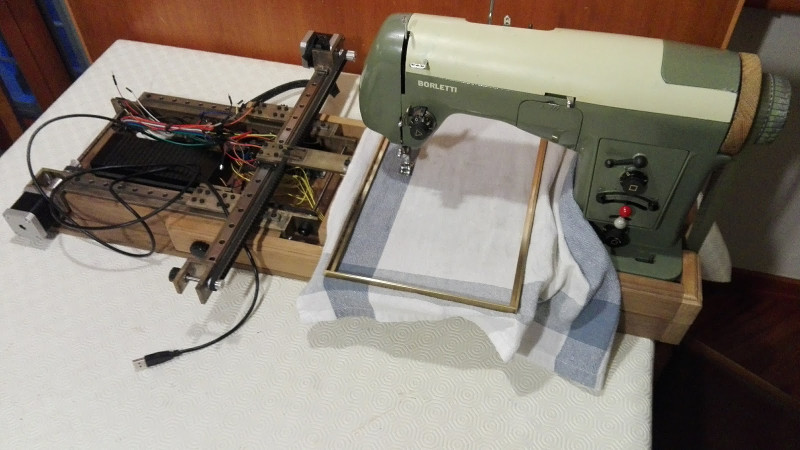
The heart of the build is a vintage Borletti sewing machine, and if you like machinery porn, you’re going to enjoy the video after the break. The brains of the machine are an Arduino UNO filled with GRBL goodness and the Pi which is running CherryPy. For muscles, there are three Postep25 stepper drivers and corresponding NEMA 17 stepper motors.
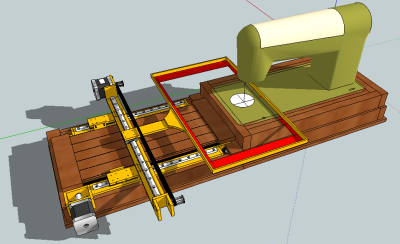
The first two axes are for an X-Y table responsible for moving the fabric through the machine. The third axis is the flywheel. The rigidity of the fabric frame comes from its brass construction which may have been soldered at the kitchen table and supervised by a big orange cat. A rigid frame is the first ingredient in reliable results, but belt tension can’t be understated. His belt tensioning trick may not be new to you, but it was new to some of us. Italian translation may be necessary.
The skills brought together for this build were vast. There was structural soldering, part machining, a microcontroller, and motion control. The first time we heard from [juppiter] was December 2012, and it was the result of a Portable CNC Mill which likely had some influence on this creation. Between then, he also shared his quarter-gobbling arcade cabinet with us.


Props, juppiter! Cool project and good read. I always love seeing old gear getting an update ????
I would never have thought to use a clothespin spring as a belt tensioner. That’s worth the price of admission right there.
I’m using a clothespin to hold the floppy drive door closed on a CP/M luggable. (the latch broke).
If I may ask, and derail the conversation a little, what kind of luggable do you have?
Openbuilds and others will sell you a belt tensioning spring that looks suspiciously like a clothespin spring but ultimately any spring in that basic configuration and approximate size and stiffness would probably do the trick and keep the belt from slipping off the pulley and skipping teeth. That is indeed a trick to remember since the dollar store down the block likely has many-packs of clothespins available _now_ for less than the shipping on a purpose-built spring.
It’s been a trick in the reprap community for years now, but it’s definitely a neat one.
I rather keep my Brother 600.
But full credit to making somthing yourself.
I have a brother SE625. My biggest issue is the difficulty of going from something like an SVG to an actual embroidered design. The software is super expensive!
Does it take standard G-code and has a serial/USB link? If it does, I would try hooking it up to Laserweb.
I write BotQueue, so if it took GCode I’d already have it connected to the cloud. ;P
But seriously, it’s got a USB A port. It takes a format called PES. You have to convert from whatever design or text format you have into that format for this machine. There’s unfortunately quite a few different formats. I should probably open the machine and see if the board has any other way to talk to it, like a debug serial port or something.
some results at http://boxedcnc.blogspot.fr/2018/02/embroidery-cnc-first-completed-work.html
Wow! Just wow!
I WANT ONE!
Great project!
Please correct me if I’m wrong, but I miss the interesting parts:
infos about his “Z-axis”
the photosensor on the shaft,
the sofware involved for getting an embroidery design into G-Code.
Got a Singer machine I inherited from my mother that does embroidery. We worked on a few projects. Have 2 issues with it. Difficult to work with Polo shirts. Can’t easily sort out how to make it work on those without getting a snag somewhere. Secondly, the bobbin runs out of thread in the middle of multi-color patches. Replacing bobbing thread requires shutting down the current job. Alignment after that is tricky at best.
Very cool! My sister has her own company which does this on large commercial machines and I’ve often wondered how easy it would be to make one of these – though it was going to be a continuous “ribbon” (for custom lanyards) design where one axis was a gripper style feeder.
Curious as to why, rather than using the original motor and sensing it’s position via a quadrature and hall sensor you ditched the original and replaced it with a stepper? I figured if you could start the X-Y movement just after the needle cleared the fabric you would have the majority of the rotation to settle the fabric in place before the needle entered it again.
You would have to synchronise the X-Y steps with feedback from the machine but that, in theory, is relatively simple.
It seems like you could even just have a simple state-machine that can power the motor and monitor a rotation sensor. You just send it a “stitch” pulse, and it goes through one needle plunge cycle, stopping at “top dead center”. The Gcode could consist of a series of G73/G8x drill cycles, one per stitch (with any desired spacing).
the brazed brass construction was a delight to behold. I think I will have another look at the scavenged sewing machine chassis sitting in the shed….
i love your software interface. Clean, simple, beautiful. i’m working at the french electrolab hackerspace with a friend on another opensource computerized embroidery project (openembroidery.com) we’re working on mechanic and software and your screen captures are a reference for me.
Thank you for this project. You’re one of the most documented on the Internet.