Hackaday Links Column Banner

Hackaday Links: December 5, 2021

Sad news from Germany, with the recent passing of a legend in the crypto community: Mr. Goxx, the crypto-trading hamster. The rodent rose to fame in the crypto community for his trades, which were generated at random during his daily exercise routines — his exercise wheel being used like a roulette wheel to choose a currency, and a pair of tunnels determined whether the transaction would be a buy or sell. His trading career was short, having only started this past June, but he was up 20% over that time — that’s nothing to sneeze at. Our condolences to Mr. Goxx’s owners, and to the community which sprung up around the animal’s antics.

It might seem a little early to start planning which conferences you’d like to hit in 2022, but some require a little more lead time than others. One that you might not have heard of is DINACON, the Digital Naturalism Conference, which explores the intersection of technology and the natural world. The con is set for the entire month of July 2022 and will be held in Sri Lanka. It has a different structure than most cons, in that participants attend for a week or so on a rotating basis, much like a biology field station summer session. It sounds like a lot of fun, and the setting couldn’t be more idyllic.

If you haven’t already killed your holiday gift budget buying NFTs, here’s something you might want to consider: the Arduino Uno Mini Limited Edition. What makes it a Limited Edition, you ask? Practically, it’s the small footprint compared to the original Uno and the castellated edges, but there are a bunch of other extras. Each elegant black PCB with gold silk screening is individually numbered and comes in presentation-quality packaging. But the pièce de résistance, or perhaps we should say the cavallo di battaglia, is that each one comes with a hand-signed letter from the Arduino founders. They honestly look pretty sharp, and at $45, it’s really not a bad collector’s piece.

And finally, the YouTube algorithm giveth again, when this infrastructure gem popped up in our feed. You wouldn’t think there’d be much of interest to see in a water main repair, but you’d be wrong, especially when that main is 50′ (15 m) below the surface, and the repair location is 600′ (183 m) from the access hatch. Oh yeah, and the pipe is only 42″ (1 m) in diameter, and runs underneath a river. There’s just so much nope in this one, especially since the diver has to swim into a special turning elbow just to get pointed in the right direction; how he turns around to swim out is not worth thinking about. Fascinating tidbits include being able to see the gravel used to protect the pipe in the riverbed through the crack in the pipe, and learning that big water mains are not completely filled, at least judging by the small air space visible at the top of the pipe. Those with claustrophobia are probably best advised to avoid this one, but it’s still amazing to see how stuff like this is done.

Continue reading “Hackaday Links: December 5, 2021”

Arduino Wannabe Should Have Used A 555. Oh Wait, It Does.

It’s a little known secret that when the Hackaday writers gather in their secret underground bunker to work on our plans for world domination, we often take breaks to play our version of the corporate “Buzzword Bingo”, where paradigms are leveraged and meetings circle back to loop in offline stakeholders, or something like that. Our version, however, is “Comment Line Bingo”, and right in the middle of the card is the seemingly most common comment of all: “You should have used a 555,” or variations thereof.

So it was with vicious glee that we came across the Trollduino V1.0 by the deliciously named [Mild Lee Interested]. It’s the hardware answer to the common complaint, which we’ll grant is often justified. The beautiful part of this is that Trollduino occupies the same footprint as an Arduino Uno and is even pin-compatible with the microcontroller board, or at least sort of. The familiar line of components and connectors sprout from the left edge of the board, and headers for shields line the top and bottom edges too. “Sketches” are implemented in hardware, with jumpers and resistors and capacitors of various values plugged in to achieve all the marvelous configurations the indispensable timer chip can be used for. And extra points for the deliberately provocative use of Comic Sans in the silkscreen.

Hats off to [Lee] for a thoroughly satisfying troll, and a nice look at what the 555 chip can really do. If you want a more serious look at the 555, check out this 555 modeled on a breadboard, or dive into the story of the chip’s development.

KVM Uses Many Arduinos

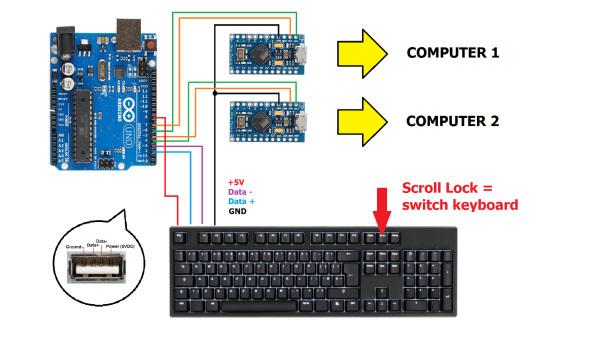
The Arduino platform is one of the most versatile microcontroller boards available, coming in a wide variety of shapes and sizes perfect for everything from blinking a few LEDs to robotics to entire home automation systems. One of its more subtle features is the ability to use its serial libraries to handle keyboard and mouse duties. While this can be used for basic HID implementations, [Nathalis] takes it a step further by using a series of Arduinos as a KVM switch; although admittedly without the video and mouse functionality yet.

To start, an Arduino Uno accepts inputs from a keyboard which handles the incoming serial signals from the keyboard. From there, two Arduino Pro Micros are attached in parallel and receive signals from the Uno to send to their respective computers. The scroll lock key, which doesn’t do much of anything in modern times except upset Excel spreadsheeting, is the toggle switch between the two outputs. Everything is standard USB HID, so it should be compatible with pretty much everything out there. All of the source code and schematics are available in the project’s repository for anyone who wants to play along at home.

Using an Arduino to emulate a USB input device doesn’t have to be all work and no play, the same basic concept can also be used to build custom gaming controllers.

Blisteringly Fast Machine Learning On An Arduino Uno

Even though machine learning AKA ‘deep learning’ / ‘artificial intelligence’ has been around for several decades now, it’s only recently that computing power has become fast enough to do anything useful with the science.

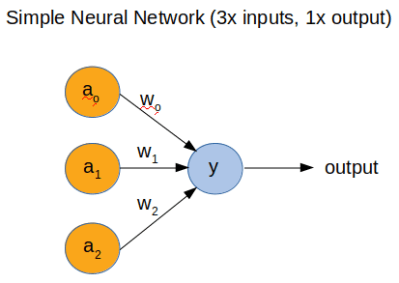
However, to fully understand how a neural network (NN) works, [Dimitris Tassopoulos] has stripped the concept down to pretty much the simplest example possible – a 3 input, 1 output network – and run inference on a number of MCUs, including the humble Arduino Uno. Miraculously, the Uno processed the network in an impressively fast prediction time of 114.4 μsec!

Whilst we did not test the code on an MCU, we just happened to have Jupyter Notebook installed so ran the same code on a Raspberry Pi directly from [Dimitris’s] bitbucket repo.

He explains in the project pages that now that the hype about AI has died down a bit that it’s the right time for engineers to get into the nitty-gritty of the theory and start using some of the ‘tools’ such as Keras, which have now matured into something fairly useful.

In part 2 of the project, we get to see the guts of a more complicated NN with 3-inputs, a hidden layer with 32 nodes and 1-output, which runs on an Uno at a much slower speed of 5600 μsec.

This exploration of ML in the embedded world is NOT ‘high level’ research stuff that tends to be inaccessible and hard to understand. We have covered Machine Learning On Tiny Platforms Like Raspberry Pi And Arduino before, but not with such an easy and thoroughly practical example.

Arduino And Pi Share Boardspace

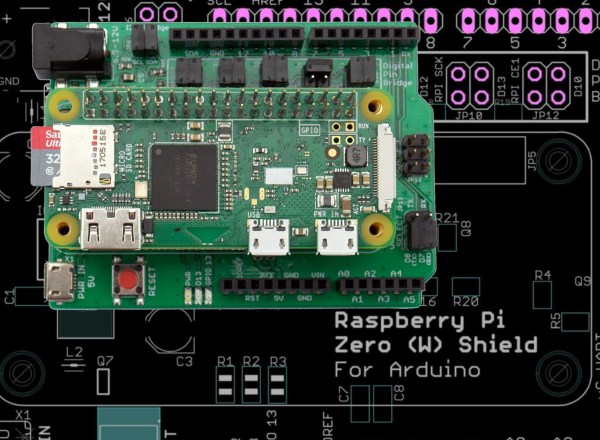
A Raspberry Pi Zero (W) and Arduino are very different animals, the prior has processing power and connectivity while the latter has some analog to digital converters (ADCs) and nearly real-time reactions. You can connect them to one another with a USB cable and for many projects that will happily wed the two. Beyond that, we can interface this odd couple entirely through serial, SPI, I2C, and logic-level signaling. How? Through a device by [cburgess] that is being called an Arduino shield that supports a Pi0 (W). Maybe it is a cape which interfaces with Arduino. The distinction may be moot since each board has a familiar footprint and both of them are found here.

Depending on how they are set up and programmed, one can take control over the other, or they could happily do their own thing and just exchange a little information. This board is like a marriage counselor between a Raspberry Pi and an Arduino. It provides the level-shifting so they don’t blow each other up and libraries so they can speak nicely to one another. If you want to dig a bit deeper into this one, design files and code examples are on available.

Perhaps we’ll report on this board at the heart of a pinball machine retrofit, a vintage vending machine restoration, or maybe a working prop replica from the retro bar in Back to the Future II.

Arduino Gets A Command Line Interface

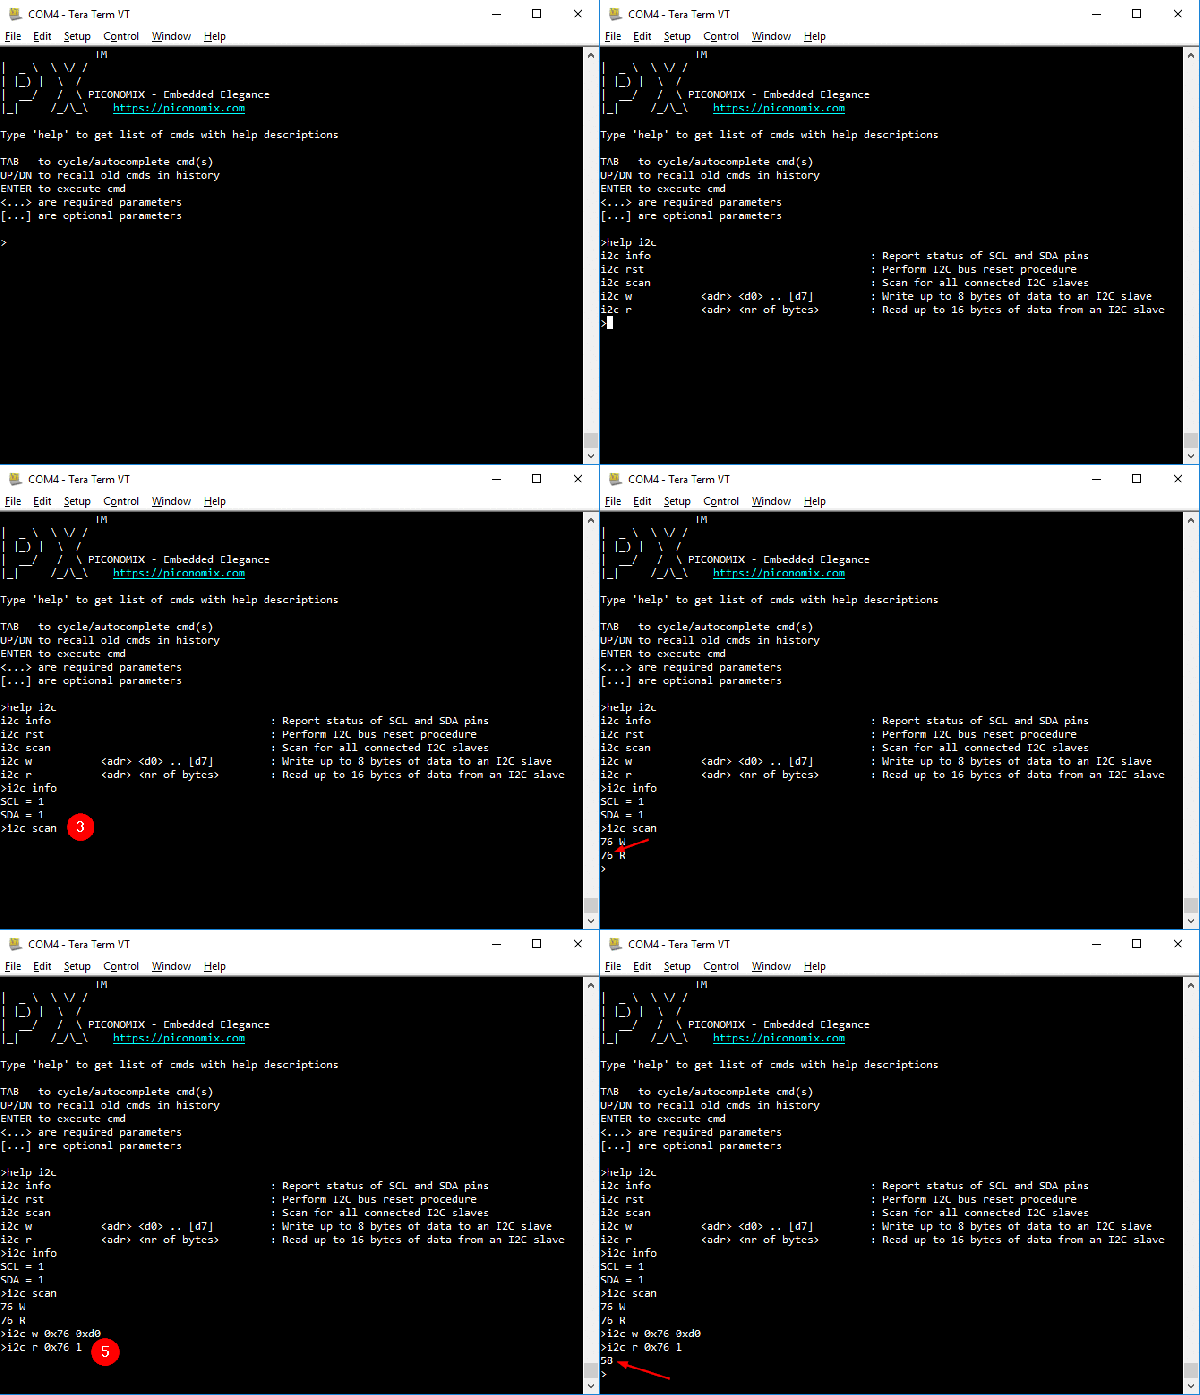
When using an Arduino, at least once you’ve made it past blinking LEDs, you might start making use of the serial connection to send and receive information from the microcontroller. Communicating with the board while it’s interacting with its environment is a crucial way to get information in real-time. Usually, that’s as far as it goes, but [Pieter] wanted to take it a step farther than that with his command line interpreter (CLI) for the Arduino.

The CLI allows the user to run Unix-like commands directly on the Arduino. This means control of GPIO and the rest of the features of the microcontroller via command line. The CLI communicates between the microcontroller and the ANSI/VT100 terminal emulator of your choosing on your computer, enabling a wealth of new methods of interacting with an Arduino.

The CLI requires a hex file to be loaded onto the Arduino that you can find at a separate site, also maintained by [Pieter]. Once that’s running, you can get all of that sweet command line goodness out of your Arduino. [Pieter] also has some examples on his project page, as well as the complete how-to to get this all set up and running. There’s a lot going on in the command line world, in Linux as well as windows. So there’s plenty to explore there as well.

Clock Plays A Game Of Pong With Itself To Pass The Time

Would you play a game of Pong where each set lasts exactly one minute and the right player is guaranteed to win 60 times more than the left player? Of course not, but if you were designing a clock that displays the time using a Pong motif, then perhaps it would make sense.

There are some neat design tips in [oliverb]’s Pong Clock that are worth taking a look at. Foremost is the case, which is a retasked jewelry box with a glass lid, procured on the cheap from eBay. It’s a good size for a clock meant to be seen from across the room, and already finished to fit into modern decor. The case holds all the goodies, from the 24×16 green LED matrix display to the Uno that runs the show, as well as an RTC module, a sound chip, a temperature sensor, and a PIR module to turn the display off when the room is unoccupied. To prevent disrupting the sleek lines of the case, all the controls are mounted in a remote panel, itself a clean and modern-looking device thanks to the chrome-plated duplex outlet cover used to house it. The clock has several display modes, from normal time and temperature to a word clock, as well as the Pong mode, where the machine plays itself and the score shows the time. It’s fascinating to watch, and we like everything about it, although we think the tick-tock would drive us nuts pretty quickly.

We recently covered the life and times of [Ted Dabney], one of Pong’s fathers and co-founder of Atari. We tend to think he’d like the design of this clock, both as a nod to his game and for its simple but functional design.

Continue reading “Clock Plays A Game Of Pong With Itself To Pass The Time”