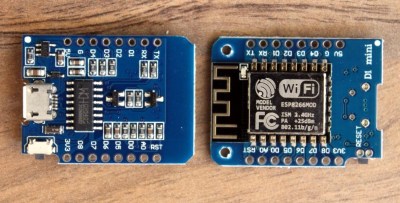
As far as ESP8266 boards go, the WeMos D1 Mini is a great choice if you’re looking to get started with hackerdom’s microcontroller du jour. It’s small, well supported, and can be had ridiculously cheap. Often going for as little as $3 USD each, we buy the things in bulk just to have spares on hand. But that’s not to say it’s a perfect board. For one, it lacks the customary mounting holes which would allow you to better integrate it into finished products.
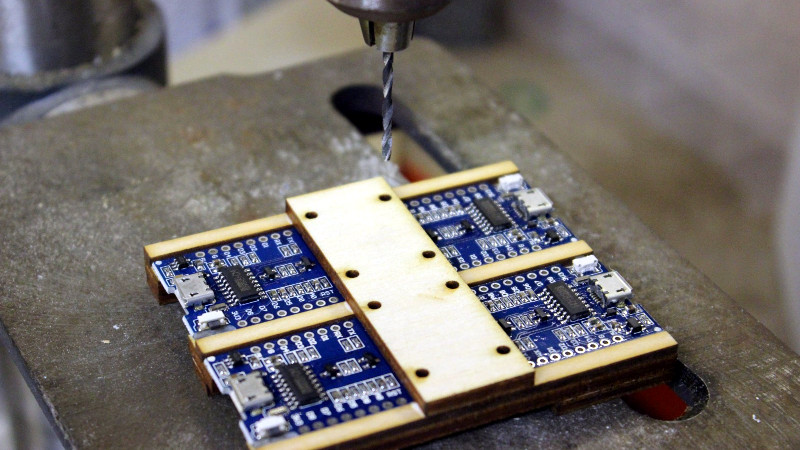
 This minor annoyance was enough to spring [Martin Raynsford] into action. He noticed there was some open area on the D1 Mini’s PCB where it seemed he could drill through to add his own mount points, but of course popping holes in a modern PCB can be risky business. There’s not a lot of wiggle room between success and heartbreak, and it’s not like the diminutive D1 Mini is that easy to hold down to begin with. So he designed a laser-cut jig to allow him to rapidly add mounting holes to his D1 Mini’s assembly line style.
For those who might be skeptical, [Martin] reports he’s seen no adverse effects from drilling through the board, though does admit it’s possible the close proximity of the metal screw heads to the ESP8266’s antenna may have a detrimental effect. That said, he’s tested them in his projects out to 25 m (82 feet) with no obvious problems. He’s using a 2 mm drill bit to make his hole, and M2 x 6 mm machine screws to hold the boards down.
The jig design is released as a SVG and DXF for anyone with a laser cutter to replicate, but it shouldn’t be too difficult to extrude those designs in the Z dimension for hackers who haven’t yet jumped on the subtractive manufacturing bandwagon.
When a project makes the leap from prototype to in-house production, designing and building jigs become an essential skill. From flashing firmware to doing final checkout, the time and effort spent building a jig early on will pay for itself quickly in production.


You could use nylon screws by the antenna traces
If he can make a jig to hold the board securely enough to drill it why can’t he use a snap in edge mounting?
He’s already made a board mount just so he can drill some holes.
Something similar would be more than adequate to hold the board.
I have a laser cutter and everything is flat. Snap in clips are possible but add 2-3 parts to the assembly and/or require gluing. At least screws are simple. Nylon screws are definitely a good idea will have to see how they cope.
Nylon screws or zipties through the holes would neatly sidestep the near-field antenna problem.
Might want to use nylon screws/standoffs when mounting this close to a RF antenna… Keep metals away as they’ll affect the EM fields and tuning.
Rejoice ! The latest Wemos D1 mini version (3.1.0) has mounting holes. But it lost the metal shield, which concerns me a bit. By the way the version shown here are not from the genuine Wemos shop and I also got a few of those but they are a bit more temperamental when comes flashing time. But who can say what is genuine on Alibaba; even the “official” shop makes it difficult to identify it’s product by not mentioning the previous versions.
In the end I’ve purchased many dozen of D1’s and try to favor the “original” WEMOS shop (pardon, LOLIN, ~wince~) at http://www.wemos.cc
Does the new D1 mini have FCC certification, even with the shield off?
I doubt it, it’s not mentioned anywhere unlike the version with an EM shield ( version < 3.0 ) where the FCC cert is engraved on the shield.
“hackerdom’s microcontroller du jour”
Du jour?? ESP8266 has been in my parts-bin since late 2014, and the bandwagon was standing-room only by 2016.
Nice drilling jig.
Something I’ve used for mounting boards with no holes in the past is those plastic binding bars (clips long edge of a few sheets of paper together into a booklet, usually triangular section with slit along acutest angle)
One can either glue them down by the flat edge or wedge them open and drill holes in the spine and screw them down.
I wonder if the intent was that this would just be “mounted” as a daughterboard via pins soldered into the holes along the edges. This would be the way to go if another PCB was involved. Hard to make any comments without knowing what this fellows application for these are and what other options could be devised for mechanically integrating these into his project. Avoiding metal screws near the antenna does sound like a good idea.
Answering my own comment – I follow the link and see where these need to go in his project. Given that the board is held on the one edge in a cantilever situation, solid mounting is important. If it works with metal screws, there are no more problems to solve. The point of the whole article though is the virtues of jigs, which is a good point to emphasize over and over. Sometimes a jig is entirely worthwhile even for a one-off project, all the more so when an operation is tricky and needs to be repeated in a production like scenario.
I would be tempted to hold the board by a line of epoxy along the edge — but whether that would give a good enough bond to what looks like a wooden member I couldn’t say, and of course that isn’t service removable unless mods were made to remove that entire member.
Yup, jigs are good mmmkay.
A one off use case is where you really only have one shot at doing something right, because you’re dealing with something expensive-ish or irreplaceably unique, or you have compound angles involved.
I have seen projects where welders use jigs to position things, even for a one-off project.
Or tricky glue ups. Some things are almost impossible to do right without jigs, even for
one-off work. And of course jigs speed up repetitive operations.
Makes me want to go drill some holes in PCB’s.