A Simple Laser Harp MIDI Instrument

Craig Lindley is a technical author and a prolific maker of things. This simple project was his first attempt to create a laser harp MIDI device. While on vacation, Craig saw a laser harp with only three strings and decided to improve upon it by expanding it to twelve strings. The principle of operation is straightforward: twelve cheap diode laser modules aim a beam towards an LDR, which changes resistance if the light level changes when the beam is interrupted.

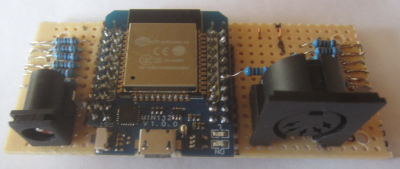
The controller is a simple piece of perf board, with a Wemos D1 mini ESP32 module flanked by some passives, a barrel socket for power, and the usual DIN connector for connecting the MIDI instrument. Using the ESP32 is a smart choice, removing all the need for configuration and user indication from the physical domain and pushing it onto a rarely-needed webpage. After a false start, attempting to use a triangular frame arrangement, [Craig] settled upon a simple linear arrangement of beams held within a laser-cut wooden box frame. Since these laser modules are quite small, some aluminium rod was machined to make some simple housings to push them into, making them easier to mount in the frame and keeping them nicely aligned with their corresponding LDR.
Sadly, the magnetic attachment method [Craig] used to keep the LDRs in place and aligned with the laser didn’t work as expected, so it was necessary to reach for the hot glue. We’ve all done that!

An interesting addition was using an M5 stack Unit-Synth module for those times when a proper MIDI synthesiser was unavailable. Making this luggable was smart, as people are always fascinated with laser harps. That simple internal synth makes travelling to shows and events a little easier.

Laser harps are nothing new here; we have covered plenty over the years. Like this nice build, which is more a piece of art than an instrument, one which looks just like a real harp and sounds like one, too, due to the use of the Karplus-Strong algorithm to mimic string vibrations.

Photo of a Nice-Power supply

Quick & Capable WiFi For Your Nice-Power Supply

Rejoice, those of us who have purchased a Nice-Power lab PSU from an Eastern source. Yes, the name might sound like a re-brand of a generic product, maybe you will even see this exact PSU on a shelf at a physical store near you, under a more local brand name and with a fair markup. Nevermind the circumstances, the most important part is that [Georgi Dobrishinov] found a way to add an ESP8266 to the PSU by tapping its internal UART control interface, and wrote a web UI for all your Internet-of-Lab-PSUs needs, called the PowerLinkESP project.

All you need is a Wemos D1 development board, or any other ESP8266 board that has UART pins exposed and handles 5 V input. [Georgi] brings everything else, from pictures showing you where to plug it in and where to tap 5 V, to extensive instructions on how to compile and upload the code, using just the Arduino IDE. Oh, and he tops it off with STLs for a 3D printed case, lest your Wemos D1 board flop around inside.

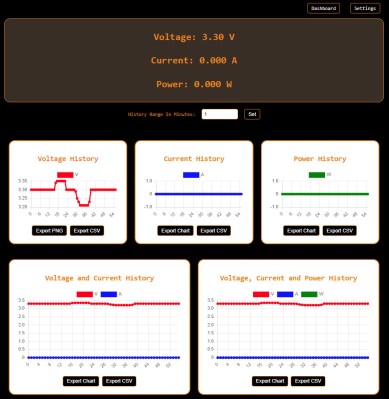
With [Georgi]’s software, you can monitor your PSU with interactive charts for all readings, export charts in both PNG and CSV, and access a good few features. Your ESP8266’s network uplink is also highly configurable, from an STA mode for a static lab config, to an AP mode for any on-the-go monitoring from your phone, and it even switches between them automatically! The firmware makes your PSU all that more practical, to the point that if you’re about to build an interface for your PSU, you should pay attention to [Georgi]’s work.

Lab PSUs with WiFi integration are worth looking into, just check out our review of this one; smart features are so nice to have, we hackers straight up rewrite PSU firmware to get there if we have to. Oh, and if you ever feel like standardizing your work so that it can interface to a whole world of measurement equipment, look no further than SCPI, something that’s easier to add to your project than you might expect, even with as little as Python and a Pi.

Linear LED clock displaying the time using different-colored triangles.

Linear LED Clock Looks Decidedly Vintage

We just love a good clock around here, and something about those triangles gives this linear LED clock a deliciously mid-century vibe. If you’ve read these pages for any length of time, you know that [andrei.erdei] loves clocks as much as we do, and is always coming up with interesting ways of displaying the passage of time.

Two upward-facing triangles sandwich one downward-facing triangle, and they are lighting up as follows: right, left, middle.This one is a remix of some other linear RGB clocks, but the result is distinctly [andrei.erdei]’s style. There’s nothing crazy going on under the hood here — it’s essentially a Wemos D1 mini running a strip of RGBs, and the microcontroller connects to a Wi-Fi router to get the time from a server. The magic is in the programming and the way the clock is read.

The brief but thorough demo video after the break does a much better job of explaining the display by showing various times of the day, but we’ll give it a shot. For one thing, it uses 24-hour time exclusively. There are four groups of triangles; yellow, red, green, and blue which correspond to tens and units of hours, and tens and units of minutes.

The triangles light up in groups of three in the order depicted in the animation. At midnight, none of the triangles are lit up. Again, it’s best explained in the video, looking at various times of day.  Plus you can see the neat-o startup animation.

Are you more into sound than blinkenlights? Then this customizable bird clock may be for you.

Continue reading “Linear LED Clock Looks Decidedly Vintage”

Retro Unit Converter Is A Neat Little Gadget

These days, unit conversions aren’t something we have to worry about so much. If you’re sitting at a computer, you can usually just tap away in your browser to get a quick conversion done, or you can ask your smartphone for an answer. [HackMakeMod] wanted a bespoke device for this, though, and built a tiny little retro-styled unit converter.

It’s a straightforward build that uses a handful of familiar components. An ESP8266 D1 Mini development board is the heart of the operation, running off a small battery harvested from a disposable vape pen. It runs a 0.96 inch OLED display which has a menu system for selecting from a whole bunch of different unit conversions. Navigating the menu is done via a rotary encoder with an integrated push button. Everything’s wrapped up in a neat 3D printed enclosure that was given a nice worn, weathered finish after printing.

[HackMadeMod] also clearly thought about usability, too. Turning the encoder dial faster ramps up the numbers exponentially so you’re not stuck jogging for ages when you need to enter a bigger figure.

It’s not something a lot of us would have a use case for, given that smartphones are always there and probably faster to use. However, it is a tidy little gadget, and a well-presented one at that. Video after the break.

Continue reading “Retro Unit Converter Is A Neat Little Gadget”

1D Fireworks Are Nice And Quiet

Maybe you do it out of respect for the dogs and parents of young children in the neighborhood. Or maybe you do it because they’re harmful to the environment, or just because it’s too darn cold outside. Whatever your reasoning for not setting off fireworks, don’t fret — you can probably put together your own silent one-dimensional “fireworks” display from what you’ve got in the parts bin.

[Daniel Westhof]’s design is simple, requiring little more than a Wemos D1 Mini and a strip of WS2812 LEDs. Once activated, a red rocket shoots up from the ground and detonates, sending lights in both directions on the strip to imitate the bombs bursting in air. It’s controlled with a small push button switch, and there’s a deliciously large red LED indicator that shows the thing is ready for detonation.

You might be surprised to find that there’s a wide array of 1D gaming and animation projects out there, many of which made possible by the ubiquitous addressable RGB LED strip. We’ve seen a dungeon crawler, at least two different versions of the classic PONG, and even the makings of a simplified Wolfenstein.

Toy Gaming Controller Makes The Big Leagues

Some of the off-brand video game consoles and even accessories for the major brands can leave a lot to be desired. Whether it’s poor build quality or a general lack of support or updates, there are quite a few things on the market not worth anyone’s time or money. [Jonathan] was recently handed just such a peripheral, a toy game controller originally meant for a small child, but upon further inspection it turned into a surprisingly hackable platform, capable of plenty of IoT-type tasks.

The controller itself was easily disassembled, and the functional buttons within were wired to a Wemos D1 Mini instead of the originally-planned ESP32 because of some wiring irregularities and the fact that the Wemos D1 Mini having the required amount of I/O. It’s still small enough to be sealed back inside the controller as well, powered by the batteries that would have powered the original controller.

For the software, [Jonathan] is using MQTT to register button presses with everything easily accessible over Wi-Fi, also making it possible to update the software wirelessly. He was able to use it to do a few things as proof-of-concept, including playing a game in PyGame and controlling a Sonos speaker, but for now he’s using it to control an LED sculpture. With something this easily modified, though, it would be pretty straightforward to use it instead for a home automation remote control, especially since it is already set up to use MQTT.

Continue reading “Toy Gaming Controller Makes The Big Leagues”

A Buzzing, Flashing Phone Ringer For The Elderly

For a lonely person, elderly or otherwise, the sound of a ringing phone can be music to the ears, unless of course it’s another spam call. But what good is a phone when you can’t hear it well enough to answer?

[Giovanni Aggiustatutto] was tasked with building an additional ringer for a set of cordless landline phones belonging to an elderly friend. Rather than try to intercept the signal, [Giovanni] chose to simply mic up the phone base that’s connected to the phone port on the router and send a signal over Wi-Fi to a second box which has a loud piezo buzzer and a handful of LEDs.

At the heart of this build is a pair of ESP8266 Wemos D1 minis and an Arduino sound sensor module inside a pair of really nice-looking 3D printed boxen that may or may not have been inspired by an IKEA air quality sensor. On the receiving side, a green LED indicates the system is working, and the red LEDs flash as soon as a call comes in.

All the code, schematics, and STL files are available for this build, and between the Instructable and the build video after the break, you should have no trouble replicating it for the hard-of-hearing in your life.

Continue reading “A Buzzing, Flashing Phone Ringer For The Elderly”