Hackaday Superconference is just a week away (precious few tickets remain), a celebration of all things Hackaday, which naturally includes creative projects making the most of their hardware. Every attendee gets a platform for hacking in the form of the conference badge.
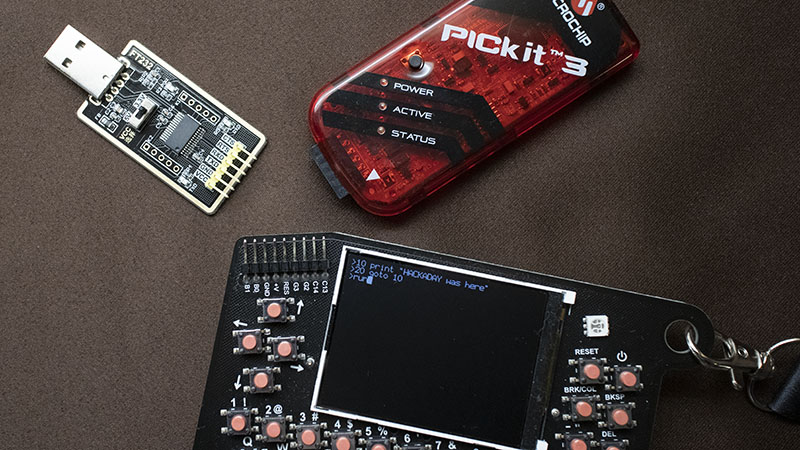
To make the most of your badge hacking fun, plan ahead so you will have the extra components and the tools you need. At the most basic, bring along a serial to USB cable and a PIC programmer. These are common and if you don’t own them, ask around and you will likely be able to borrow them. Now is also the time to put in a parts order for any components you want to use but don’t have on hand!
The badge is hackable without any extras, but it’s designed for adding hardware and hacking the firmware. We’re excited to see what you can do with it. We gave an overview of this retro themed pocket computer a few days ago, today we’re inviting you to exploit its potential for your hardware hacks.
Expansion Header, Board, and Custom Firmware
 With a full keyboard, LCD screen, audio speaker, and a BASIC programming environment on board, the badge will be a friendly on-ramp for curious beginners attending Supercon. And for our hardware hacking veterans, there’s a header for an expansion board: a gateway to endless possibilities. Serial communication is a good starting point to familiarize with badge expansion, and you should bring your own USB-to-serial adapter to follow our badge serial communications guide.
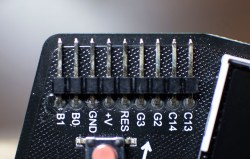
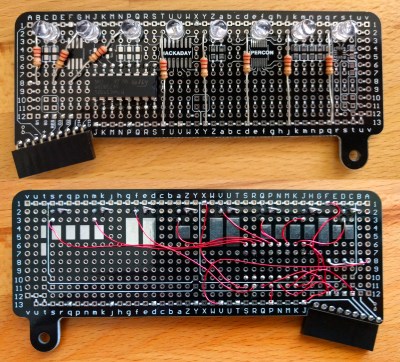
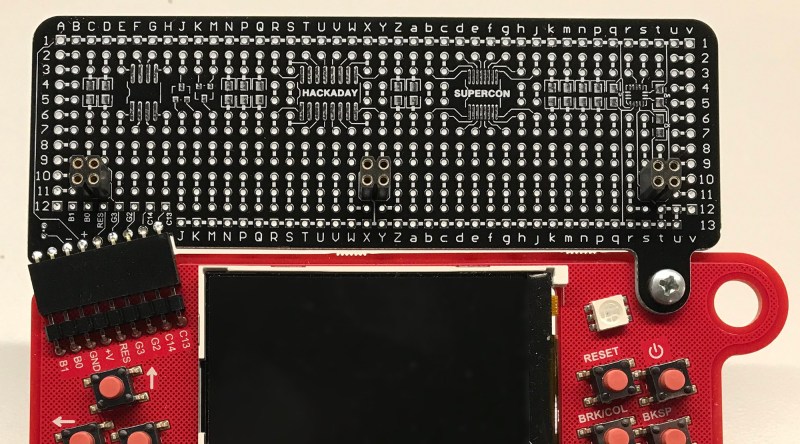
When you’re ready to venture beyond talking to your computer over a serial link, each badge also comes with this expansion board. It plugs into the badge and brings out all the pins for through-hole soldering plus some common surface-mount footprints (0805, SO-8, SO-16, TSSOP-16, SOT-23). And last but not least, it has three Shitty Add-On headers. Our badge hardware hacking reference guide will continue growing up to (and through) Supercon to help answer your questions.
The expansion pins can be controlled from badge BASIC. But if BASIC should prove limiting, the badge is ready for that, too. The heart of the badge is a PIC32-series processor donated by (along with the Flash chips) by Microchip The expansion header brings out all the pins necessary for in-circuit programming with a PIC programming tool. Microchip’s PICkit (3 or 4) are popular choices, but there are other options out there. And finally, a computer with the firmware development tools installed. Our C programming guide lists the required downloads and steps to install them.
The image above shows a red circuit board as this is one of the five prototypes. We’re using Macrofab as the contract manufacturer for this project (they graciously donated a portion of the assembly cost) and we just received word that the full production run of 500 badges with black solder mask has completed!
What Will You Make?
As fitting for the retro computing theme, most badge features in the default firmware (like Z80 emulation) are text-based. But the badge screen is not restricted to text! We’d love to see what can be done with its graphics capabilities. Maybe even in sync with music playing from the speaker?

Another exciting frontier are multi-badge hacks. It is straightforward to connect two badges to each other over serial, so two-player BASIC gaming is begging to be written as soon as you turn on the badge. But how much further can this idea go? The serial pins can be employed to bridge to all sorts of wireless communications modules. Or perhaps we’ll witness a multi-badge serial protocol for a wired badge LAN?
And while we’ve got the serial port all set up and ready to go for everyone, with some additional work the PIC32 can also communicate over I2C or SPI opening up access to a huge range of electronics peripherals. Will someone attach a camera module to one-up last year’s camera badge? Add motor/servo controllers for badge-brained robots? The only limits are imagination, time, and 3 volt power from the pair of AA batteries.
Be Prepared, Adventure Awaits
So pack your USB serial adapter, your PICkit, and join us at Supercon! Badge pickup and work area opens Friday morning (November 2nd) at 9AM. While we will provide some components and of course basic tools like soldering irons, there will be a ton of people in line to use them. It’s best to bring whatever tools you can pack with you to best help realize your vision. During Sunday evening’s closing ceremony, you’re invited to show the entire conference what you’ve built.
Keep an eye on the badge project page for updates to reference material and join the chat rooms (there’s one for Supercon in general, and one specific to the badge) to connect with similar-minded hackers. You all have great ideas, let’s see them happen. It’s going to be a great adventure!


ahhhh… the PICkit3… it reminds me of the PICkit2, which was the best programmer I ever owned. The PICkit2 software did what it had to do and it did that just fine without any fuss. The programmer software even included a tiny logic analyzer function (although I never used it, I really liked the gesture). But then Microchip decided to bring out the PICkit3 which wasn’t supported by the same software and from then on the fun was over…
But if you never worked with the PICkit2, the PICkit3 is just fine.
I never had a PICkit2 (I was an AVR person to start) but now I have a PICkit3 and a PICkit4. The 4 is certainly faster and I’ve been using throughout the year to work on these badges. What upsets me is that by now I thought the programmer-on-the-go feature would have been added in by Microchip but alas we’re still waiting. The firmware for the badges is too big for programmer-on-the-go on the 3, but the 4 has an SD card slot so would work perfectly when we flash all 500 of the badges next week. It’s fine, we’ll just have one computer for each programmer we use.
But beside that small annoyance I haven’t had a need that this programmer didn’t fill.
What was the reason for switching from AVR to PIC?
I didn’t switch, still use both along with ARM. I got into PIC when Voja used it for the 2016 Hackaday Belgrade badge. It’s not hard switching between the different chips… just need to get up to speed on a handful of gotchas and get familiar with the datasheets.
@Daniel From what I can tell, the ‘PIC’ being used here is a device from the PIC32 series, which is based on a 32bit MIPS core and therefore considerably more powerful than any of the ‘classic’ PIC16/PIC18 series controllers. I can only guess you were thinking of PIC16/18 series controllers relative to AVR?
Just general curiosity. Coming from the hw side I have often wondered how the decision on what mcu to use is made. In a corporate environment is it a cost/features opimization or time to market code reuse for instance? Hobbyists, grab the usual ard/pi or dirt cheap stm32 boards? I don’t see PIC/16/18/32/DSP very often in open projects so that’s why I asked. I guess it’s a mulitude of reasons and combinations.
@Daniel,
in this case, it is as simple as, the PICs were supplied for free…
Hobbyists probably don’t use them much because the toolchain licensing is obnoxious. Sure, PIC32 is just MIPS and the compiler is basically gcc, but Microchip decided to take the MIPS version of gcc, add in a license check which disables gcc’s higher optimisation levels unless you pay them something like a grand, and put a clause in the license for their libraries requiring you to use their DRM-locked, crippled gcc binaries. They literally took the hard work of the open source community which was given to them for free and made people pay them a hobbyist-prohibitive price to use it. (Also, to add insult to injury, for a long time they only released binaries for Windows. So even though this was open source code that could compile and run almost anywhere, the only place you could legally develop with it was on Windows.) For a long time, the free version of their C library also imposed a really low code size limit which made using any of the higher-end chips basically pointless.
Alternatively, you can use one of the dirt cheap STM32 boards with the standard ARM GCC that’s freely downloadable and available in most Linux distros and forget all this nonsense. It’s pretty obvious why people go for that option, I think.
lol, just yesterday i found an old PIC programmer in the junk box.
It’s from the 90’s I think, just when the first FLASH chips became available. Before that the chips were one time programmable (OTP) or the “C” versions before the “F” versions for FLASH.
It connects via a parallel port and only programs the 16C84 and 16F64 which makes me wonder why it wouldn’t also program the 16×57?
This is a silly thing, but why are the letters I, L and O missing in the column names on the veroboard?
Because Voja is a god damned genius. Also because those letters look the same (although there’s no row ‘0’, so whatever).
It’s an intentional convention for technical documentation to avoid the confusion between alpha and numeric characters like “0” and “O” , “1” and “l” (lower L) and “I” (Capital i).
Those of you without PIC programming gear should check out Jaromir’s guide to using an Arduino clone as a Pickit2 programmer. (https://hackaday.io/project/27250-mcu-how-tos-reviews-rants/log/148016-programming-pic32-with-arduino) Sure, it’s not full-featured, but if you just want to get code on the chips, it’s a start.
Also check out his rant about PICs (https://hackaday.io/page/2437-myths-and-legends-of-pic-microcontrollers) because there are instructions for getting the complier toolchain set up buried within. I haven’t tried it out yet, but I’ve got a long plane flight to Supercon. :)
If anyone else has any tips/tricks for getting binaries up and running on these beasties, post up!
On a whim I bought six generic serial to USB cables that I will bring to share with those who need a cable.
Awesome! I think we’ll have something like 40-50 of those on hand too. The things that will be in short supply are the programmers themselves so anyone who wants to dig into the C code should try to find one (ask around, you can likely find a fried who will lend you theirs for the weekend).
“you can likely find a fried who will lend you theirs for the weekend”
Fried? As in Limor?
B^)
Your kidding right? In 2018 you can’t make a badge that you program over wifi? It is bad enough that whoever designed this did not have the sense to put the ftdi chip on the thing. You would still need a cable but at least that is just a cable. Urg. Next you will be saying the things need to be charged up because they are not solar powered. Urg. I guess I should be happy the fast breaking stories on LED throwies have finally died down.
Yeah, WiFi , that should suck the batteries dry real fast!
It’s a hackers badge! You add what “YOU” want because what you want may not be the same as what someone else wants. Personally I would choose Bluetooth rather than WiFi for programming, lower power, less protocol overhead and easier to access of many other devices. It has TTL Serial, I2C and SPI. Go for it , add what you want.
Quote: “It is bad enough that whoever designed this did not have the sense to put the ftdi chip on the thing”
Well two comments –
1) As a hacker I have dozens of serial connectors and programmers already. USB serial, Jtag, Xilinx DLC, Altera USB Blaster, at least six programmers for PIC, several AVR including STM8 STM32, 8051, E/EPROM FLASH programmers so would I want to pay the extra price to have them included onboard.
2) The “Whoever designed this” in this case is Voja Antonic and he has been creating innovative electronic projects since the 70’s https://en.wikipedia.org/wiki/Voja_Antoni%C4%87 including an affordable home computer he designed in the 80’s https://en.wikipedia.org/wiki/Galaksija_(computer)
Also Voja on IO – https://hackaday.io/Voja
It’s easy to criticize but where is your design with built in FTDI? And how many people would even want built in USB serial?
I can see that a USB port on the device would be useful – USB has been around for a long time, but would the increase in BOM cost be worth it? For a hackers device, probably not. As pointed out by ROB, if you don’t have a USB/serial converter lying around, then you can’t call yourself a hacker… well, an embedded hacker (because you could be a hacker of RF, or hardware, or wood, or CNC, or…)
Many of the MX chips have native USB, this one was donated by Microchip and doesn’t happen to have USB. I don’t think that’s much of a problem. I mean it would be nice if the header worked for a stock FTDI 6 pin header, but then it wouldn’t work for PIC ICSP.
Having a FTDI chip on the thing would mean that you also have to include something to disconnect it in case you want to use serial communication for something else. This is after all a hackers device.
But if you want to add WiFi, Get your inner hacker out and add it to the board!
I have napkins and silverware at home too. Should I bring my own along? Making the programming tool less would be a great convenience to your customers. Besides how long does the thing have to live on a charge? It is not like a cellphone that some of us need to have for business. I am pretty outspoken in thinking that badges are pointless, but making them totally wifi would at least be novel.
It would be kind of awesome for you to pull out a real plate, silverware, placemat, and cloth napkin (with napkin ring) and maybe a little flower vase. Hack the cafeteria.
That was the in thing years back, but at a local McDonalds. They kept the lights low in one side of the dining room and people would bring their own candles and napkins etc.
tooooo big
short time working
+ add memory (256KiB minimum)
+ add FPGA
+ add gcc backend (for c,fortran, etc).
+ durable and small case
I would rather buy that thing in a shop or so. :)
Hey, for the PICkit 2 software nostalgics -and they are right, we really loose functionalities with PICkit3-, you can always try this :
http://gcbasic.sourceforge.net/Typesetter/index.php/pickitPlus
I didn’t try it myself nor am I involved in it, but, it looks promising isn’t it?
I have some PIC32 boards here but absolutely detest MPLABX (do YOU still enjoy running Java desktop applications in 2018?), so have been taking a shot at getting a toolchain working in Platform.io. The only canned framework for PIC32 is Arduino-based, which I guess is still better than MPLABX. It comes bundled with pic32prog, but assumes you will be using a bootloader…with some non-obvious config changes I was able to get it to write flash using my old PicKit2 (and actually boot, which is not that easy because of the way the linker scripts are structured, virtual flash addresses, etc etc). However, that’s just a hello-world LED blink. The actual badge firmware won’t compile there yet, because it depends heavily on the old Microchip plib.h includes which aren’t licensed very well for OSHW…and you can’t just download them, you have to run an installer program to get them. Only 50 or so compiler errors left in the conversion process.
Will it work sans-MPLABX or chipKIT before Superconference? Not sure…but I might already be hacked-out on this badge before getting it in hand, and am looking forward a bit more to the adafruit Hallowing…arm-none-eabi for the win.
Any reason not to use JLink programmer for PIC32?: https://www.segger.com/products/debug-probes/j-link/technology/cpus-and-devices/microchip-pic32-support/