There are plenty of techniques and components that we use in our everyday hardware work, for which their connection and coding is almost a done deal. We are familiar with them and have used them before, so we drop them in without a second thought. But what about the first time we used them, we had to learn somewhere, right? [TheMagicSmoke] has produced just what we’d have needed then for one component that’s ubiquitous, the I2C EEPROM.
These chips provide relatively small quantities of non-volatile memory storage, and though they are not the fastest of memory technologies they have a ready application in holding configuration or other often-read and rarely written data.
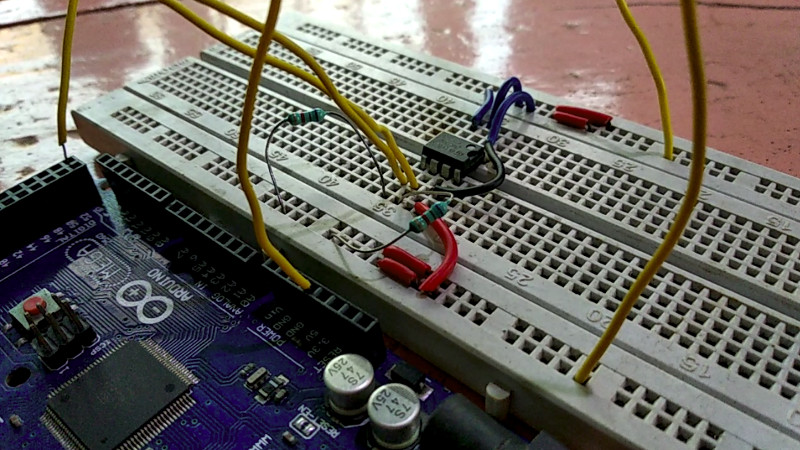
Since the ST24C04 512-byte device in question has an I2C bus it’s a straightforward add-on for an Arduino Mega, so we’re shown the wiring for which only a couple of pull-down resistors are required, and some sample code. It’s not the most complex of projects, but it succinctly shows what you need to do so that you too can incorporate an EEPROM in your work.
If learning about I2C EEPROMs piques your interest, perhaps you’d like to read a previous look we made at them.


Err, I may be stupid, but doesn’t the Mega have onboard EEPROM?
You’re not stupid.
I think this is applicable in cases where one needs more memory than the original microcontroller board provides.
You get 512 to 4k bytes with the ATMEGAs. The ST24C04 holds 512 bytes.
This would be more useful on the ATTiny chips which only come with 128 bytes.
True, but storing data in an external device might be beneficial in some cases. For instance when you have to replace the Arduino-compatible device with another and retain some data that you collected over time (e.g. some historical data of your sensors that you don’t want to lose when the device dies and many other use cases).
> so we’re shown the wiring for which only a couple of pull-down resistors are required
You might want to read the I2C spec. They use Pull-up resistors. Even the breadboard picture shows they are connected to pin8 Vcc pin.
In U.K. they drive on the low side. ;-)
Or Australian.
You joke, but back in the days many British cars also had positive frame/ground.
Made for fun times installing a new radio that expected negative ground/frame
Pull down resistors?! OP got this /REALLY/ wrong. Looking at the pictures they are indeed pull-up. I2C needs pull-up resistors. Also generally for messing around with breadboarding something running on I2C you can do without the pull-ups since the Arduino employs built-in pull-up resistors that are around 20k. HAD writer should have caught this btw …
Sadly the schematic from the original author also got it wrong.
Yes , I made a silly error in the schematic. I have changed it , the resistors are definitely pullups. Thanks for pointing it out :)
Even the article cant make up its mind about pull-up or pull-down. The schematic says down, text says up!
Hmm, this article seems to be lacking in a lot of information. For a fundamentals article, I would’ve liked to have seen a description of how I2C works and how to implement it when you have nothing more than a data sheet like I did in my own journal posts on this exact subject:
https://engineerworkshop.com/2019/04/06/expand-your-arduinos-storage-with-an-external-eeprom-at24c256-a-tutorial-in-how-to-use-the-i2c-protocol/
https://engineerworkshop.com/2019/04/28/expand-your-arduinos-storage-with-an-external-eeprom-part-ii-reading-from-the-at24c256-a-tutorial-in-how-to-use-the-i2c-protocol-continued/
Sorry for the shameless plug for my own content but I think my articles are genuinely more helpful for beginners as they explain how/why I2C works which is helpful for when you’re working on a new device you won’t always have a library or tutorial. (If you have any suggestions for improvement, please leave feedback for me so I can implement it).
Yeah. It explains some stuff about EEPROM but nothing about I2C. I still recommand to read the specifications if you want to know how it works. Its a simple interface so the specs are easy to understand. Of course if you just want to use your wire.h you don’t need it…
FYI: The official I2C spec. The first 31 pages covers most of the things you’ll need to know about the interface.
https://www.nxp.com/docs/en/user-guide/UM10204.pdf
I2C is one of few specifications that are so simple they end up confusing me.
Which either means it’s either cleverly designed or bodgejobs upon bodgejobs, and given its success its most likely the former.
I just built a programming and test fixture at work using an Arduino Nano, and stuck the firmware to be uploaded to the target processor in one of these: https://www.adafruit.com/product/254
They’re SPI, and with the Adafruit library, they’re extremely easy to use. If we need to update the firmware being sent to the target board, it’s a matter of putting a different file on the SD card.
Yeah, I think in general SD card is the way to go for most projects, at least the kind I do which tend to involve more data logging. It’s easier to pull the data back to a computer after you’re done. I tend to prefer I2C if I have a choice though, since I don’t always have the luxury of the additional pins needed for SPI.
Try 23LCV1024 – it has 128 kilobytes and 50 nanoseconds access time – you can use it as fast access rambuffer.