Microphones Listen To Your… Monitor?

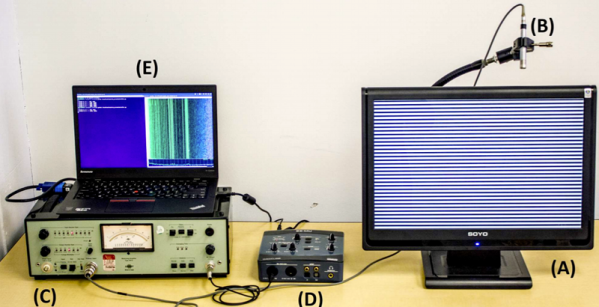
A song by Rockwell, “Somebody’s Watching Me” might be the anthem for the tin foil hat crowd. But a new paper reveals that it might be just as scary to have someone listening to you. Researchers have used common microphones to listen in on computer monitors. The demonstration includes analyzing audio to determine input from virtual keyboards and even a way to tell if people are surfing the web during a Google Hangout session.

Reading monitors based on electronic emissions is nothing new — ask Wim van Eck or read about TEMPEST. What makes this worrisome is that we constantly have live microphones around our computers. Webcams, phones, the latest smart assistant. Even some screens have built-in microphones. According to the paper, you could even pick up data from recorded audio. The paper has three main goals: extract display text, distinguish between different websites on screen, and extracting text entered with a virtual keyboard.

The analysis looked at 31 different screens. There were 12 distinct models from 6 different vendors. They did use a special VGA cable to tap the vertical sync to help manage the data, but they claim this was only an aid and not essential. They also used a high-end sound setup with a 192 kHz sampling rate.

Measuring the sound made by different display patterns was empirical. The authors think the mechanism is from subtle changes in the vibrations of the power supply components due to changes in current consumption. The refresh rate of the monitor also plays a part.

Armed with the proof of concept, the team went on to use an LG V20 cellphone and via a Hangouts call. Imagine if the person on the other end of your call could tell when you were reading Hackaday instead of paying attention to the call.

Different types of monitors need to be learned for best accuracy. It appears that reading small text may have problems, too. Even website detection depends on training. Still, maybe the tin hat people aren’t exactly wrong.

If you want to try your hand at reading the RF emissions, software defined radio is your friend. We’ll be interested to see if anyone duplicates the acoustic method in this paper, though.

Humanizing Industrial Robots By Sticking A Jibo On Top

A great many robots exist in our modern world, and the vast majority of them are highly specialized machines. They do a job, and they do it well, but they don’t have much of a personality. [Guilherme Martins] was working on a fun project to build a robot arm that could create chocolate artworks, but it needed something to humanize it a bit more. Thankfully, Jibo was there to lend a hand.

For the uninitiated, Jibo was a companion robot produced by a startup company that later folded. Relying on the cloud meant that when the money ran out and the servers switched off, Jibo was essentially dead. [Guilherme] managed to salvage one of these units, however, and gave it a new life.

With the dead company unable to provide an SDK, the entire brains of the robot were replaced with a LattePanda, which is a Windows 10 single-board computer with an integrated Arduino microcontroller. This was combined with a series of Phidgets motor drivers to control all of Jibo’s joints, and with some Unity software to provide the charming expressions on the original screen.

With the Jibo body mounted upon the robot arm, a simple chocolate-decorating robot now has a personality. The robot can wave to humans, and emote as it goes about its day. It’s an interesting feature to add to a project, and one that certainly makes it more fun. We’ve seen projects tackle similar subject matter before, attempting to build friendly robot pets as companions. Video after the break.

Continue reading “Humanizing Industrial Robots By Sticking A Jibo On Top”

A Laser Aiming Module For First Person Hacking

You’ve perhaps noticed that [Jeremy Cook] is rather prolific on YouTube, regularly putting out videos on his latest and greatest creations. He wanted to add a head-mounted GoPro to his video production bag of tricks, but found it was a little trickier than expected to get the camera to point where he was actually looking. The solution? A 3D printed laser “sight” for the GoPro that let’s him zero it in while creating videos.

The idea here is very simple: put a small laser module on the same mount as the GoPro itself so you’ll have a handy red dot showing more or less where the camera is looking. The position of the red dot relative to the center-point of the camera’s field of view is going to vary slightly with range, but with something like a GoPro that’s shooting a very wide area to begin with, it’s not really a problem in practice.

Sounds like a good idea, but won’t that leave a weird red dot in all the videos? [Jeremy] is already ahead of you there, and added a small push button switch to the front of the module so he can quickly and easily turn the laser on and off. The idea is that he turns the laser on, gets the dot roughly where he wants the camera pointed, and then turns it back off.

[Jeremy] has put the STL files for the single-piece 3D printed module up on his GitHub for anyone who might find them useful. Besides the printed part, you just need to provide a suitably sized 3.7 V LiPo battery and the laser diode itself. If you need to find a good supply of cheap lasers, you might want to check the clearance rack at the big box store.

Continue reading “A Laser Aiming Module For First Person Hacking”

Little Lamp To Learn Longer Leaps

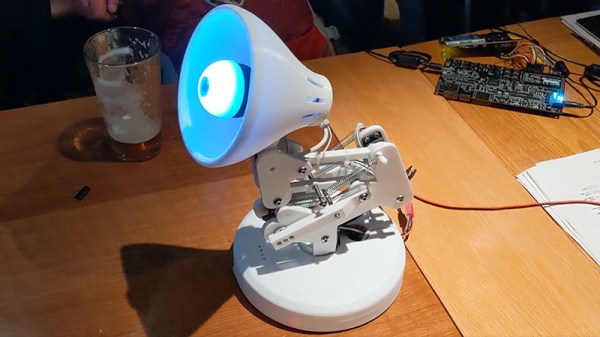
Reinforcement learning is a subset of machine learning where the machine is scored on their performance (“evaluation function”). Over the course of a training session, behavior that improved final score is positively reinforced gradually building towards an optimal solution. [Dheera Venkatraman] thought it would be fun to use reinforcement learning for making a little robot lamp move. But before that can happen, he had to build the hardware and prove its basic functionality with a manual test script.

Inspired by the hopping logo of Pixar Animation Studios, this particular form of locomotion has a few counterparts in the natural world. But hoppers of the natural world don’t take the shape of a Luxo lamp, making this project an interesting challenge. [Dheera] published all of his OpenSCAD files for this 3D-printed lamp so others could join in the fun. Inside the lamp head is a LED ring to illuminate where we expect a light bulb, while also leaving room in the center for a camera. Mechanical articulation servos are driven by a PCA9685 I2C PWM driver board, and he has written and released code to interface such boards with Robot Operating System (ROS) orchestrating our lamp’s features. This completes the underlying hardware components and associated software foundations for this robot lamp.

Once all the parts have been printed, electronics wired, and everything assembled, [Dheera] hacked together a simple “Hello World” script to verify his mechanical design is good enough to get started. The video embedded after the break was taken at OSH Park’s Bring-A-Hack afterparty to Maker Faire Bay Area 2019. This motion sequence was frantically hand-coded in 15 minutes, but these tentative baby hops will serve as a great baseline. Future hopping performance of control algorithms trained by reinforcement learning will show how far this lamp has grown from this humble “Hello World” hop.

[Dheera] had previously created the shadow clock and is no stranger to ROS, having created the ROS topic text visualization tool for debugging. We will be watching to see how robot Luxo will evolve, hopefully it doesn’t find a way to cheat! Want to play with reinforcement learning, but prefer wheeled robots? Here are a few options.

Continue reading “Little Lamp To Learn Longer Leaps”

One-Legged Robot Does The Hop

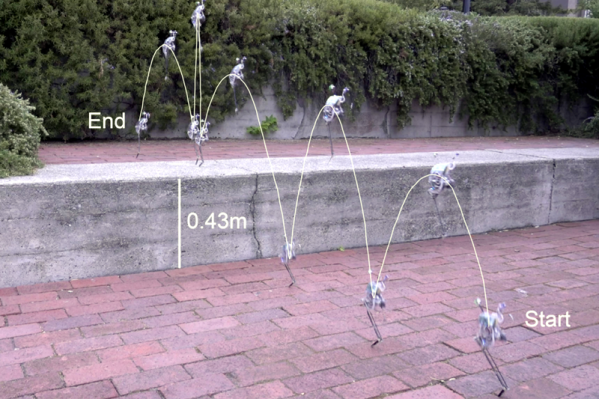
At first, we thought this robot was like a rabbit until we realized rabbits have a 300% bonus in the leg department. SALTO — a robot from [Justin Yim], [Eric Wang], and [Ronald Fearing] only has one leg but gets around quite well hopping from place to place. If you can’t picture it, the video below will make it very obvious.

According to the paper about SALTO, existing hopping robots require external sensors and often are tethered. SALTO is self-contained. The robot weighs a tenth of a kilogram and takes its name from the word saltatorial (adapted for leaping ) which itself comes from the Latin saltare which means to jump or leap.

Continue reading “One-Legged Robot Does The Hop”

Build A Sheet Metal Brake With No Welding Required

Sometimes, there’s a job to be done and the required tools don’t fall easily to hand. [Bob] found himself in just such a position, needing to get some window flashing made up despite lacking a sheet metal brake. After waiting far too long for someone else to do the job, [Bob] elected to simply make the tools and do it himself instead (Youtube link, embedded below).

The project came about simply because [Bob] needed to bend 42″ sections of flashing, and couldn’t find a decent deal on a sheet metal brake above 36″ wide. The build starts with some angle iron and simple hinges, bolted together to form a basic brake design. With some rectangular hollow section bolted on for handles, the brake is then clamped to the bench and is ready for action.

It’s a build that any experienced hacker could whip up in an afternoon and be pumping out basic sheet metal parts by sundown, and requires no welding to boot. To learn more about bending sheet metal, check out our primer on the subject. Video after the break.

Continue reading “Build A Sheet Metal Brake With No Welding Required”

Back To Basics With An Arduino And An EEPROM

There are plenty of techniques and components that we use in our everyday hardware work, for which their connection and coding is almost a done deal. We are familiar with them and have used them before, so we drop them in without a second thought. But what about the first time we used them, we had to learn somewhere, right? [TheMagicSmoke] has produced just what we’d have needed then for one component that’s ubiquitous, the I2C EEPROM.

These chips provide relatively small quantities of non-volatile memory storage, and though they are not the fastest of memory technologies they have a ready application in holding configuration or other often-read and rarely written data.

Since the ST24C04 512-byte device in question has an I2C bus it’s a straightforward add-on for an Arduino Mega, so we’re shown the wiring for which only a couple of pull-down resistors are required, and some sample code. It’s not the most complex of projects, but it succinctly shows what you need to do so that you too can incorporate an EEPROM in your work.

If learning about I2C EEPROMs piques your interest, perhaps you’d like to read a previous look we made at them.