Having a motorized gate on your driveway is great, but only if there’s an easy way to trigger it. [Andrew] says the gate at his parent’s place could only be controlled by manually pushing a button on the panel or with a dinky remote that didn’t have nearly the range they wanted. So he decided to build his own magnetometer allowing the gate to automatically open when a car was trying to leave.
Naturally, there are commercial offerings that would solve this problem. But with a sticker price of more than $150 USD, [Andrew] was more than happy to spend a bit of time tinkering to get the job done for less than 1/10th the cost with an ESP8266 and a QMC5883X series magneto-resistive sensor. Of course, this is one of those projects that seems simple enough in your head, but ends up taking a bit of finesse to pull off in the real-world.
 For one, [Andrew] had to figure out how to prevent false positives. Pretty much any object brought close enough to the sensor, including his hand, would cause it to react. He ended up coming up with a way to use a rolling average to prevent the gate from firing off just because a squirrel ran past. The built-in safeties are designed to ensure that the gate only opens when an actual car is sitting in the appropriate spot for long enough.
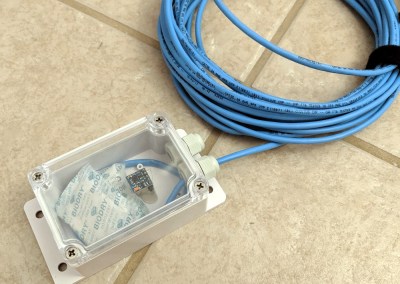
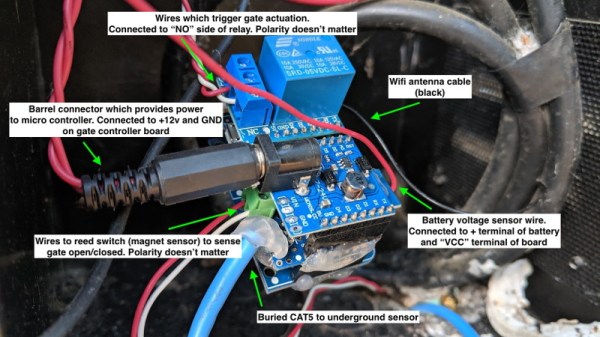
Speaking of, we love how [Andrew] deployed the QMC5883X sensor for this project. The small sensor board and a few moisture-absorbing packets were placed in a Sonoff IP66 waterproof enclosure, and buried under the rocks of the driveway. A standard CAT5 cable is used to tether it to the ESP8266, relay, and assorted other goodies that now live in the gate’s control box. In the future he says the cable will likely have to go into a conduit, but for now the system is working more or less how he expected.
If your estate isn’t quite palatial enough to have a motorized gate out front, we’ve seen plenty of projects that add some much-needed intelligence to the humble garage door opener which might be more your speed.


