Back in the early 1980s, hotshot business types on the go would have used what were referred to at the time as portable computers from companies like Osborne or Kaypro. Due to the technical limitations of the era these so-called “luggables” were only slightly smaller and lighter than contemporary desktop computers, but they had integrated displays and keyboards so they were a bit easier to move around. A few years later the first generation of laptops would hit the market, and the portables predictably fell out of favor. Today they’re relatively rare collectors items; a largely forgotten first step in the steady march towards true mobile computing.
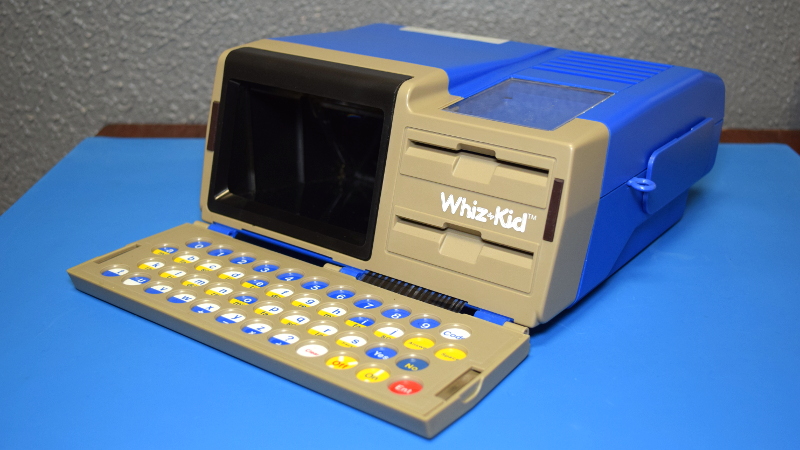
 Which makes the 1984 edition of VTech’s “Whiz Kid” educational computer an especially unique specimen. The company’s later entries into the series of popular electronic toys would adopt (with some variations) the standard laptop form factor, but this version has the distinction of being what might be the most authentic luggable computer ever made for children. When this toy was being designed it would have been a reflection of the cutting edge in computer technology, but today, it’s a fascinating reminder that the latest-and-greatest doesn’t always stick around for very long.
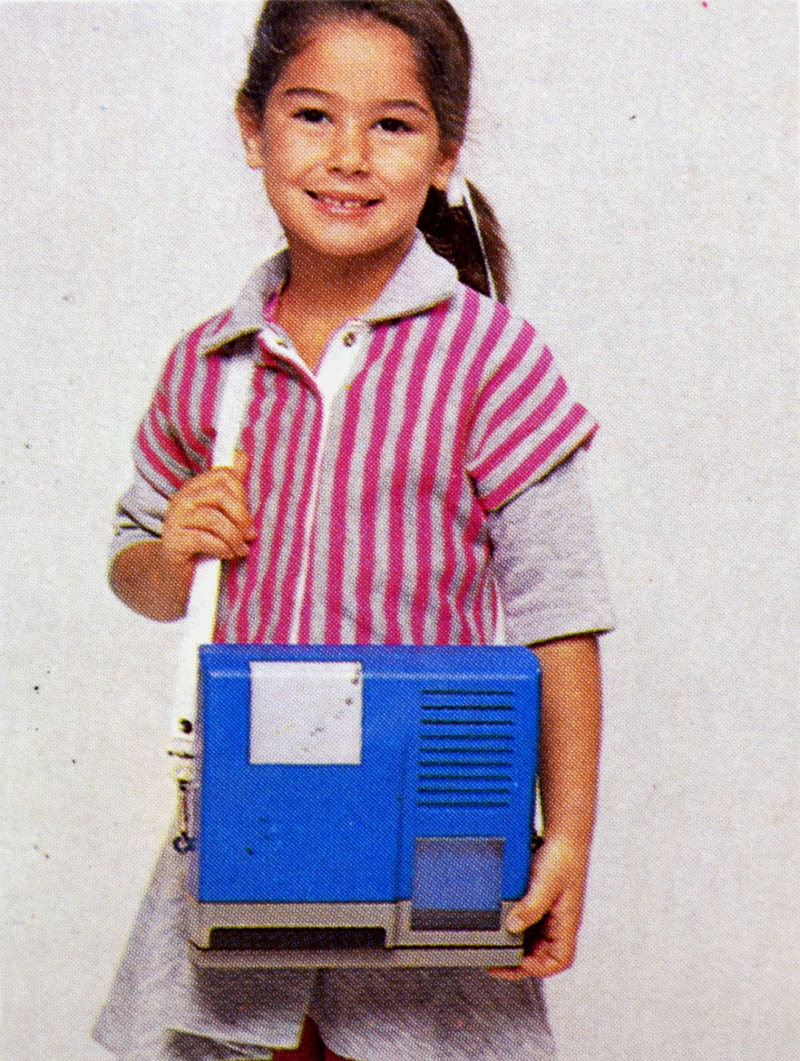
The classic luggable hallmarks are all here. The flip down keyboard, the small and strangely offset display, there’s even lugs on the side to attach an included strap so the youngster can sling it over their shoulder. On the other hand, the fact that it’s just a toy allowed for some advantages over the real thing: it can actually run on battery power, and is quite lightweight relative to its size.
When we last took a peek inside one of VTech’s offerings, we found a surprisingly powerful Z80 machine that was more than deserving of its PreComputer moniker. But that BASIC-compatible design hailed from the late 80s, and was specifically marketed as a trainer for the next generation of computer owners. Will the 1984 Whiz Kid prove to have a similar relationship to its adult counterparts, or does the resemblance only go skin deep? Let’s find out.
Form Over Function
When I saw that the Whiz Kid included a shoulder strap, I naturally expected it to be pretty heavy. But without the four C batteries installed (only 80s kids will remember every toy using C cells), it actually weighs less than a kilogram. Holding it in your hands, it almost feels like the bulky plastic enclosure is hollow. Which, it turns out, isn’t far from the truth.
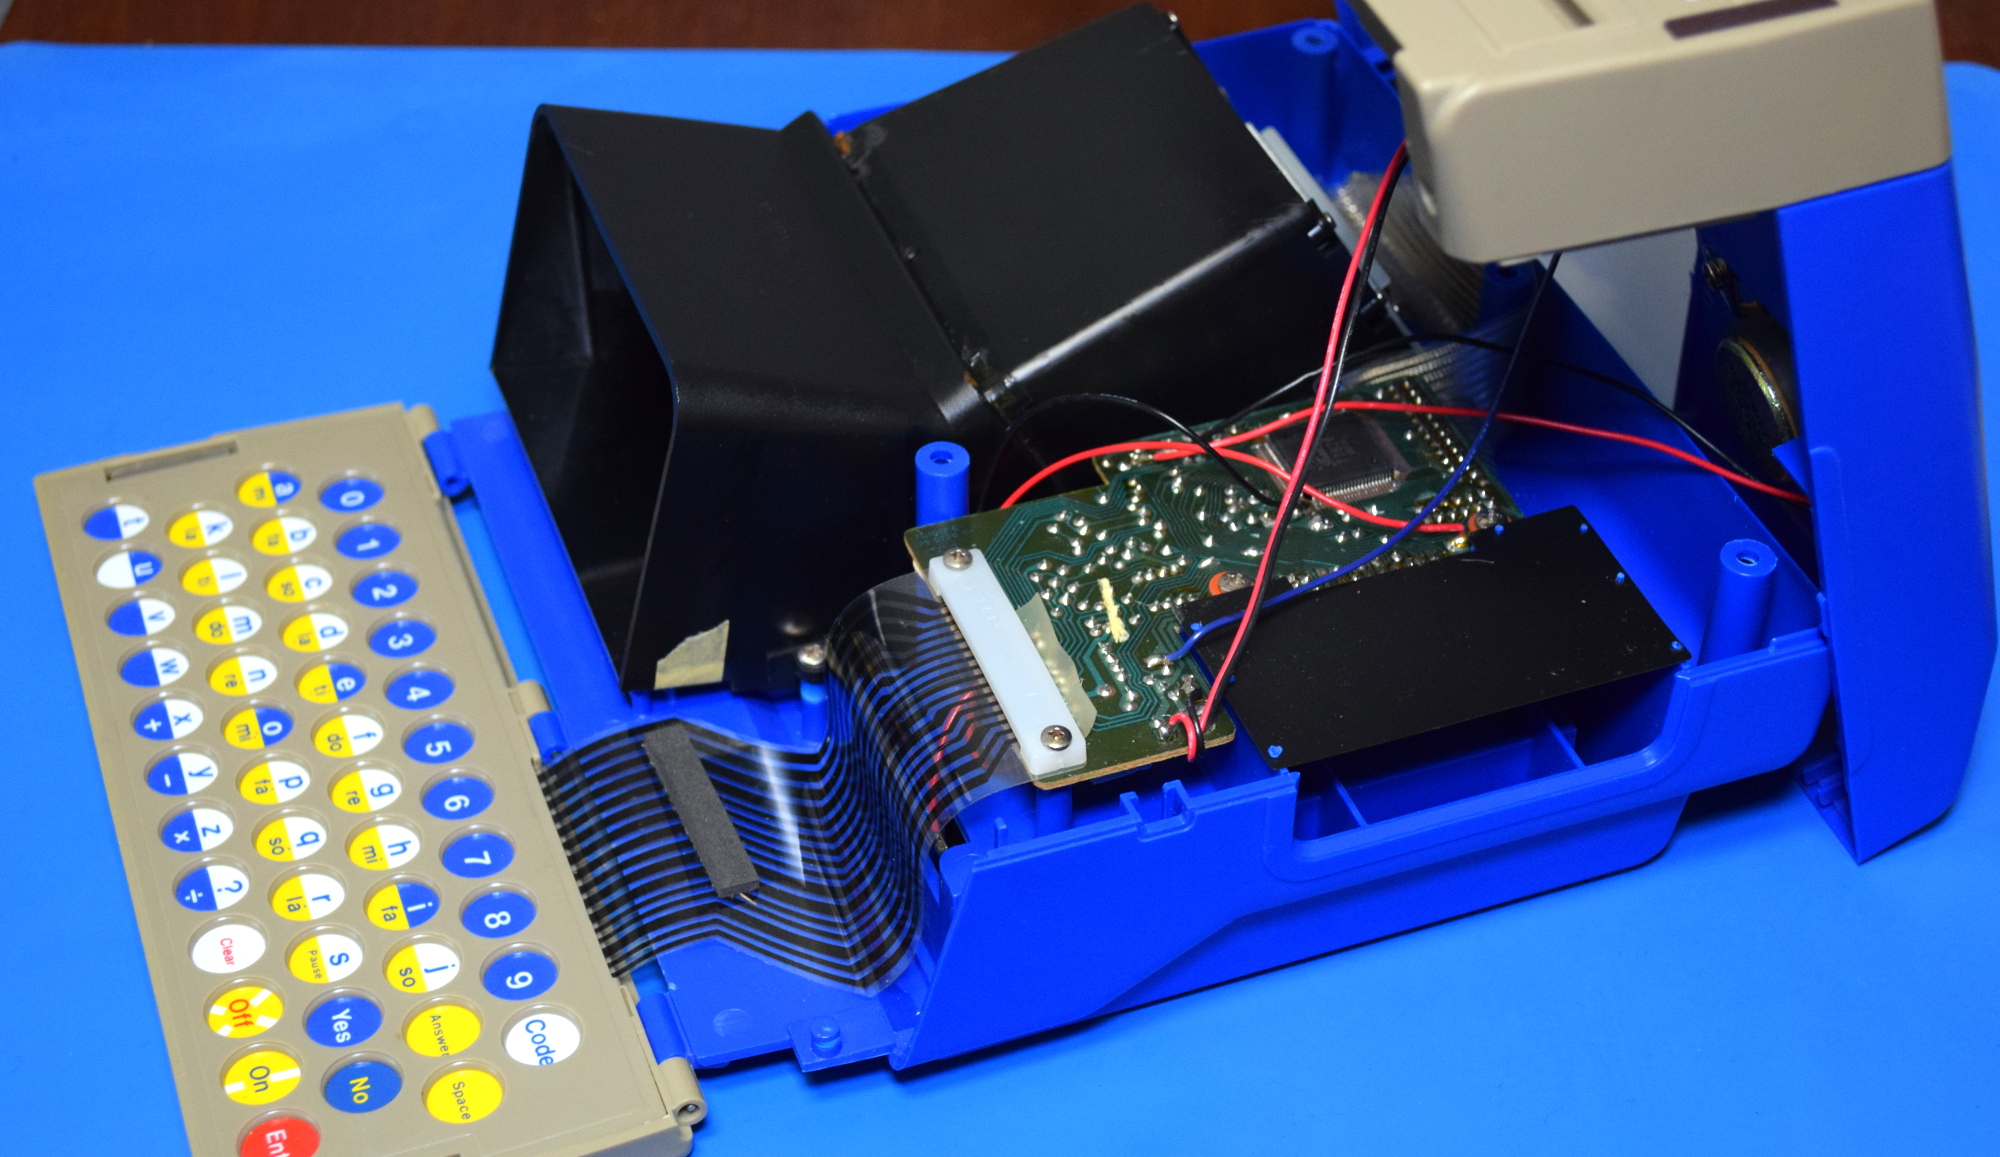
Opened up, we can see just how little is actually inside the Whiz Kid. Beyond the black LCD projector assembly, which we’ll come back to in a minute, the only thing in the bottom half of the shell is the relatively small PCB. With all the empty space inside, it seems like the case dimensions weren’t really a matter of necessity. More likely VTech had specific external dimensions, or at least proportions, in mind when designing the Whiz Kid to really drive home the luggable look.
Ye Old Single Chip
Anyone who’s taken apart a piece of electronics from the 1980s knows they’re generally swimming with integrated circuits. Which of course should come as no surprise, as the rapidly falling cost of ICs is what gave rise to all sorts of weird and wonderful electronic devices that would have been prohibitively expensive previously. But in this case, there’s only one obvious chip on the PCB: a QFP-92 device from Toshiba.
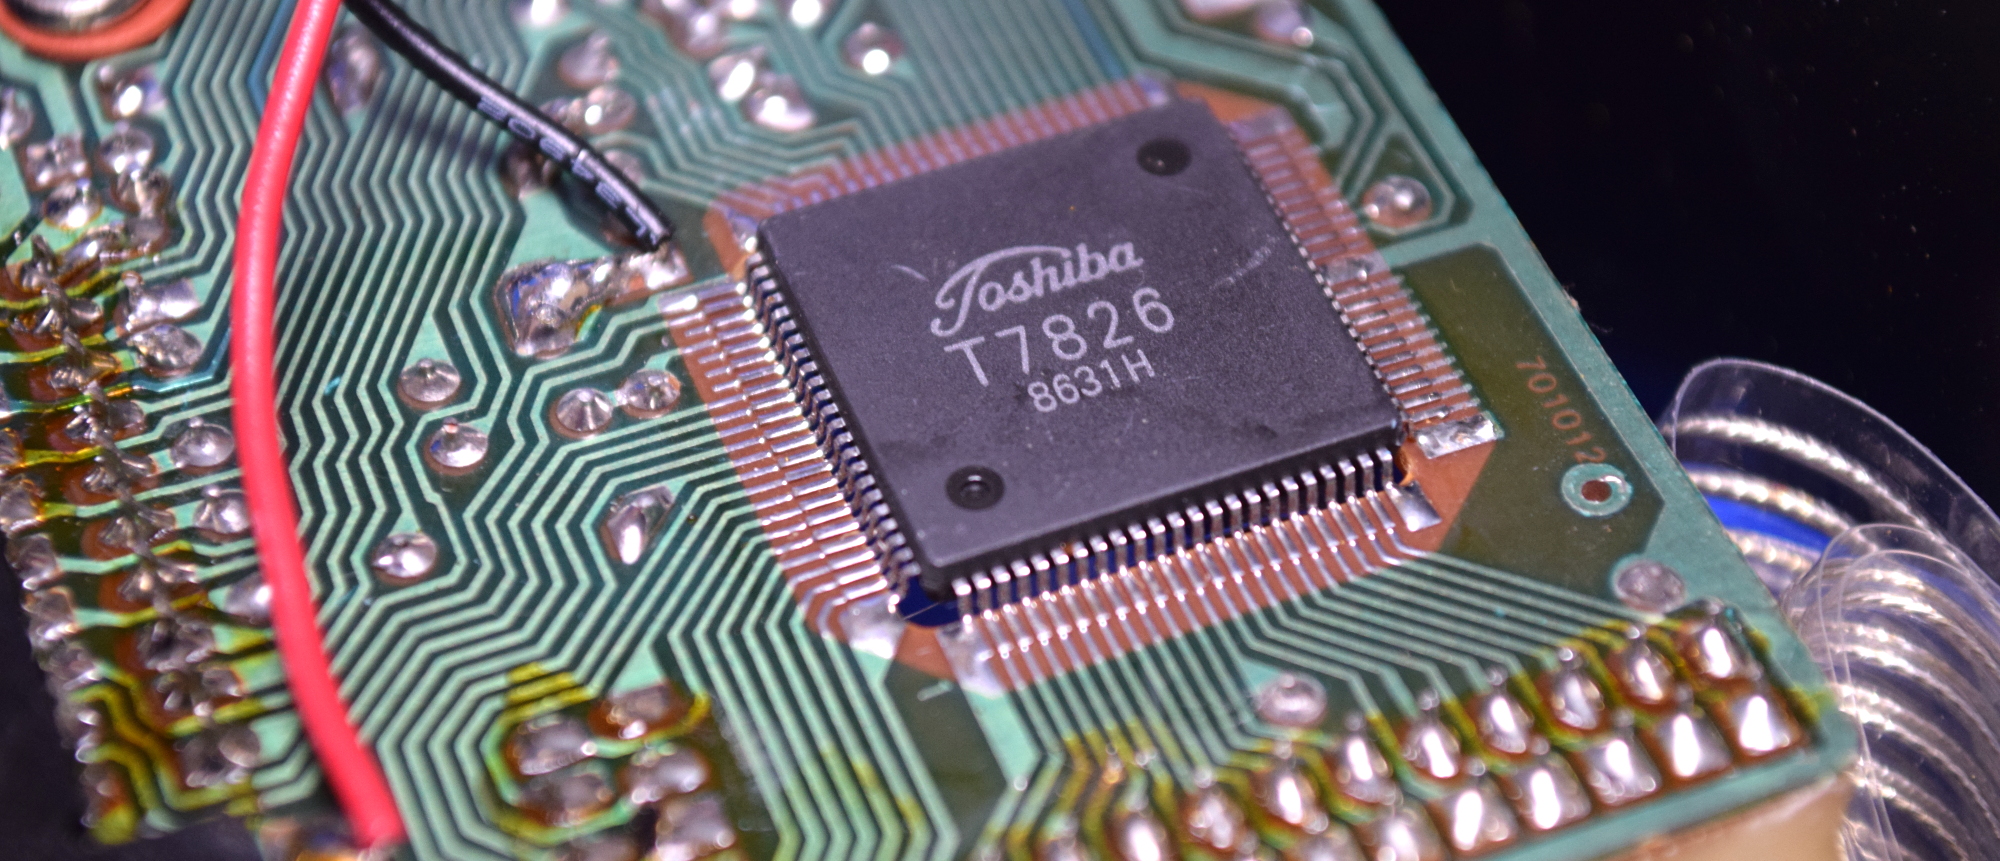
Marked T7826, I’ve unfortunately not been able to find any information about this particular device. But we can see from the traces that it’s responsible for everything inside the Whiz Kid, as the chip’s pins are directly connected to the LCD, cartridge connector, and keyboard. Today we’d call this device a microcontroller, but back then the terminology was a bit different. Of course, this is just one side of the PCB. Surely we’ll see some support ICs when we flip it over.
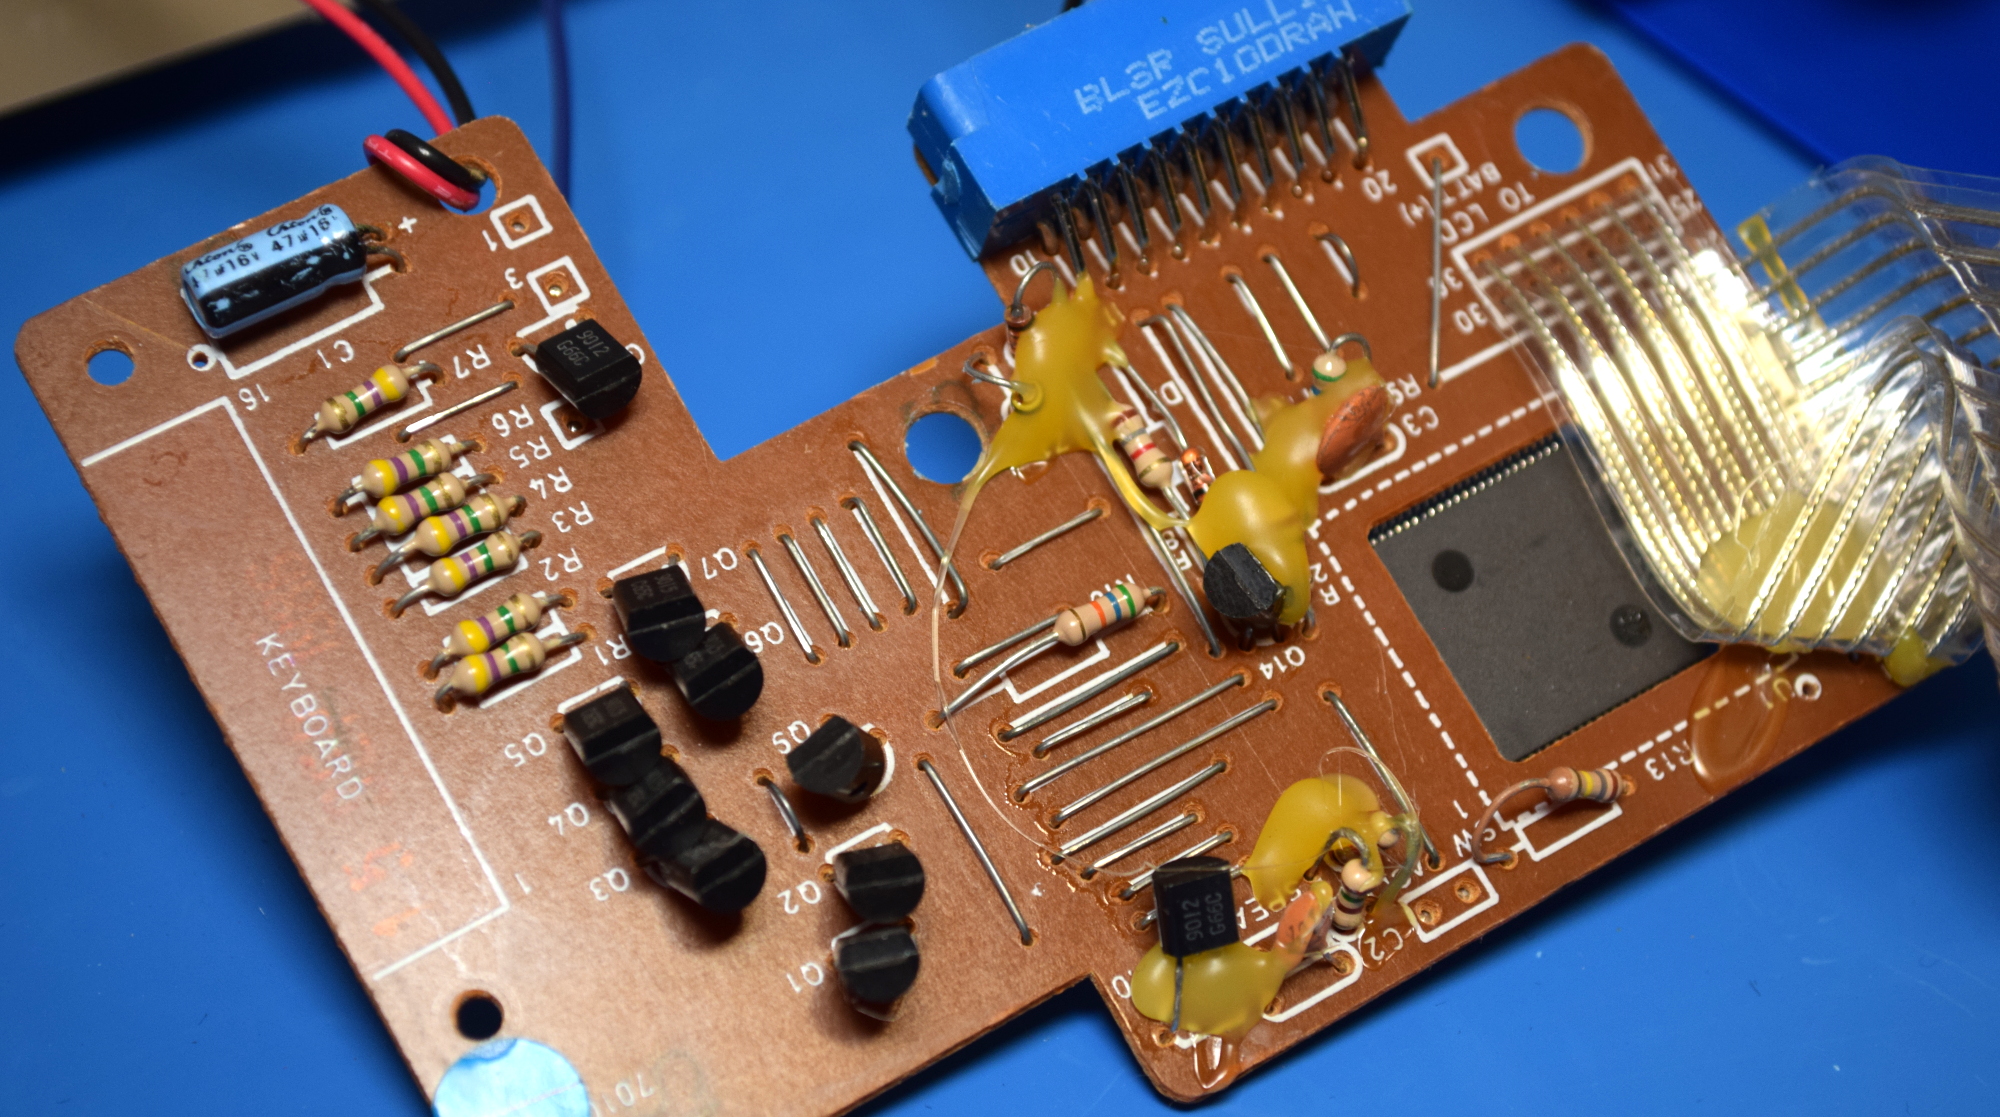
Or not. The reverse side of the board is remarkably free of…well, just about anything. There’s plenty of the metal jumpers that were so common on the single-sided PCBs of mass produced gadgets of the era, but outside of that, there’s only a smattering of simple components. As there’s actually no physical power switch on the Whiz Kid some of those transistors are presumably part of a soft power system, and the bulk of the resistors appear to be connected to the keyboard matrix.
These days, a single chip that handles nearly every function of the device is fairly common in mass produced electronics. You’ve certainly seen them. A nearly bare PCB with a big black epoxy blob in the middle has been a depressingly common sight over the last couple of decades. But even today, you’d still expect to see a separate chip for storing the device’s firmware and other data. This thing is supposed to be a computer, so where are all the games and programs being held?
It’s All in the Cards
Since there’s no external ROM, and the expansion cartridges are optional, then all of the software must be stored inside that single chip. That wouldn’t be a problem today when even $3 microcontrollers include several megabytes of onboard storage, but doing it in 1984 would be quite a trick indeed. So how did they pack in all the lines of text and images?
Well, the short answer is that they didn’t. Not in the way you’re probably expecting, anyway. The Whiz Kid borrows a trick that was common in computer games of the era: making extensive use of printed material to compensate for limited digital storage capacity. In this case, the “games” take the form of paper cards which are inserted into the front of the system. The back of each card explains what the user is supposed to do, and the front (which can be viewed through a clear plastic window) has the appropriate images printed on it. Most of the cards task the user with guessing, and correctly spelling, words that are somehow related to the artwork.


The back of each card features a linear barcode, which is picked up by an infrared reader mounted under the tray. It would appear the codes store some sort of lookup information (presumably related to the string of characters printed within the code) that tells the Whiz Kid which of the pre-loaded words the user is supposed to be spelling. With creative use of the instructions and imagery on the cards, VTech was able to create many different games and activities that ultimately revolve around the list of words the Whiz Kid has stored internally.


The reader itself is quite simple, and is not unlike what you might find in an old mouse. An IR LED and detector are placed into a housing so that that the alternating white and black stripes passing in front of them will produce a voltage change in the detector. This is fed into an LM358 op-amp to create a clean square wave the microcontroller on the main PCB can easily read. There’s only three wires between the main board and the reader, which makes it easy to hook the oscilloscope onto the data line and see this exchange happen in real-time.
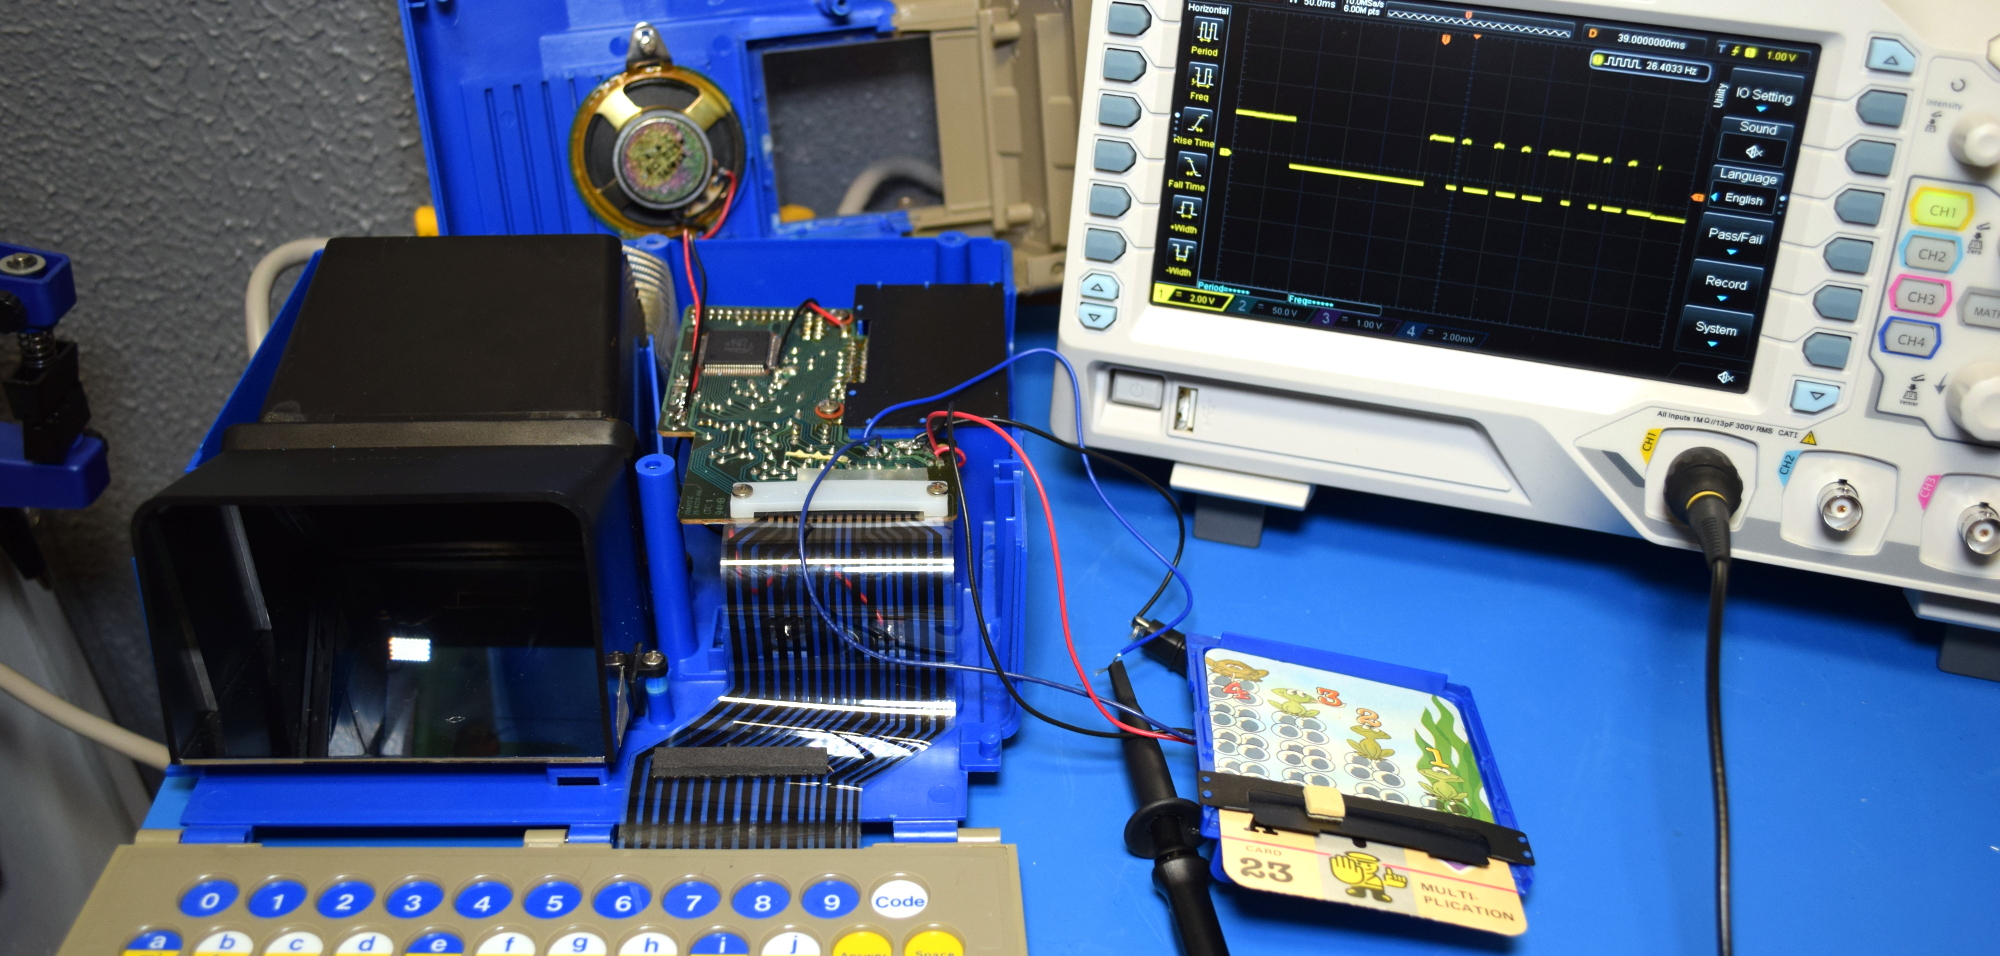
I didn’t attempt to decode the signal, so feel free to chime in for extra credit in the comments. But from the looks of it, the code holds at least a few bytes worth of data. Certainly enough to hold two hex characters, and as there’s only 50 cards in a pack, that would offer more than enough possible combinations to use as a unique ID.
Tick Tock, You’re the Clock
 At this point, the particularly astute reader might notice something’s not quite right with this concept. If pushing the card through the reader creates a square wave that corresponds to the data on the barcode, wouldn’t the speed at which the card is inserted be of critical importance? Surely the young operator couldn’t be expected to push the card in at the perfect speed each and every time they wanted to change cards?
Well it turns out VTech must have had a lot of faith in the kids of 1984, because that’s exactly what you have to do. Getting the cards to reliably decode is perhaps one of the most frustrating user experiences I’ve ever had, and it’s difficult to remember a time as a child when I would have been so bored that fighting this machine would have been preferable to literally kicking rocks.
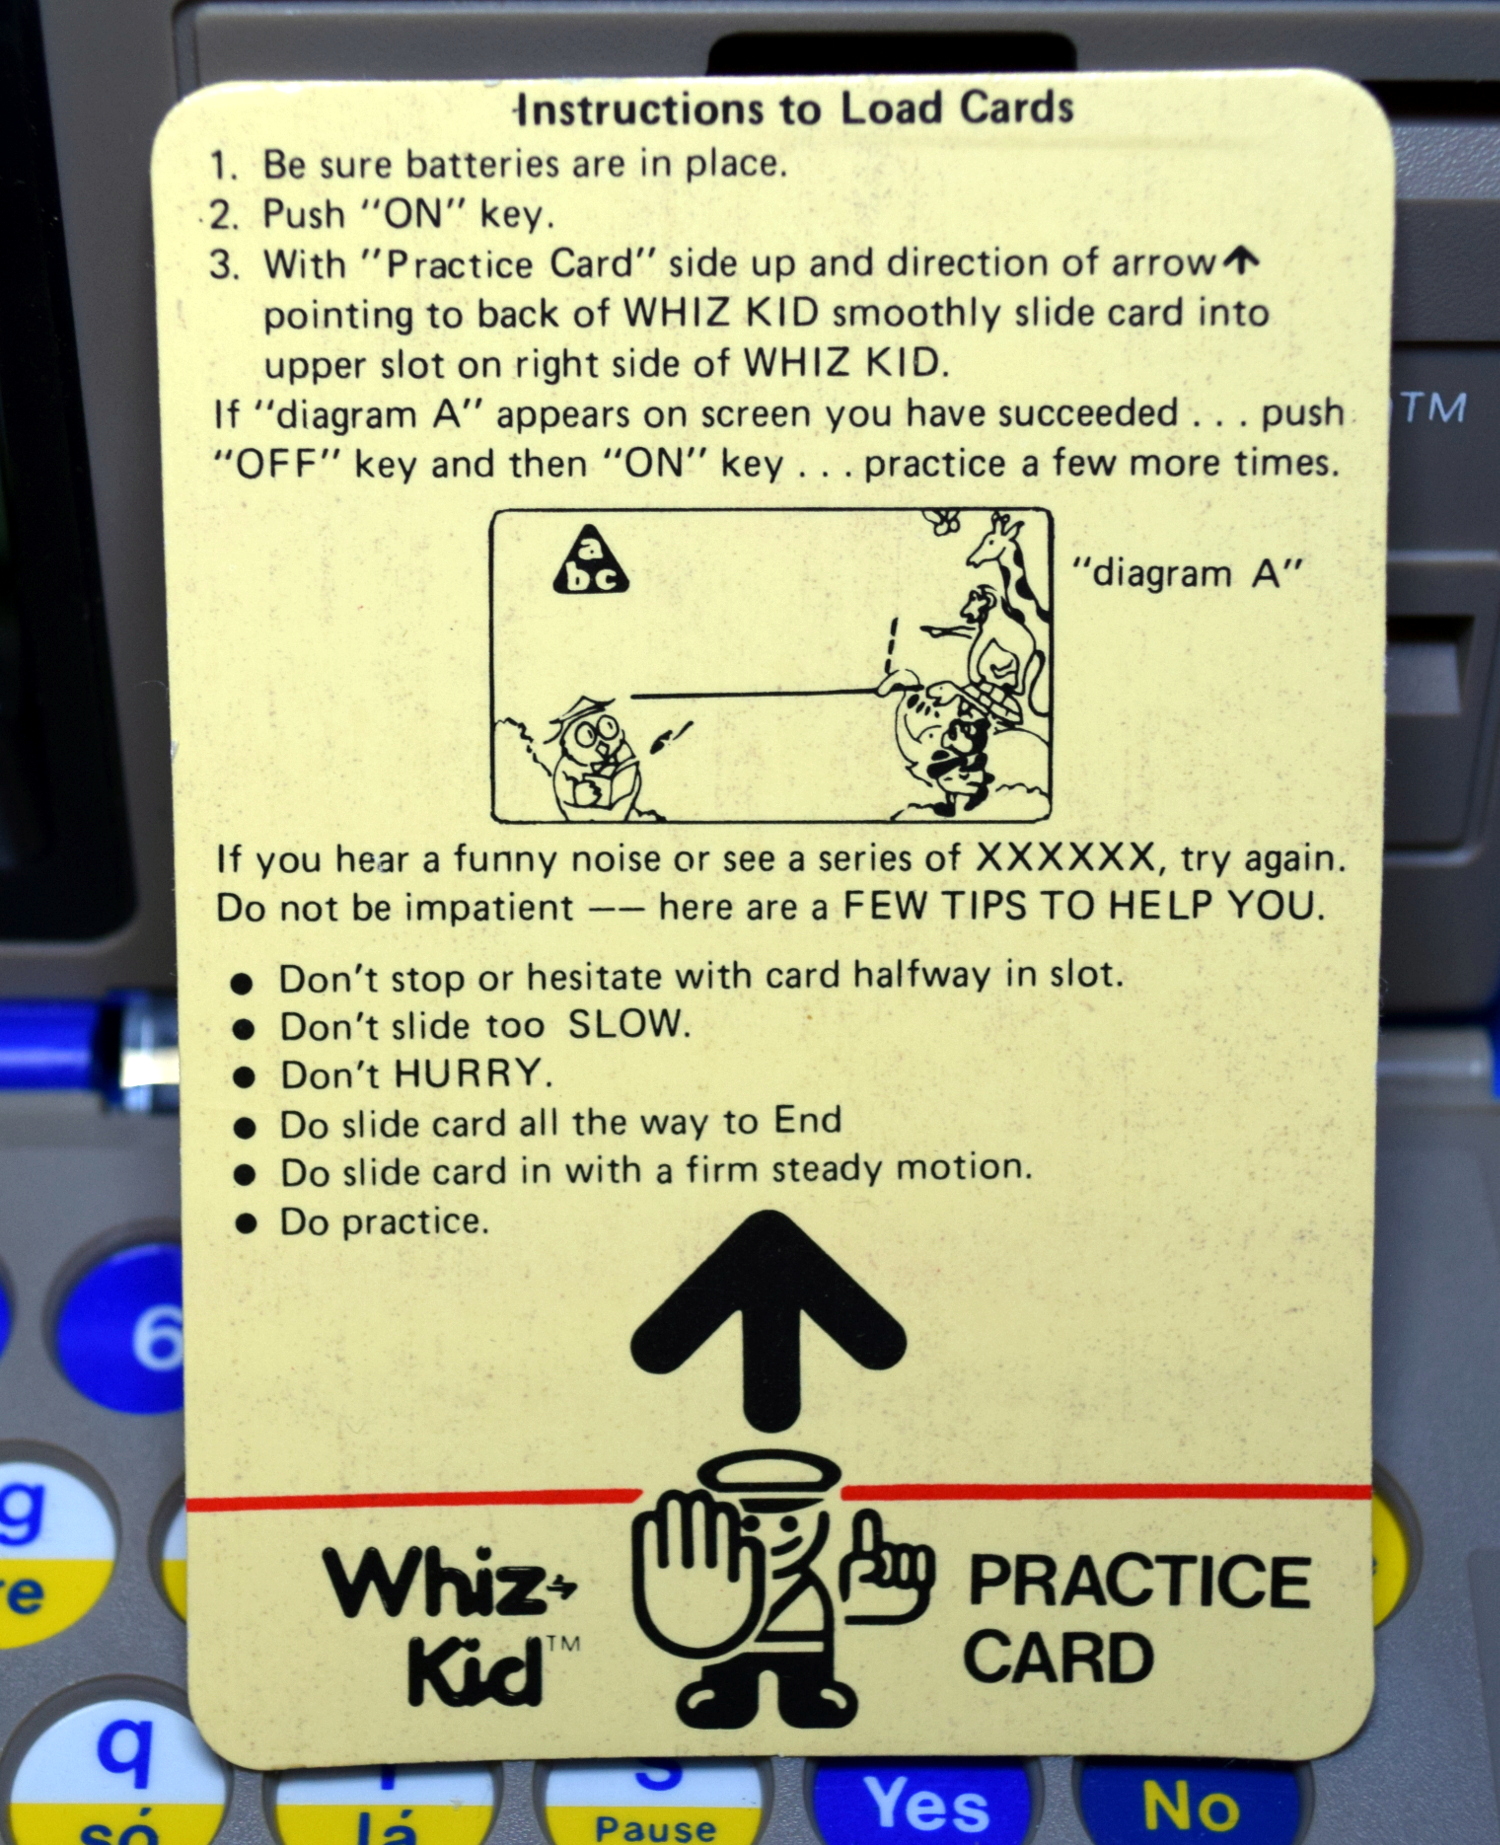
The inclusion of a “Practice Card” makes me think at least somebody at VTech had misgivings about this particular method of data entry. The user is instructed to use this card as a way to hone their insertion technique until it essentially becomes muscle memory.
There’s no special trick, and the tips given on the card aren’t anything you wouldn’t have figured out yourself eventually. I can only imagine how little comfort the tip “Do Practice” would have had for a frustrated six year old on Christmas morning in 1984.
Gaming on the Big Screen
Going back to the idea that the visual look of this device was clearly very important to VTech, they obviously needed a screen that would be in proportion with the rest of the case. A row of little dinky LED characters wouldn’t do, and obviously a real CRT was out of the question. So they came up with a rear-projection LCD that, given the limitations of the time, isn’t half bad.

The idea here is that light coming through an opaque window in the back of the Whiz Kid passes through an LCD panel not unlike what you’d find in Nintendo’s Game & Watch handhelds. This projected image is then bounced off of a real glass mirror mounted in the bottom of the chamber which the viewer is looking down on.
From the viewer’s perspective, you see a nice bright image with an apparent size that is larger than the physical LCD panel. Thanks to some tinted filters, it even appears in color. Well, at least the parts that don’t move anyway.

The downside is that you need a lot of light coming in through that back panel. The addition of an onboard light wouldn’t have been much of a technical challenge, but was probably deemed pointless since you still need to read the cards and see the pictures on them to actually play any of the games.
Hack Without Apologies
The way I figure it, there’s a good chance you’ve read this far because you’re wondering if you can use the carcass of a Whiz Kid as the base for a Raspberry Pi luggable. Well you definitely can, though there are a few things to keep in mind that might not be obvious from looking at these pictures.
![]() For one, it’s probably smaller than you think. Remember, this is a device that was designed for grade-school children to use. For reference the keyboard is roughly 200 x 70 millimeters (7.87 x 2.75 inches), and depending on how creative you get with the mounting, you’ve only got about 120 mm (4.72 inches) diagonally to put a screen in. Doable, but pretty cramped for any serious use.
For one, it’s probably smaller than you think. Remember, this is a device that was designed for grade-school children to use. For reference the keyboard is roughly 200 x 70 millimeters (7.87 x 2.75 inches), and depending on how creative you get with the mounting, you’ve only got about 120 mm (4.72 inches) diagonally to put a screen in. Doable, but pretty cramped for any serious use.
Of course, once you had a keyboard and real LCD mounted on the front of it, the internal dimensions are absolutely cavernous. You’d have no problem fitting in whatever you wanted, up to and including x86 single board computers like the Atomic Pi.
At the end of the teardown for the VTech PreComputer 1000, I noted the machine seemed to have enough historical significance that gutting it shouldn’t be taken lightly. But frankly, the 1984 Whiz Kid doesn’t hold that same kind of importance or charm. Its oddball internals don’t appear worthy of preservation, and the infuriating card reader gimmick makes operating the toy an absolute chore for the modern user.
VTech’s goal was to make the outside of the Whiz Kid look as much like a real portable computer was possible, and didn’t give nearly as much thought to the electronics inside. So why should you?


Very interesting.
If I were to ‘hack’ it, I’d try to keep the card reader intact, both for the original games (Should be trivial to scan them in and show on the screen), and create new ones to trigger games, videos, etc., on even a PiZeroW, Pi3A, Compute module or similar…
I imagine with modern techniques, you could do a lot better at reading the pulses with the Pi’s GPIO port than this thing’s chip is doing too. Would be interesting to see a dump of a few cards from a logic analyzer to see what actual format the barcode is in.
As a child, I had the later model, the Talking Whiz Kid that could also speak. I actually learned quite a bit playing with it, and my whole family had some fun on it, the hangman game had some 2 player functionality that was great, and I liked making some beepy music on it. This was way back in 1990 which all might sound lame in 2020, but back then it was fun.
I had this OG one in probably 1987 or so before we got an NES and it saw a ton of use. I think about all the things I probably learned just because there wasn’t anything do besides read my kids encylopedia and play that computer’s learning games.
Once I got an NES I was done with anything that used those lcd style displays calculators use.
Funny thing about the card reader speed matter. We’re still using the same sort of tactile skill set at modern gasoline pumps.
As to the rarity of luggables? I think I only ever saw 3~5 of them, in total. They would have been in the re-furb (closed display case) of a local computer shop.
No surprise that shop was also one of the few, truly good, scrounging spots in the area.
So much cooler than the Tiger 2-XL cassette robot I had! I agree that if you’re going to hack it, some of the original functionality needs to be preserved.
I had one, and the card reader was so infuriating that i opened it up to try and fix it. Only to find that it wasn’t broken, it just sucked.
Joe Weisbecker solved this problem a decade earlier on his FRED computer (Flexible Recreational and Educational Device). It also used cards to load its programs. But he oriented it vertically. You dropped the card in, and gravity automatically determined the speed!
Why is the go-to x86 sbc around here always the atomic pi when there’s plenty of other examples? That thing was a gussied-up piece of electronic waste being lazily foisted as a product until they emptied out their stock.
What are some other examples of x86 SBCs that you would recommend? I’m always on the lookout for what might work in various weird scenarios that we might need at work.
Not them, but a lattepanda alpha is what I’m planning to use. I had one of these as a kid and I absolutely loved it. This article gave me all the feels, so I’m going with a lattepanda alpha, a display I can hopefully use with the projection system (or make my own system) and a new keyboard with trackpad. The end result will (hopefully) be a luggable that I can connect basic VR gear to (like a really cheap headset, maybe even a cell phone one with the software that lets you use that as a regular VR headset with basic head tracking) for the cyberpunk feel.
I’m not sure if I want to paint it or try to preserve the external look so as to make it the ultimate sleeper cyberdeck, but the lpa certainly looks like a mighty powerful x86 solution for small spaces
I had one of these as a child, what a great writeup! I broke mine when i tried to solder wires to the battery terminals and run it off external lantern batteries instead of the C batteries, a ball of solder landed right across the pins of that SMT microcontroller and i didn’t have the ability back then to repair it.
I was the other kid, putting 4xC holders in things that took lantern batteries. There was never much change from $10 buying those things in my areas of residence. Even now, it’s cheaper to wait for the big flashlights to go on sale for $4 and throw the flashlight away if you want one.
Kind of surprising there doesn’t seem to be a jack for external DC adapter, that seemed to be a common feature on these edu computers back in the day.
Something that infuriates me with these kids “computers” nearly all of them use a keyboard that is alphabeticaly aligned.
If your going to teach the kids with a computer style thing make it a QWERTY layout ( ok there are possibly better layouts but that’s the one most western countries use)
The kids play with them and then sit infront of a real computer and can’t find the keys.
I’ve got a stack of various “computer” toys that would lend them selves to a real SBC except for the keyboard layout.
There’s a line in the sand where the toy goes from teaching ABCs to a “trainer” that gets them ready for real computers, and this one is firmly on the former side. I’d say target age for this toy is 6 and under.
The VTech preComputer 1000 that I looked at previously is of the latter category, and has a full-size QWERTY keyboard. Unfortunately, I discovered the keyboard is garbage to actually type on.
I’ve tried thinking along those lines as well but ABC is purely arbitrary as far as I can tell – no reason the song can’t be changed to QWERT YUIOP …
I ran into a spot of trouble with my boys waiting for the milk to warm in the microwave – I would count down from 10 seconds indicating the number on the display. They have a bugger of a time counting up :-(
I am extremely distressed at the thought of someone intentionally making their milk *warmer*.
Arbitrary sure, but also standardized for many typing applications – namely sorting alphabetically where knowing the universal order is important.
QWERTY will be on it’s way out once more kids learn to type on screens with predictive swipe texting
Is this seriously 1984? Looks more like 1994 since the fake disk drive slots look like 3.5″ slots, which were much more common in the 1990s compared to 5.25″ in the 1980s. I don’t recall VTECH being a common brand name in the 1980s, either, and I thought I would be aware of tech since I busy programming on Vic20 and C64 plus playing with a multitude of other cool stuff by 1984.
It’s honestly hard to believe anyone could be old enough to have been programming on a C64 but not recognize this as a quintessential 1980s toy.
Look at the art style on those cards. Look at the clothes the girl is wearing. How about the fact that luggable computers wouldn’t even have existed in 1994, so what would they have been trying to emulate with the design?
For the record, the “floppy” drives don’t look anything like 3.5s. Look up pictures of the IBM Portable or Osbone, the 5.25s look almost identical.
Agreed, those are definitely 5 1/4″ floppy slots.
To be fair. I have seen early midi-tower cases that came with 3.5 drive faceplates that looked more like the older 5.25s. Also there was some variety in 3.5 faceplates in general through the mid 90s until they seemed to more or less standardise, unless made custom for a big name manufacturer, Compaq, Dell etc.
They aren’t just 5.25″ drives, they are the older mind with the latch. The indentation halfway along the slot emulates that.
by 1984, when I got my first floppy drive, there were levers. The latches seemed earlier, or maybe specific to the Apple II drives? I can’t remember. Except for maybe two Apple II drives, I never had drives with the latch, just levers (and then buttons for 3.5″ drives) .
A lot of retailers didn’t carry many Vtech products where I lived as they were always a bit pricey and a bit “heady” for most kids just wanting GI Joes and Hot Wheels stunt tracks. We would have had to have mom drive 2 hours to get to the mall with decent toy stores otherwise it was Kmart most times. The real savior of my rural existence was the Sears Catalog and Service Merchandise to a lesser extent. Every xmas, a little bit of the civilized world crept down our chimney.
Interesting that the cats reader was so poor. I know these were built to a price, but just one more IR detector you could have printed a “clock” on the card as well to alleviate all that pain.
Damn auto correct. Cats = card
Cats find their way into just about everything,
just ask that fellow named Schroedinger.
In consumer electronics development, the joke is to design the product so that it works, throw away half the components and make it work again (I believe that was from Steve Garcia of Circuit Cellar fame.) Bil Herd in one of his talks tells how he once worked all day to eliminate a <$1 part from his design because Commodore had to first buy all the parts to make those units before selling them to the channel. So if you're building 1 million units, a $1 part == $1 million dollar additional cost upfront.
The card's bar code pattern looks like VTech tried to make it self-clocking so one detector should be fine. The black and white areas alternate and (from the top-down) start at regularly-spaced intervals. The two different widths of a black bar seems to indicate mark or space. Looks like one start bit, 8 bits of data, then a stop pattern? With that scheme the software decoder can be designed to be pretty tolerant to how fast and steady the card is pulled, but it's possible the chip's speed and memory forced them to use a smaller, simpler, and not-so-good algorithm.
^ Steve Garcia ==> Steve Ciarcia. I blame autocorrect.
The parts reduction technique is known as “Muntzing”, named after Earl “Madman” Muntz circa 1950. Read the wikipedia articles.
A few bytes? Looks like 10 bits to me.
My guess is start + 8 bits + stop, asynchronous with embedded clock. This method was also used for bin/tray identification in automated warehouses before modern barcodes came into fashion.
They are variable width though, so a thicker line is presumably meant to be two bits. So I’d interpret that scope output as something like:
110100100100110110100100100
Which in hex is:
6926D24
No idea if that actually means anything or is just a coincidence, but…
Such a long number would be overkill for less than 100 cards. The CPU inside the ASIC ist probably a 8048 with 2kB or 4kB ROM, the usual stuff for consumer electronics in the 1980s.
Some of that is almost certainly a preamble though, and maybe even a set bit sequence for the closing. So it might still just be a single byte for the ID.
That’s where it would be nice to see the pulls from a couple cards to see what actually changes.
It looks like thin black stripes = one state (0?) and thick black stripes = the other state (1?). Clocking is ensured by having them both take up the same space plus having white space between all the stripes.
I have the same idea.
And looks like the format is:
DDDD DDDD C or
DDDD DDDD D
Where the D is for the data and C is the checksum or a card switch
I think the most likely is the first format is use.
But the second format has more values.
I see that there are a series of bars and spaces, each 1x (narrow) or 2x (wide). There is information in the bar width as well as the space width. The 11x bar at the bottom, the 5x space with the alphanumeric writing, and the 5x bar above it probably constitute the start pattern. Following that are a series of 10 bars and 10 spaces, each 1x or 2x wide. Given that the code length is fixed, and the reading direction is fixed, there would be no need for a stop pattern; a bar count would suffice to validate a successful read.
I suspected at first that it was a variation of an Interleaved 2 of 5 code, which encodes one decimal digit in 5 bars (2 of which are wide, the other 3 are narrow) and the next digit in the widths of the spaces between the bars of the first digit, etc. The bar+space count of 20 would encode 4 digits in the I2of5 symbology. But my theory doesn’t hold up completely, because 3 of the bars in the last group of 5 are wide, which violates the I2of5 rules.
Clearly, though, there is information in the space widths as well as the bar widths.
Inspection of additional cards and the human-readable printing on them might provide more of a clue as to the encoding.
It looks like ten bits of long bar+short gap or short bar+long gap, plus the super long bars as a lead-in. To determine if any of the ten bits has a special meaning like a start bit or parity would require a few more samples.
I remember C cells. :)
The keyboard is the same width and, minus one row of keys, the same height as the little Bluetooth keyboard I got for my tablet, but the VTech’s is clearly better because it doesn’t have the keys all abutting one another so adult fingers inevitably press two at once. Insert roar of frustration here! ;) IT’s a double shame because my Bluetooth keyboard actually has decent key action. I should give it to a kid who wants to type a lot.
Thinking about modding, (okay, daydreaming about modding,) I’d love to find a use for those slots. They look to be 3 to 3.5″ wide, but only the thickness of 5.25″ disks. I don’t suppose anyone would want to build a scale model of a 5.25″ disk drive. :D It would be much easier to design a smart card to fit, maybe even a thin PCB with the chip in a hole and the traces brought to the end for an edge connector.
“She sells C-cells at the C-store!”
Ren,
Easily your funniest comment yet –
Bravo.
(c;=
I had one of these. The “keyboard” only worked half the time when you pressed the buttons. The user experience was literally depressing and disappointing at best.
A clock timing strip on the side of the card would probably have solved the whole problem? But that would have required another few cents worth of components for a clock channel. Cost Overun!!.
I had one of these a relative brought back from America. We could never get the damn thing to read a card and assumed it was broken (Australia was a little too far for warranty repair) It was very impressive at the time, I enjoyed just playing make believe “computer” on it anyway.. I’ve come so far, ahem.