We live in a time when all manner of electronic components are practically a mouse click away. Still, we like to see people creating their own components. Maybe a stock part won’t fit or isn’t immediately available. Or maybe you just want to build it yourself, we get that. [Aptimex] shows off a design for a 3D printed slide switch that uses a paperclip for the contact material.
Of course, it had better be a metal paperclip and we’d make sure the shiny metal was pretty conductive. Of course, you could probably use thick wire to get the same effect. It sounds like [Aptimex] was inspired by an earlier Hackaday.io project that created a few different kinds of switches using similar techniques.
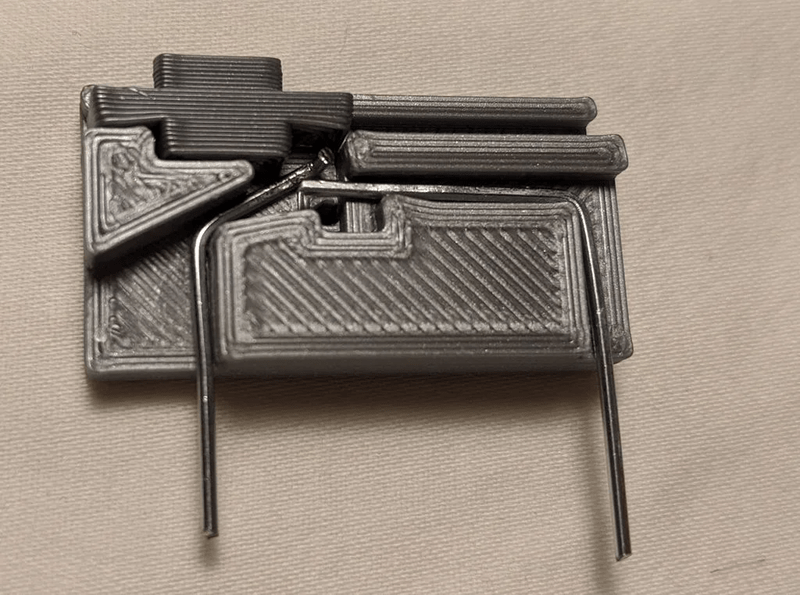
The 3D printing pieces look small and easy to print, the hard part is probably straightening and cutting the paperclip. The instructions offer some tips on how to best do that. From the pictures, they look as though they make nice PCB terminals.
Custom printing switches might not be for everyone. As for us, we can’t help thinking about how to design switches for some retrocomputer replicas or to replace bad switches in old radio gear. Of course, it isn’t news that paperclips are pretty versatile hack material. We’ve seen them in use for breadboarding. We can’t forget the paperclip computer, either.


Even in small switches material erosion due to arcing is limiting the lifespan of a switch.
Maybe this is of no concern for [Aptimex]. But was it, instead of paperclip, a silver coated copper wire could improve this switch.
Another thought, instead of a precious metal nickel coating could also work nice if the load of the switch was very small.
Maybe the paperclip was made of nickel coated steel..
To improve the contact reliability, use a reed switch for actual contact and a magnet.
Hey that’s a nice idea!
This clever hacker has built a switch, using only some 3D printed components and a switch!
I would think metal fatigue would be the death of this one. Paperclips these days often don’t even survive being unbent. Or it will lose spring and stay closed. Any design with random wire, I’d prefer to arrange so that it mechanically pulls it open rather than relying on it remaining springy enough.
Looking forward to “House fire caused by home made switch” article.
hah, pretty nuts!
for a bike light (which had to be ‘rain proof’), i built basically this switch but with a moving magnet and a reed switch. it worked well, but because my printer isn’t that great, the switch had too much friction. i would sometimes have to use a coin just to push the switch across without hurting my fingers. i could have dramatically expanded all the tolerances but i didn’t want it to flop around on its own from being shaken on the bike. this kind of ‘tight but not too tight’ dilemma is a recurring challenge for 3d printed objects.
i made other lights using regular latching push button switches, and i’ve never had the switch fail, so that’s what i do now. moisture eats battery contacts like crazy — they have to be soldered — but it doesn’t seem to bother slightly expensive on-off switches, at least in my usage.
in other news, just about every professionaly-designed bike light fails after the first rain. they’re typically designed to be water-tight which means once water does make it in, it never makes it out. these days, it’s a poorly-seating rubber door on the usb charge port that kills it, but i had this problem with AAA-powered lights too. cateye, in particular, is bad at engineering.
I bet this design could be made fully enclosed or used with magnetic actuation of a paperclip reed switch.
https://www.youtube.com/watch?v=qKPIRQ43980
Print quality remind me how much we are needed open source high-pressure extruders for hot/friction extrusion and injection molding.
Also bending switch from Veritasium video http://axqzx4s6s54s32yentfqojs3x5i7faxza6xo3ehd4bzzsg2ii4fv2iid.onion/watch?v=97t7Xj_iBv0
Forgot clearnet link: https://invidio.us/watch?v=97t7Xj_iBv0
The metal bands that Dupont pins come on are quite nice for making leaf switches. Very springy, take solder easily, and obv. conductive as that’s the purpose of the pins. Can be used to make both normally open and closed switches. /Arne