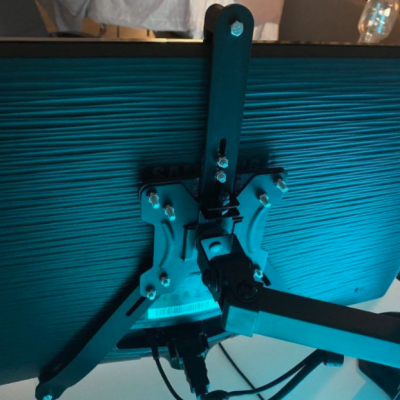
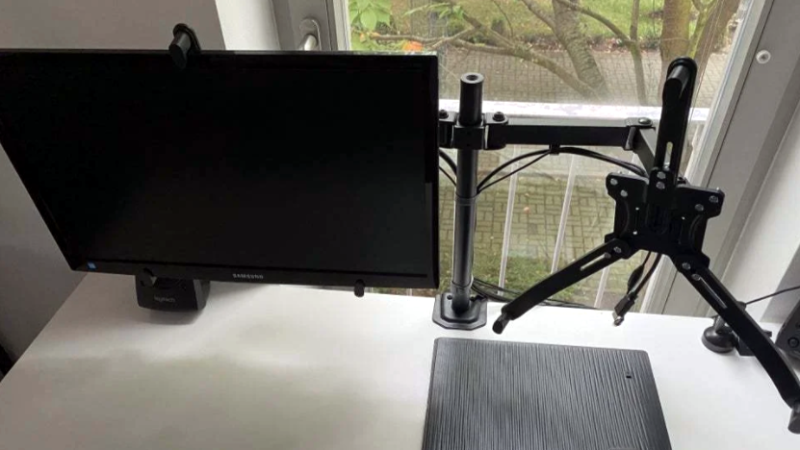
 Some monitors lack the holes on the back that make them VESA-compliant, so mounting them on a monitor arm can be a non-starter. To handle this, [Patrick Hallek] designed and 3D printed these adapter arms to make flat monitors mount to VESA hardware whether they want to or not.
How does it work? When a monitor can’t attach directly to a VESA mount, this assembly attaches to the mount instead. The three arms extend around the edge of the monitor to grip it from the bottom and top. Some hex-head M5 bolts and nuts are all that are required to assemble the parts, and the top arm is adjustable to accommodate different sizes of monitor. As long as the screen size is between 17 and 27 inches diagonal, and the monitor thickness falls between 30 mm and 75 mm, it should fit.
It’s a smart design that leverages one of the strengths of 3D printing: that of creating specialized adapters or fixtures that would be troublesome to make by hand. That is not to say that there’s no other way to make exactly what one wants when it comes to mounting monitors: check out this triple-monitor setup using some common metal struts, no welding required.
[via reddit]


*looks at post*
*looks at basic woodshop skills*
amateur hackery.
I kid, it’s a very clean build.
“When you have a hammer, everything looks like a nail”.
I wouldn’t trust that plastic to support the weight long-term. Would not a couple of pieces of wood or aluminum have been a better choice? But, I suppose that lacks the “I am a clever hacker with a 3-D printer” cred.
Depends on the plastic and printer configuration and software settings.
Materials science often surprises people.
Just like welding, sometimes the pretty welds are the shitty ones while the ugly blobs might actually have a surprising amount of penetration
I really detest this sort of “but doing it this other way would be better!!!!” comment. Yeah, so what? I’m more interested in seeing people’s ideas, creativity and design choices than in cheap criticism. There’s *always* an easy way to tear down someone else’s work.
Many monitors aren’t nearly heavy enough to cause a problem here. We’re not mounting CRTs after all.
And this is a good way to make use of cheap old monitors that normally would just end up gathering dust.
+1 times 100
“I wouldn’t trust that plastic to support the weight long-term.”
That depends on the weight of the monitor of course.
But also it depends on what kind of plastic is used and which way the layer lines are run. I wouldn’t want the weight of the monitor constantly pulling the layers apart.
“When you have a hammer, everything looks like a nail”.
Complains the guy with a screwdriver who sees everything as a screw?
Honestly, I have a pretty decently stocked shop for working with wood and enough knowledge and skills to use them. I appreciate a printable design though and usually turn to my printer first. 3d printed designs, once you do the work to perfect it once are pretty much a button press away from duplication. And even if you never want to build the same thing twice someone else might. You can always share your design with the internet. And then there is the potential for parametric designs.
I see a lot more potential for building up a wealth of community driven open source designs in the form of scad, stl and other 3d models than in paper wood cutting templates. Hopefully in time we will see CNC plywood cutters, CNC water jets or even CNC plasma cutters or 3d metal printers become more commonplace and affordable. Then maybe we really will have whatever a person wants available via download.
““I am a clever hacker with a 3-D printer”
Wow. That sounds so much like jealousy. You know that 3d printers are pretty easy to obtain these days right? Can’t you save your paper route earnings for the next few weeks?
I glued a piece of wood to the back of my monitor and used wood screws to put it on the vesa mount. 10/10 would recommend to everyone with an old cheap monitor
There’s already an adapter for that monitor: https://images-na.ssl-images-amazon.com/images/I/71TYBBzSb3L.jpg
And these mounting brackets are also sold as kits made of pressed steel, which I would trust more than printed plastic to not creep and fall off.
That is one ugly way to mount to the OEM stand attachment point, and it looks like it’d make plug access difficult.
People here clearly underestimate the strength of 3D printed parts.
It’s not the strength – plastics creep. It’s not a question of if, but when – the plastic brackets will yield over time with a heavy item like a monitor.
monitors are not heavy
You puny humans think small glass window with plastic box heavy? AHAHAHAHAHAHA!
Plastics don’t creep *that* much, unless they’re near the glass transition temperature or they’re right up against the knee of the stress-strain curve. You don’t leave a plastic doodad on the table and come back to find it’s spontaneously become a puddle of goo.
Brackets like these have multiple points of stress concentration, and a monitor like that easily weighs a few pounds, and the lock bracket pieces acting as levers which makes it highly likely to creep and fall off one day in the not so distant future.
Not from my limited printing experience. My parts tend to break pretty easy. Some are functional, if used with care, but most just don’t hold up all that well. I really would trust a monitor on printed parts. The arm I made for a small camera, is a little scary, but hasn’t broken yet. Very gentle when mounting and adjusting. Broke two pieces when I first assembled it, and learned it wasn’t very strong. GoPro mounts haven’t worked out well at all…
Are you using 100% infill? This sounds like a setup problem of some sort. PLA or ABS? Nothing printed should be so weak that a gopro can break it without a hard fall.
Even faster: I would have glued with epoxy an old monitor VESA interface, cut to the smallest square size, done!
What kind of epoxy are you using? I have never had good luck with epoxy. I must be using it wrong.
@John said: “What kind of epoxy are you using? I have never had good luck with epoxy. I must be using it wrong.”
It’s not you. Prep the surfaces properly then try something appropriate for the job from an expert in epoxy products like JB-Weld: www(dot)jbweld(dot)com. The key is to pick the right epoxy for the job and follow the instructions carefully. I have had good results with the putty epoxy products. With putty you can sculpt the material to increase the contact area and build fillets for added strength. [Note: I have no affiliation with JB-Weld.]
Normally I’d go a little side-eyed when JB-Weld is mentioned, if only because it often gets the WD-40 treatment – constantly recommended despite being a bad choice. But in this instance it’s not! https://www.thistothat.com/cgi-bin/glue.cgi?lang=en&this=Plastic&that=Metal
Surface prep is always critical for good bond strength; a too smooth surface or contaminants are great ways to sabotage an adhesive bond. Certain plastics (the polyethylenes) are also practically immune to adhesives, although I’ve yet to see a monitor made out of them :D
Regular 3M100 epoxy and, yes prep is everything and surface must be ground to get grip
After few years working with plastics, I found out for identical plastics PC, abs, ps, are best glued with solvant glue, like the pvc tubing one, the bond is indestructible.
for dissimilar plastic, go with expoy or PMMA (less prep work)
For the most ungluable plastics (polyethylene and polypropylene) find scrap of the same plastic and color, cut strips, and weld it like TIG: one hand with the hot air rework and the filler rod the other: no longer to have to discard those broken tanks, pump, kayak, garbage bin, but it takes some practice to have a nice finish (like TIG actually)
I bought one of those welders at Horror Fraught.
It has patched a couple of broken plastic things, it seems the gray sticks are the only ones that have worked at all.
https://www.harborfreight.com/plastic-welding-kit-with-air-motor-and-temperature-adjustment-96712.html
My thought was: Use an aluminium square plate, like 5mm thick, with tapped holes and glue it with silicone (or epoxy) at the back side of the monitor.
https://www.youtube.com/watch?v=82eTkx17bxQ
When you hold a piece of plastic under constant strain, it will gradually re-align the polymers and lose the tension, which is why plastic springs don’t really work. Alternatively, if you keep a constant stress, the strain will keep growing and the plastic part sags.
This happens fastest if you should ever get the plastic hot, so an errant sunbeam through the window can make your monitor fall onto the table.
I thought VESA was the extra connector next to the ISA connectors on my old motherboard.
I hated those. You’d need to be a Hulk to push a 12″ long card into that long slot. I was glad when the majority went with small PCI slot back then
VESA is Video Electronics Standards Association. You’re right, they published a standard for graphics expansion cards way way back with that extra connector. They’re into all sorts of other stuff, including the “VESA mounts” on the backs of monitors and TV sets.
Thanks!
I have to question why you would not just get VESA-compliant monitors instead. Most monitors are to my understanding.
Why buy a VESA-compliant monitor, when there is already one on the bench?
“By the time he finished drawing this in CAD I’d have similar mounting cut and welded from scrap steel laying around the shop.”
I bet you would. But that CAD file can be re-used. How long would you be in the shop making 10 of them? 20? Ok the printing probably does take longer but with Octopi and a smoke alarm it’s not like you need to stay in the room with the printer the whole time. Your stuck out in the shop making the same cuts and the same welds over and over again.
But wait, you don’t need 10 or 20? Yah but that CAD file can be shared over the internet. You just volunteered to weld up brackets for everyone here on HaD and that’s just for starters. 10 or 20 was just the warmup!
I thought PLA had a problem where any force that was constant over a long period of time would cause a break. So the solution was just not to use PLA. PLA kind of sucks anyway since it will go soft outside on a hot day or in a hot car, pretty much anywhere but inside an air conditioned house. So the solution was to use ABS.
But, I printed up a couple of PLA brackets to hang an air filter from my printer enclosure. It probably has a couple of pounds of charcoal in it. This was supposed to be temporary. It’s been close to a year now probably. They were a little droopy from the start but don’t seem to have degraded at all. I can see brackets like these holding a monitor as long as it isn’t a particularly heavy one. And that’s just PLA!
I think the trick is make sure the weight pulls parallel to the layer lines and not perpendicular.
Oh, and if the sun is shining on your monitor mount hot enough to soften plasitc then it probably isn’t doing any favors to your monitor either.
And for the real plastic haters in the comments here.. Your monitor’s cases are made from plastic themselves are they not?
Plastic creep happens quickly at only slightly elevated temperatures.
My monitors are made with an internal structure of steel, and non-load-bearing exterior shells of plastic.
Well, for a while I was sticking an electric windshield defroster in my printer enclosure yet those brackets which I mentioned handled it just fine. And that was just PLA. I never did measure the temperature and I stopped doing that when I found that it was pulling enough current to make it’s own power wire warm. I’m pretty sure it was hotter than any of my monitors though.
But that’s just PLA.
I’ve had a PET-G Benchy sitting in my car all summer long, even on days that were near 100°F (~38°C). It hasn’t deformed a bit although admittedly there is no pressure on it. It has passed the fingernail test just fine though even on those 100° days.
ABS handles even hotter temperatures. Much of a typical car’s interior is made of ABS. Does your monitor reach the temperature of a closed car on a hot summer day?
And if this doesn’t convince you there’s always nylon.
There are actually many different kinds of plastic and each has their own properties. It doesn’t really make a lot of sense to make blanket statements about them.
CNC router, or laser, cut wood. Or heck, even scroll saw cut wood! 3D printing is too slow and WAY too expensive for these things that are fundamentally 2D shapes.
3D printing has got to be one of the most overused and misused technologies of all time.
But maybe I’m just bitter because my own printer is a Taz 6.