Your Scope, Armed And Ready

[VoltLog] never has enough space on his bench. We know the feeling and liked his idea of mounting his oscilloscope on an articulated arm. This is easy now because many new scopes have VESA mounts like monitors or TVs. However, watching the video below, we discovered there was a bit more to it than you might imagine.

First, there are many choices of arms. [VoltLog] went for a cheap one with springs that didn’t have a lot of motion range. You may want something different. But we didn’t realize that many of these arms have a minimum weight requirement, and modern scopes may be too light for some of these arms. Most arms require at least 2 kg of weight to balance the tensions in their springs or hydraulics. Of course, you could add a little weight to the mounting plate of the arm if you needed it. The only downside we see is that it makes it hard to remove the scope if you want to use it somewhere else.

Assuming you have a mount you like, the rest is easy. Of course, your scope might not have VESA mounting holes. No problem. You can probably find a 3D printed design for an adapter or make (or adapt) your own. You might want to print a cable holder at the same time.

Honestly, we’ve thought of mounting a scope to the wall, but this seems nicer. We might still think about 3D printing some kind of adapter that would let you easily remove the scope without tools.

Of course, there is another obvious place to mount your scope. Monitor arms can also mount microscopes.

Continue reading “Your Scope, Armed And Ready”

VESA Arm Turned Low-Cost Overhead Camera Rig

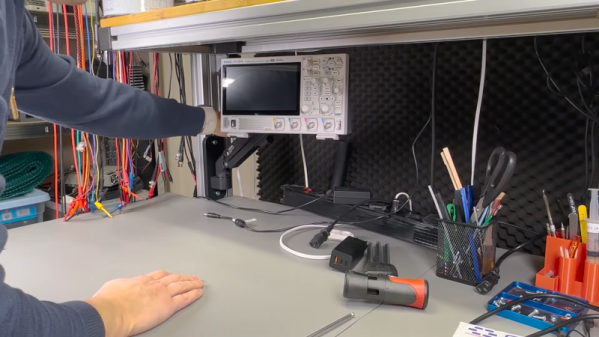
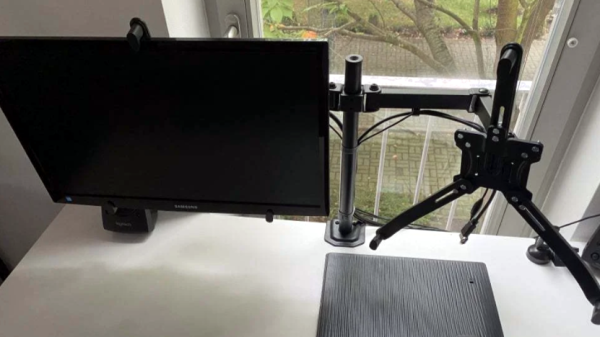
Whether you’re live streaming builds or just want to take your project photography to the next level, you can’t beat an overhead camera setup. Unfortunately, they tend to be cumbersome and more often than not quite pricey. Looking for an affordable solution that could easily be moved out of the way when not in use, [Jay Doscher] had the clever idea of adapting a common VESA monitor arm to give his camera a bird’s eye view of the action.

If you think about it, one of these monitor arms is a nearly perfect base for a camera rig. They’re easily mounted to a desk or work bench, can be quickly repositioned by design, and perhaps best of all, you don’t have to spend a lot of money to get a decent one. A camera is also a far lighter and less awkward payload than the arm was designed to hold, so you don’t have to worry about it potentially dropping your expensive gear. Or cheap webcam, as the case may be.

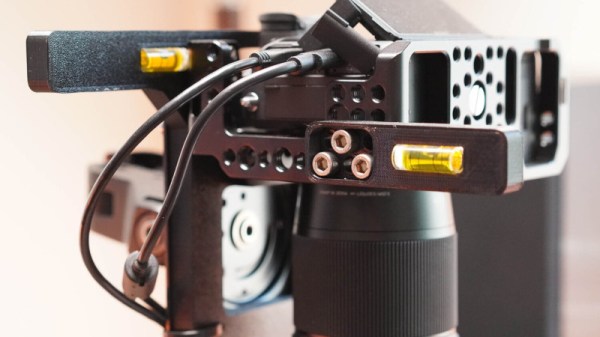
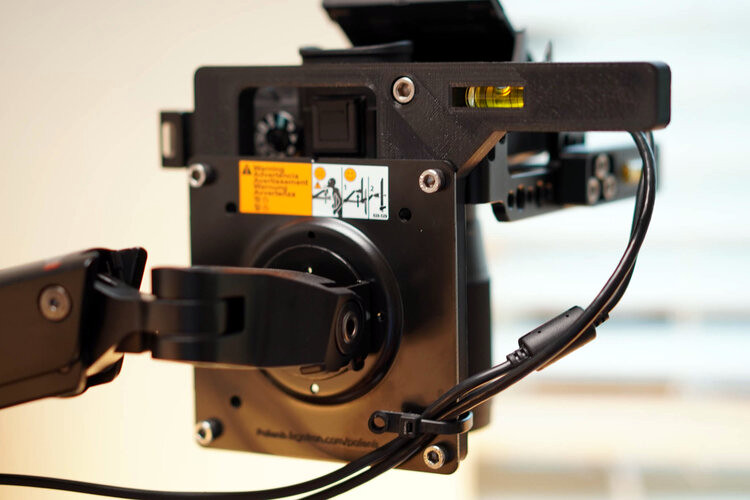
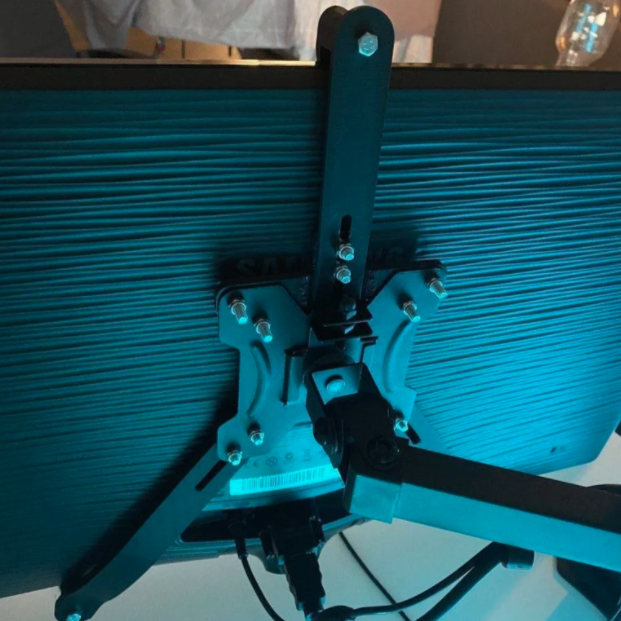
All [Jay] had to do was come up with a way to securely mount his Sony A7R3 on the end of one. While there’s certainly a few ways you could solve this particular problem, he went the extruded plastic route and 3D printed a beefy adapter plate with the standard VESA bolt pattern. His Smallrig camera cage attaches to the plate, and thanks to a pair of press-fit bubble levels from McMaster Carr, he’s able to get everything lined up properly over the bench.

Of course, there’s an excellent chance you don’t have the same camera as [Jay]. But that doesn’t mean you can’t modify the design of his adapter to fit your own gear. To that end, he’s not only shared the final STLs, but he’s provided a link to the TinkerCAD project that you can actually edit right in the browser.

If you’ve got a light enough camera, you could put something similar together with PVC pipes or even an articulated arm intended for a desk lamp. But if you’ve got a DSLR or other full-sized camera, we think it’s more than worth the $30 USD one of these will cost you on Amazon to make sure your gear doesn’t end up smashing into the deck during a live stream.

Monitor Not VESA-Compliant? It Is Now!

Some monitors lack the holes on the back that make them VESA-compliant, so mounting them on a monitor arm can be a non-starter. To handle this, [Patrick Hallek] designed and 3D printed these adapter arms to make flat monitors mount to VESA hardware whether they want to or not.

How does it work? When a monitor can’t attach directly to a VESA mount, this assembly attaches to the mount instead. The three arms extend around the edge of the monitor to grip it from the bottom and top. Some hex-head M5 bolts and nuts are all that are required to assemble the parts, and the top arm is adjustable to accommodate different sizes of monitor. As long as the screen size is between 17 and 27 inches diagonal, and the monitor thickness falls between 30 mm and 75 mm, it should fit.

It’s a smart design that leverages one of the strengths of 3D printing: that of creating specialized adapters or fixtures that would be troublesome to make by hand. That is not to say that there’s no other way to make exactly what one wants when it comes to mounting monitors: check out this triple-monitor setup using some common metal struts, no welding required.

[via reddit]

Apple Just Killed The VESA Mount And We Couldn’t Be Happier

After the immense failure of the 2013-era Apple Pro trash can Mac, Apple has been hard at work at the next generation of workstation desktops. This week, the new Mac Pro has been announced, and the specs are amazing: We finally can buy a professional, desktop Mac with half the storage of an iPhone. The big story isn’t the next generation of cheese-grater Macs, though: the new display, the Pro Display XDR, has killed the venerable VESA mount and we couldn’t be happier.

The VESA mount, or more correctly, the VESA Mounting Interface Standard, was created in 1997 as a mounting standard for flat panel monitors and televisions. Look on the back of your monitor, and you’ll probably find a pattern of M4 threaded inserts laid out on a 75mm or 100mm square. Larger sizes, with respectively larger thread sizes, are used for gigantic wall-mounted televisions. For the last two decades, this has been the standard for mounting monitors to stands. Now this standard faces a challenger thanks to the brave designers at Apple. Continue reading “Apple Just Killed The VESA Mount And We Couldn’t Be Happier”

Tri-mounted Monitors Using Strut Channeling (no Welding)

[Optec] want his own triple monitor setup built to his specifications. It turns out to have been a pretty easy project thanks to his mastery of stock materials. The image above is just a bit dim, but if you look closely you can see the strut channel which makes up the monitor frame.

When it comes to this type of metal strut material there’s a lot to choose from. [Optec] went with the half-slot format which provides a little bit of left and right wiggle room. This is important to get the edges of those monitors to butt up to one another. After making a pair of relief cuts he bent the channel in two places, using 45 degree brackets as reinforcement. The monitor mounts are made of MDF with countersunk holes to hide the bolt heads which connect it to the channel.

He figures the total cost of the mount was around $40. Seeing how easy it was makes us think we may never buy a commercial TV mounting bracket again. Of course if you’re more into woodworking there’s a tri-monitor project for you too.

[via reddit]