Simplify 3D Printer Wiring With CAN Bus

[mark] had an interesting idea when looking at all the wiring of a typical 3D printer; Use CAN Bus. There are a lot of wires going to the extruder assembly, and with most designs this thing is flying around at quite some speed. You’ve got connections for powering the heater, fan power, four wires for the extruder motor, thermistor sensor wires. You get the idea. Lots of wires. Worse, they’re all moving around with the axis, and if failures occur at either end due to poor strain relief, or the conductors themselves break, then all manner of interesting failures can occur. If the hot end thermistor connection goes open circuit, usually no damage occurs but the temperature control goes out the window and your print will fail.

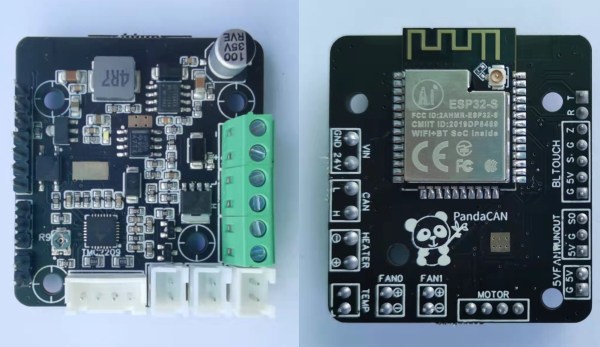
Now if you push the electronics needed to drive and control the extruder, directly onto the moving body itself, and hook-up to the main printer electronics with CAN Bus, you can do the whole moving interconnect thing with a measly four wires. Yes, you need another PCB assembly, so it adds cost, but it does also simply the electronics at the control end, so some savings can be made. [mark] has used CAN Bus due its availability with modern microcontrollers and also its designed-in robustness, thanks to its automotive and industrial heritage. When you think about it, this is a rather obvious thing to do, and we’re not sure why we’ve not see it much before.

If you want to dig into the detail, the project GitHub has the schematics and code ready to go.


Continue reading “Simplify 3D Printer Wiring With CAN Bus”

Python Ditches The GILs And Comes Ashore

The Python world has been fractured a few times before. The infamous transition from version 2 to version 3 still affects people today, and there could be a new schism in the future. [Sam Gross] proposed a solution to drop the Global Interrupt Interpreter Lock (GIL), which would have enormous implications for many projects that leverage the CPython internals, such as Pandas and NumPy.

The fact that Python is interpreted is a double edge sword. It means there can be different runtimes, such as Pyston, Cinder, MicroPython, PyPy, and others, that might support the whole language, a specific version, or a subset. But if you’re using Python, you’re probably running CPython. And it has something known as global interpreter lock that affects threaded code. In a nutshell, only one thread can run in the interpreter at a time. There are some ways around it, such as moving performance-critical sections to C or having multiple interpreters. However, most existing solutions come with considerable downsides. Continue reading “Python Ditches The GILs And Comes Ashore”

[Nick Rehm] explains the workings of a gps-less self guided drone

Autonomous Drone Dodges Obstacles Without GPS

If you’re [Nick Rehm], you want a drone that can plan its own routes even at low altitudes with unplanned obstacles blocking its way. (Video, embedded below.) And or course, you build it from scratch.

Why? Getting a drone that can fly a path and even return home when the battery is low, signal is lost, or on command, is simple enough. Just go to your favorite retailer, search “gps drone” and you can get away for a shockingly low dollar amount. This is possible because GPS receivers have become cheap, small, light, and power efficient. While all of these inexpensive drones can fly a predetermined path, they usually do so by flying over any obstacles rather than around.

[Nick Rehm] has envisioned a quadcopter that can do all of the things a GPS-enabled drone can do, without the use of a GPS receiver. [Nick] makes this possible by using algorithms similar to those used by Google Maps, with data coming from a typical IMU, a camera for Computer Vision, LIDAR for altitude, and an Intel RealSense camera for detection of position and movement. A Raspberry Pi 4 running Robot Operating System runs the autonomous show, and a Teensy takes care of flight control duties.

What we really enjoy about [Nick]’s video is his clear presentation of complex technologies, and a great sense of humor about a project that has consumed untold amounts of time, patience, and duct tape.

We can’t help but wonder if DARPA will allow [Nick] to fly his drone in the Subterranean Challenge such as the one hosted in an unfinished nuclear power plant in 2020.

Continue reading “Autonomous Drone Dodges Obstacles Without GPS”

Liberating The ESP8266 From Its Development Board

While the ESP32 is clearly a superior piece of hardware, we think you’ll agree that the ESP8266 is just too useful not to have a dozen or so kicking around the parts bin at any given time. Cheap, easy to use, and just enough capabilities to bring your projects into the wonderful world of IoT. But if you really want to get the most out of it, you’ll eventually have to skip the development board and start working with the bare module itself.

It can be a scary transition, but luckily, [Ray] has collected some notes that should prove helpful for anyone looking use modules like the ESP-12F in their own custom PCBs. From different tips on making sure the power-hungry modules get enough juice, to cost cutting measures that help reduce the ancillary parts needed in your circuit design, it’s a worthwhile read for new and experienced ESP8266 wranglers alike.

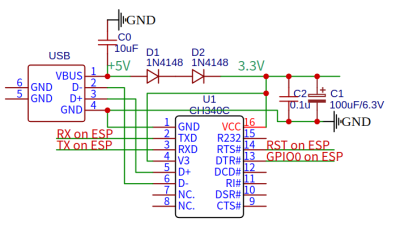
An auto-reset circuit with the CH340C

For example, [Ray] talks a bit about using the infamous GPIO10 pin. This pin is on the rear of the ESP8266 module, and on many development boards, it isn’t even connected. That’s because its internally hooked up to the ESP8266’s SPI flash chip, and using it can cause problems if you’re not careful. But as explained in the blog post, as long as you make sure the flash mode is set to “dual IO” (DIO), then GPIO10 can be used just like any other free pin.

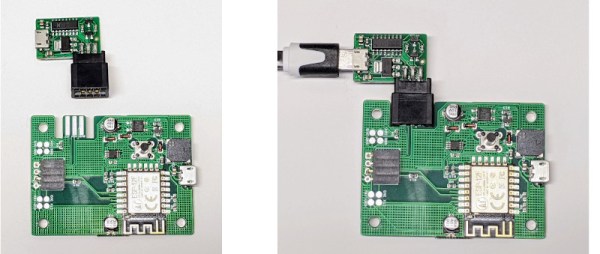
We also really liked the tip [Ray] shares at the end for making your boards more easily programmable. Sure you can leave an unpopulated header on the board, or fiddle with some pogo pin setup, but his edge connector approach is quite clever. Just slip the programmer on for the initial burn, and then after that you can update over the air.

There’s no denying how easy it is to throw something together with an ESP8266 development board, but we’ve covered so many incredible projects that have made use of the bare module’s diminutive dimensions that you’ll ultimately be missing out if you don’t cut out the middle-man.