Gift Idea From 1969: A Kitchen Computer

The end of the year is often a time for people to exchange presents and — of course — the rich want to buy each other the best presents. The Neiman Marcus company was famous for having a catalog of gift ideas. Many were what you’d consider normal gifts, but there were usually extreme ones, like a tank trunk filled with 100,000 gallons of cologne. One year, the strange gift was an authentic Chinese junk complete with sails and teak decks. They apparently sold three at $11,500 (in 1962 money, no less). Over the top? In 1969, they featured a kitchen computer.

Wait a minute! In 1969, computers were the purview of big companies, universities, and NASA, right? Well, not really. By that time, some industrial minicomputers were not millions of dollars but were still many thousands of dollars. The price in the catalog for the kitchen computer was $10,600. That’s about $86,000 in today’s money. The actual machine was a Honeywell 316, based on one of the computers that helped run the early Internet.

Continue reading “Gift Idea From 1969: A Kitchen Computer”

A crown ornament made from PCB material

Clever Design Technique Makes Flexible PCB Fit For A Queen

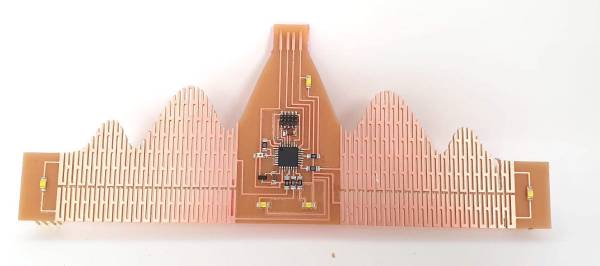
Printed circuit boards can be square, round, octagonal, or whatever shape you desire. But there’s little choice when it comes to the third dimension: most PCBs are flat and rigid. Sure, you can make flexible PCBs like the kapton-backed ones you find inside electronic gadgets, but those are complicated to work with. As it turns out however, you can also make flexible boards using regular PCB material: check out [Rehana Al-Soltane]’s Flexible Crown PCB, a project she did as part of [Neil Gershenfeld]’s “How To Make (Almost) Anything” class at MIT.

The basic idea is to create flexures in the PCB by milling out several long slots with thin pieces connecting the two sides. [Rehana] got this idea from [Quentin Bolsée]’s flexible capacitive sensor project and applied it to make a crown-shaped PCB with sparkly LEDs. The crown can bend through 180 degrees and can actually be worn as a head ornament, with pin headers to clamp it down on the wearer’s hair.

[Rehana] used a tool called svg-pcb to design the board. This is an open source toolkit that lets you design PCBs by describing them in code, rather than drawing shapes by hand. Although this might look a bit odd if you’re used to working with traditional PCB design software, it’s ideal for making repetitive structures like the flexures in the crown: simply write a for loop and let the tool generate a perfect array of identical slots.

Fabricating the Flexible Crown posed a few difficulties of its own, because the PCB began to flex and wiggle itself loose before the milling process was finished. As it turned out, the trick was to cut all the slots on the interior first and only mill the board’s outline as the very last step.

Adding flexures to a PCB like this looks like a promising technique and we’ll keep an eye on further developments in this field. There are other ways of making bendy boards though: researchers at the University of Maryland used a laser engraver to make foldable PCBs. Our 2019 Flexible PCB Contest also yielded several impressive implementations.

Continue reading “Clever Design Technique Makes Flexible PCB Fit For A Queen”

Homebrew 3D Printer Goop Promises Better Bed Adhesion

Back when 3D printers were pretty new, most of us had glass beds with or without painter’s tape. To make plastic stick, you’d either use a glue stick or hair spray. Many people have moved on to various other build surfaces that don’t require help, but some people still use something to make the bed sticky and there are quite a few products on the market that claim to be better than normal glue or hairspray. [Jonas] wanted to try it, but instead of buying a commercial product, he found a recipe online for “3D printer goop” and made it himself.

You need four ingredients: distilled water and isopropyl alcohol are easy to find. The other two chemicals: PVP and PVA powder, are not too hard to source and aren’t terribly dangerous to handle. The recipe was actually from [MakerBogans] who documents this recipe as “Super Goop” and has another formula for “Normal Goop.” You’ll probably have to buy the chemicals in huge quantities compared to the tiny amounts you really need.

We assume the shots of the 3D printer printing its first layer is showing how effective the glue is. This looks like a very simple thing to mix up and keep in a sprayer. If you have some friends,  you could probably do a group buy of the chemicals and it would cost nearly nothing for the small amounts of chemicals you need.

If you don’t want to order exotic chemicals, you might not need them. We used to make “goop” by dissolving ABS in acetone, but hairspray usually did the trick.

Continue reading “Homebrew 3D Printer Goop Promises Better Bed Adhesion”