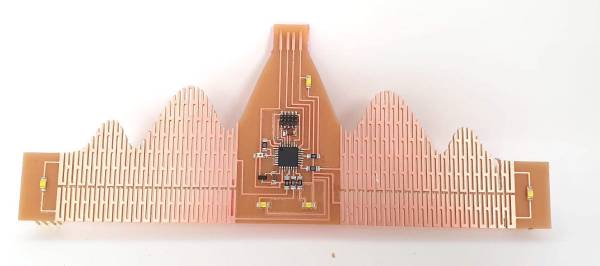
A crown ornament made from PCB material

Clever Design Technique Makes Flexible PCB Fit For A Queen

Printed circuit boards can be square, round, octagonal, or whatever shape you desire. But there’s little choice when it comes to the third dimension: most PCBs are flat and rigid. Sure, you can make flexible PCBs like the kapton-backed ones you find inside electronic gadgets, but those are complicated to work with. As it turns out however, you can also make flexible boards using regular PCB material: check out [Rehana Al-Soltane]’s Flexible Crown PCB, a project she did as part of [Neil Gershenfeld]’s “How To Make (Almost) Anything” class at MIT.

The basic idea is to create flexures in the PCB by milling out several long slots with thin pieces connecting the two sides. [Rehana] got this idea from [Quentin Bolsée]’s flexible capacitive sensor project and applied it to make a crown-shaped PCB with sparkly LEDs. The crown can bend through 180 degrees and can actually be worn as a head ornament, with pin headers to clamp it down on the wearer’s hair.

[Rehana] used a tool called svg-pcb to design the board. This is an open source toolkit that lets you design PCBs by describing them in code, rather than drawing shapes by hand. Although this might look a bit odd if you’re used to working with traditional PCB design software, it’s ideal for making repetitive structures like the flexures in the crown: simply write a for loop and let the tool generate a perfect array of identical slots.

Fabricating the Flexible Crown posed a few difficulties of its own, because the PCB began to flex and wiggle itself loose before the milling process was finished. As it turned out, the trick was to cut all the slots on the interior first and only mill the board’s outline as the very last step.

Adding flexures to a PCB like this looks like a promising technique and we’ll keep an eye on further developments in this field. There are other ways of making bendy boards though: researchers at the University of Maryland used a laser engraver to make foldable PCBs. Our 2019 Flexible PCB Contest also yielded several impressive implementations.

Continue reading “Clever Design Technique Makes Flexible PCB Fit For A Queen”

Circuit Board Origami Puts You Face-to-Face With Low-Poly Electronics

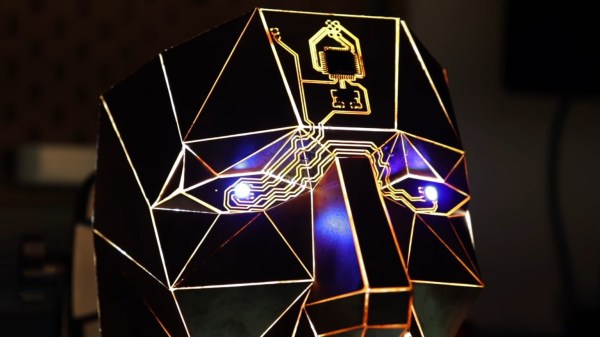
Paper craft has been around almost as long as paper itself. It’s fun to mimic paper craft and origami with low-poly 3D prints, and [Stephen Hawes] wondered whether it could be done with copper-clad PCBs. Two years after the question arose, we have the answer in the form of a fantastical mask with light-up eyes. Check it out in the video below.

[Stephen] started with a model (Update: [kongorilla]’s 2012 low poly mask model from back in 2012 was the starting point for this hack) from the papercraft program Pepakura Designer, then milled out dozens of boards. Only a few of them support circuitry, but it was still quite the time-consuming process. The ATmega32U4 on the forehead along with the fold-traversing circuitry serve to light up the WS2812B eyes. Power runs up the copper tube, which doubles as a handy mounting rod to connect to the 3D printed base.

Continue reading “Circuit Board Origami Puts You Face-to-Face With Low-Poly Electronics”

Desktop PCB Mill Review

[Carl] wanted to prototype his circuits quickly using printed circuit boards. He picked up a Bantam Tools Desktop PCB Mill and made a video about the results. His first attempt wasn’t perfect, as you could notice under the microscope. A few adjustments, though, and the result was pretty good.

Be warned, this mill is pretty expensive — anywhere from $2,500 to $3,000. The company claims it is a better choice than a conventional cheap mill because it uses a 26,000 RPM spindle and has high-resolution steppers. Because of its low backlash and high accuracy and repeatability, the company claims it can easily mill boards with 6 mil traces.

Continue reading “Desktop PCB Mill Review”

A 3D Printer To PCB Miller Conversion

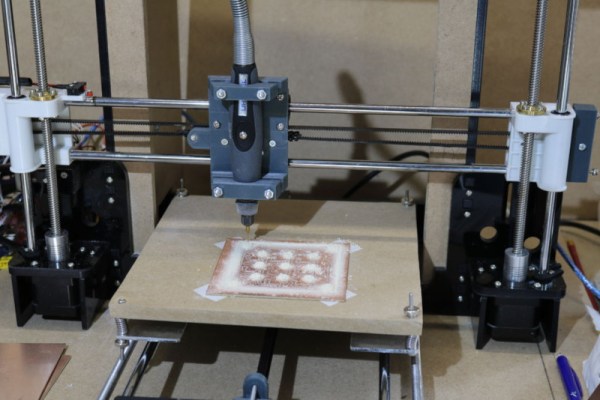
Got a 3D printer? With a bit of work, you may also have a PCB miller. That’s the basis of this neat hack by [Gosse Adema], who converted an Anet A8 3D printer into a PCB miller by building a holder for a Dremel rotary tool and adapting the GCode. This approach means that the adaptations to the printer are minimal: the only hardware is a 3D-printed holder for the Dremel that replaces the print head. The result is an impressive PCB milling machine that can do double-sided PCBs and make through holes.

The excellent write-up that [Gosse] did on this hack describes how he converted the printer, and how he took an EagleCAD design and converted it into four GCode files. That’s one for each side of the PCB, one for through holes and one for the final outline of the PCB. These are then fed to the 3D printer and cut in turn with an appropriate milling bit on the Dremel.

We’ve featured a few similar conversions before, such as this vintage conversion of a Makerbot and this cheap engraver conversion, but this one is much more detailed than those, covering the entire process from PCB design to final product.

Review: LinkSprite Mini CNC

It’s a great time to be a hobbyist. No matter how you feel about the Arduino/Raspberry Pi effect, the influx of general enthusiasm and demand it has created translates to better availability of components, a broader community, and loads of freely available knowledge. When people have access to knowledge and ideas, great things can happen. Tools that were once restricted to industrial use become open source, and the price of entry-level versions goes into a nosedive.

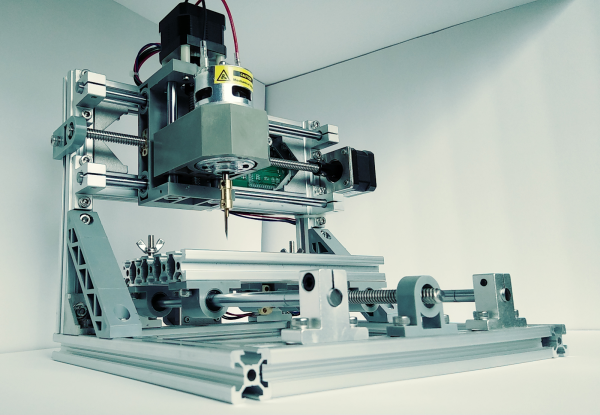
As we’ve seen over the last several years, the price of cheap 3D printers keeps falling while the bar of quality keeps rising. It’s happening with laser cutters and carving tools, too. Strolling through Microcenter a few weeks ago, I spotted a new toy on the back wall next to the 3D printers. It was LinkSprite’s desktop mini CNC. They didn’t have one out on display, but there were two of them in boxes on the shelf. And boy, those boxes were small. Laughably small. I wondered, could this adorable machine really be any good? To some, the $200 price tag suggests otherwise. To me, the price tag made it justifiable, especially considering that the next price point for a hobby CNC mill is at least twice as much. I took my phone out and stood there frantically looking for reviews, documentation, anything that was available. It seemed that the general, if sparse consensus is that this thing isn’t a total waste of money. Oh, and there’s a wiki.

According to LinkSprite’s wiki, this little machine will engrave wood, plastic, acrylic, PVC, and PCBs. It will specifically not engrave metal (PCB copper notwithstanding). I’m a bit leery of the chemicals used in the PCB etching process, so the idea of engraving them instead was especially tempting. I pulled the trigger.

Continue reading “Review: LinkSprite Mini CNC”

Guide: Why Etch A PCB When You Can Mill?

I recall the point I started taking electronics seriously, although excited, a sense of dread followed upon the thought of facing the two main obstacles faced by hobbyists and even professionals: Fabricating you own PCB’s and fiddling with the ever decreasing surface mount footprints. Any resistance to the latter proves futile, expensive, and frankly a bit silly in retrospect. Cheap SMD tools have made it extremely easy to store, place, and solder all things SMD.

Once you’ve restricted all your hobbyist designs/experiments to SMD, how do you go about producing the PCBs needed for prototyping? Personally, I dread the thought of etching my own boards. The process is laborious and involves messy chemicals and specially sensitized PCB’s — none of which interest me. I’ve only ever done it a few times, and have promised myself never to do it again. Professional but cheap PCB manufacturing is more like it board pooling services such as OSH park have made this both easy and affordable — if you can wait for the turnaround.

So what are the alternatives? If you are really serious about swift prototyping from your own Lab, I put forth the case of milling your own PCB’s. Read on as I take you through the typical workflow from design to prototype and convince you to put up with the relatively high start up cost of purchasing a PCB mill.

Continue reading “Guide: Why Etch A PCB When You Can Mill?”

Blob Grid Array Technique Mounts Board-To-Board

[Howard Matthews] mills his own PCBs, and man, does he hate drilling through-holes. Manually changing the bits between engraving and drilling after isolation routing? What is this? The stone age? [Howard] decided to rethink his DIY PCB manufacturing process, and came to one essential conclusion: Only a fraction of these drills are actually necessary.

Continue reading “Blob Grid Array Technique Mounts Board-To-Board”