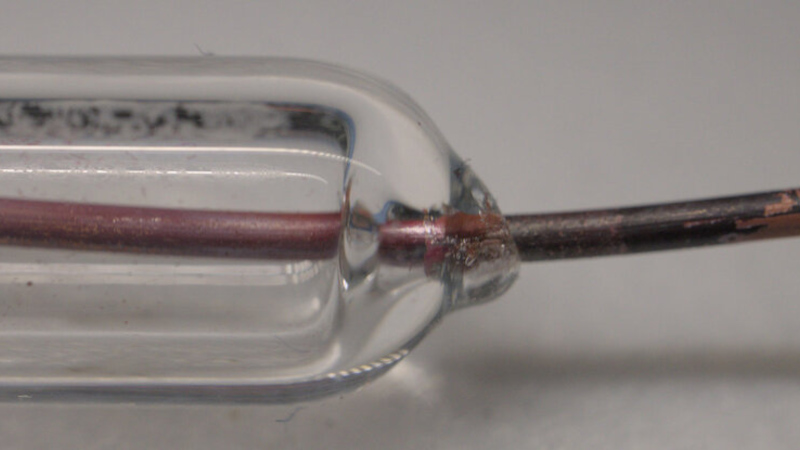
If you’ve ever taken a close look at a vacuum tube, you’ll have seen the seals around the pins that keep everything air-tight while providing the the device’s electrical contacts. As [maurycyz] finds out, it’s not an easy process to get right.
The problem is one of both chemistry and thermal expansion, as while a good seal can be made between glass and red copper oxide, it remains very difficult indeed to stop the glass cracking on cooldown due to differing thermal expansion properties. We’re led through a variety of experiments including surface treatments and flattening the metal to a sheet, with varying pros and cons. The most successful seal on the page comes from very thin tungsten wire, though hardly the most practical conductor for a vacuum tube.
It’s a fascinating investigation for the casual reader, taking them into the properties of metal-glass bonds and the difficulties involved in making them. We have even more respect for the people who make their own tubes after reading it.


The interesting point is they learned to solve this very early one (with light bulbs) but also with million of vacuum tubes, that had in some cases a sizable number of pins passing through.
Pinged Google and got this:
Dumet Wire: The industry standard for decades. It consists of a nickel-iron core (often a 42% nickel / 58% iron alloy) clad in a copper sheath. The copper creates a strong hermetic bond with the glass.
Platinum: Used in early vacuum tubes (pre-1915). It expands and contracts at almost the exact same rate as soda-lime glass and bonds well to it (it would be an expensive option though!)
Kovar: An alloy of iron, nickel, and cobalt specifically engineered for glass-to-metal seals. It is widely used with borosilicate glass in heavier-duty or power tubes
This is why I read the comments . . . I’m six months into a new job, and have been scratching my head as to why we only use “dumet wire” for certain things – now it makes even less sense, but with historical implications of the “if it ain’t broke don’t fix it” type. No metal/glass, but fifty years back ic bodies were ceramic and certain industries move very slowly.
I was always under the impression that platinum was the early leader due to its similar thermal expansion and wettability – to be followed by tungsten for similar reasons.
I really don’t have much to contribute here – other than a thank you for inadvertently solving a mystery in my brain.
Iron/nickel alloys have a sharp drop in coefficient of expansion to a minimum at 64/46 – at the lowest point it’s called invar. But that sharp drop allows you to find expansions over a wide range of values to match it.
Dumet is basically the cheap version, because the copper oxide bonds well and the core provides the CTE match, and the copper can handle the stress across the boundary so long as the wire isn’t that big.
Dumet/kovar are basically derivatives of invar, which is the iron/nickel alloy at basically the minimum thermal expansion of the two combinations. Won the Nobel Prize for its discovery and is stupid useful. We always called the leads through PMTs invar because we were lazy. (It’s still where almost all of the cracks started).
They’re derivatives because you don’t want zero thermal expansion, you want to match glass, so you move slightly off the minimum around 36% nickel to match it.
If I remember it correct, they used a special glas aloy around the pin. However, if I had to do something like this, I would use the lower part of an old tube. There are plenty in the world…
However, the idea is nice to make your own nixie. But why? I have a watch at my wrist and a mobile phone! Hm…probably for a chess computer? There must be a reason for building a stylish part of our living room that is NOT a clock! Some ideas?
Yes, on older tubes this was often Uranium glass.
This problem was solved generations ago by Kovar family alloys. See the book “Laboratory Scientific Glassblowing” by Paul Pinnet, that’s the bible behind the explanations. The key is wetting prep and the right coefficient of thermal expansion matching material to the glass.
Handbook of Electron Tube and Vacuum Techniques by Fred Rosebury. Published in 1965. Still near the state of the art, because most all of this field was bypassed by transistors. Large tables of coefficients of thermal expansion for both glasses and metals. Also techniques for how to make the seals, with additional geometries other than wire-through-wall.
I have a paper copy. It’s full of great stuff, including how to do hydrogen brazing (reducing atmosphere), which is how you built high-vacuum fittings before e-beam and laser welding was a thing, and remains totally accessible to a serious garage hacker.
I’ve been idly wondering about this for a while, thanks.
The trick for tungsten wire is you need to oxidize it before you coat it in glass. You heat it in a flame to get it hot to oxidize and you are looking for “Kentucky fried Chicken brown”, as the glassblower I learned from called it.
You want to dive into vacuum tube making don’t miss Glasslinger on youtube … lately mostly fixing old radios but years back tons of tube making stuff, tools for vacuum tubes making, theory etc … very cool stuff there https://www.youtube.com/@glasslinger/videos
Some tubes, especially the little ones, had an all-glass bottom with the pins sticking out, while others (which I seem to associate with older tubes, from a prior generation, could be wrong though) had a plastic (bakelite?) or metal base, and I don’t remember ever cracking one up to see whether the glass wraps around the bottom or bonds to the material of the base.
Octal (8 pin) tubes had a Bakelite base, but the leads exited the tube in a similar fashion to the all glass miniature tubes. The leads were soldered or welded to the pins in the base. The tube was evacuated from the center of the base via a narrow glass tube in the same manner as a light bulb. The Bakelite base covered it, covered by the center polarizing boss.
Variously stem or button sealed. When you see a, well, stem come up in the middle of the base, with the leads coming through a flat pinch seal, that’s a stem base. The plastic or metal base added on, allowed them to use thinner wire, which was soldered into the base. They made button seals like this I think (pressed glass, around feedthru wires held in final base position) but mostly octal was going out of fashion by then, and all other manner were directly pinned (locktal I think, noval, Compactron, etc.).
Stem bases obviously present a problem for RF purposes, wasting so much lead length (and making so much common inductance between terminals that should otherwise provide shielding). This led to the acorn tube’s rim seal, but the button base was also found effective (and later, flange seals for radial and planar tubes).
Please keep in mind, Old dead tubes offer replacement parts to make new tubes if you harvest and treat those pins as if they were gold…. you don’t have to recreate them if you have a bunch on old gear already and can fathom the polishing fix to reuse them. Once liberated from the old glass they are ready to be cleaned and reused, without all that complex metallurgy stuff to fuss with.
This planet has a lot of tubes with lost vacuum. Every one can make this process just a glass forming thing if you see the old as a potential new.
Cheers.
Very good point, reuse is usually the best form of recycling anyway.
If you want to dive deep on the subject then Fred Rosebury’s book ‘The Handbook of Electron Tube and Vacuum Techniques’ and Walter Kohl’s ‘Materials Technology for Electron Tubes’ were the bibles of the valve industry.
I just hope that someone digitised them somewhere because copies were like hens teeth.