Caption CERN Contest Week 11

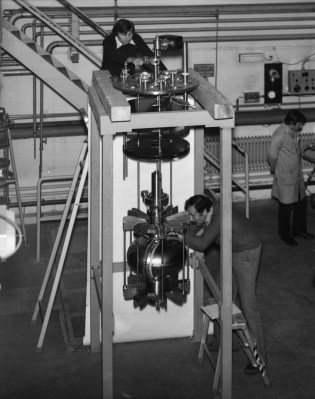
Week 10 of the Caption CERN Contest is a wrap folks! Our surprised scientist brewed up a ton of great captions from our great Hackaday.io community. We may never know what exactly is in that keg/carboy, or what the heck is draining into that bucket. Still, it’s probably safe to say that no one has put this much thought into those particular items since this scientist performed his research.

The Funnies:

  • “After many decades of hard work, Dr. Milton and his research was moved down into basement after he complained one too many times about his missing stapler.” – [joe_pumpernickle]
  • “Parker! Get down here! Ever since that radioactive spider bit you, you’ve crawling up the walls!”-[DainBramage]
  • “It rubs the dielectric grease on its relay contacts or else it gets the hose again” -Team effort from [MechaTweak] and [Nick Sayer]

The winner for this week is [airbuckles] with “Meet Dooglas, experimenting with beer brewing, CERN style. Shown here controlling the critical HOP collider.” [airbuckles] won’t need any buckles for his new Robot T-Shirt From The Hackaday Store!

Week 11: A double-header!

cern-11-smWe’ve got something a bit different for week 11: Two images from CERN’s archives! Both of these images feature a lovely PDP-11 from Digital Equipment in Galway, Ireland. They also feature two CERN researchers. The scientist on the left is wearing typical hacker attire – sneakers, jeans, and a comfy shirt. The hacker on the right went for something which we’re guessing was a bit more stylish back in 1982, but hasn’t quite held up to the test of time.

These scientists must have been doing some heavy-duty number crunching to need a PDP-11. Do you know what that strange hand wired rack of equipment is in the center? Do you have any idea where we can find a pair of harem pants like the woman on the left? Write a caption and let us know!

Add your humorous caption as a comment to this project log. Make sure you’re commenting on the project log, not on the project itself. As always, if you actually have information about the image or the people in it, let CERN know on the  original left CERN image, and original right CERN image.

Good Luck!

Review: Re:load Pro

About a year ago, [Nick Johnson] over at Arachnid Labs sent a tip in about Re:load Pro, his digital constant current load design. [Nick] was running a crowdfunding campaign, which always makes me think twice about posting. However in this case, I had no qualms writing a feature here on the blog (and backing the campaign with my own cash). Re:load Pro is actually [Nick’s] third generation current load. Having purchased and used the original Re:load, I knew [Nick] was capable of fulfilling all the promises in the campaign. Turns out I was right – [Nick] and the Arachnid Labs team had a very successful crowdfunding campaign. All the kickstarter backers have been enjoying their units for months now. When it came time to stock up the Hackaday Store, the Re:load Pro was a no-brainer.

What does one need a digital constant current load for? Plenty of jobs could benefit from it! From testing batteries to verifying power supplies, to tests of many driver circuits, a digital load is a great tool to have in your arsenal.

Like many electronic devices, our first step with the Re:load Pro was to upgrade the firmware. Since the Re:load Pro is operated by a Cypress Semiconductor PSOC 4,  firmware updates are handled by the cyflash python package. For now this means heading to the command line and installing pip and cyflash. Those who aren’t familiar with a command line prompt will find a step by step guide on the firmware update page.

I should note that the Re:load Pro is powered by the USB input. I connected it up to my lab PC, which had no problem supplying the necessary power.

Calibration

The next step is calibrating the Re:load Pro. This requires an adjustable power supply capable of supplying at least 10 volts at 2amps, a decent multimeter, and of course some test leads. If you don’t have a reliable adjustable supply ask around; it should be easy to find someone who does.

The calibration is performed in three steps – first with nothing connected to the Re:load Pro. Then a power supply set to approximately 9.99 volts is connected. The voltage displayed on the Re:load Pro is tweaked with the rotary encoder to display the same value as that of the power supply. My power supply has a rather cheap internal voltmeter, so I used a multimeter in parallel with the setup. With voltage done, the Re:load Pro will draw 2 amps from the power supply. You need to adjust the current displayed on the Re:load Pro such that it matches the voltage displayed on your power supply current meter. Again, since my supply doesn’t have the most accurate meter, I used a multimeter – this time in series with the Re:load and the power supply.

Taking Measurements

reload-pro-review-thumbWith all the preliminary work done, it’s time to make some measurements! Re:load pro has a simple user interface. everything is accessed with the rotary encoder on the front panel. Turn the dial to your desired value, and press to select. In my case, I wanted to check the voltage drop of a LiPo battery under various loads. I simply hooked up the battery and dialed 350ma on the encoder. The Re:load Pro showed me that the battery was holding at 12.1 volts, and a display on the lower left side showed me how many milli amp hours I had pulled from the battery.

The Re:load Pro’s USB connector isn’t just for power. It will show up on your PC as a serial device. Just open your favorite terminal emulator, set the port to 115200 baud 8/N/1, and you’re good to go. The Re:load Pro uses a simple text based command/response protocol, all the commands are outlined on the Arachnid labs page.

Conclusion:

Re:load Pro is one of the first of new breed of open source tools. Like the closed source Rigol Oscilloscope, it replaces tools which cost several times more. [Nick] and Arachnid Labs aren’t just resting on their success though – they’ve just finished up a kickstarter for their latest open source tool. Tsunami is an open source signal generator based upon the Arduino platform. Tools enable projects, and open source tools are the best way to push the entire ecosystem forward.


Editor’s Note: We are reviving the concept of “Reviews” on Hackaday. These were pioneered long long ago by Hackaday Alum [Ian Lesnet] with his post on smart tweezers but little has been done since. We see a lot of tools, parts, raw materials, and equipment flow through our inbox. We plan to post reviews as a new Hackaday Column. These reviews are not paid placement, they are chosen by editors and writers based on our own interest. This particular example is available in the Hackaday Store and we started with it because we already have the hardware in-hand. However, we will be reviewing items we do not sell and have already put out requests for review units. If you know of something you think worthy of a review, please let us know by submitting it to the tips line. Thanks!

-Mike Szczys, Managing Editor

Hacklet 42 – Mouse Projects

Ever since [Douglas Engelbart] and his team came up with the computer mouse, hackers, makers, and engineers have been creating ways to change and improve the design. Even the original mouse was something of a hack, built form a block of wood, a button, and two encoder wheels. The wire exited toward the user’s wrist, making the device look like it had a tail. Even after all these years, folks are still working to make the perfect pointing device. This week’s Hacklet highlights some of the best mouse projects on Hackaday.io!

mouseballzWe start with [s_sudhar] and ORB – A 3D gaming mouse. Orb uses accelerometers and gyros to track its location in 3D space. The popular MPU-6050 chip provides all the sensors to create an Inertial Measurement Unit (IMU). The controller is an Arduino Micro, which provides the USB interface to a PC with the help of Arduino’s MouseKeyboard library. Two micro switches handle button duties. The original Orb was built up in a cardboard box. [S_sudhar] created a more advanced version housed in a 3D printed sphere with two buttons. The translucent joint between the two halves of the sphere is just begging for some RGB LEDs. We can already see them flashing red when you’re getting shot in Team Fortress 2!

mouse-wheelAnyone who has used X-Windows with a three button mouse knows how maddening the modern clickable center scroll wheel can be. You can’t click the wheel without it rolling, and causing all sorts of mayhem. There are plenty of software solutions and window manager mods to work around this, but [mclien] wanted a real three button mouse with a side scroll wheel. He didn’t want just any mouse though – it had to be a Silicon Graphics International (SGI) 3 button unit. His project 3-buttonmouse with seperate wheel used a dremel, drill press, and glue to transplant the electronics of a 3 button scrolling mouse into the classic SGI plastics. The final wheel placement did work – but it didn’t quite fit [mclien’s] hand. It did fit one of his friends hands perfectly though. So well in fact that the friend borrowed [mclien’s] creation. Neither the mouse nor the friend have been seen since!

jimmy[Jay-t] decided that mice are for more than pointing, so he built Jimmy the mouse bot. Jimmy is a robot built from an old Commodore Amiga two button mouse. His brain is a Parallax Propeller processor. Two outrigger mounted gear motors help Jimmy drive around. Jimmy has plenty of sensors, including infrared object detectors, switches, and a GPS module from Adafruit. Jimmy may be the world’s first homing mousebot. [Jay-t] does all his interactive testing with Tachyon Forth on the Prop. The great thing about having an 8 core processor is that there is plenty of room for expansion. Even with all these sensors, Jimmy is still only using 3 cores!


clovis

Finally we at [Clovis Fritzen] and the Wireless Batteryless Mouse. This is our favorite type of project – the kind that has just been uploaded. [Clovis] plans to use a movement based system to charge up a supercapacitor – eliminating the need for batteries or wires. He’s also hoping to use an accelerometer to detect the mouse’s position rather than a power-hungry optical system. The details are still sparse, because he’s just started the project! These are exactly the type of projects that get us thinking. How will [Clovis] translate movement to energy? Will it be weights, like a self-winding watch? Maybe pizeo elements in the buttons. Will people mind having to jiggle their mouse to get it working once that capacitor is discharged? One thing we’re sure of, [Clovis] has a proven track record of implementing projects like his weather station. Get in there and help with your own ideas, or simply follow along with us and see how this one turns out.

Not satisfied? Want more mousy goodness? Check out our freshly minted mouse and pointer projects list!

That’s about all the time we have for this week’s Hacklet. As always, see you next week. Same hack time, same hack channel, bringing you the best of Hackaday.io! 

Caption CERN Contest Week 10

We had some great entries in the Caption CERN Contest this week. A huge thanks goes out to everyone who entered.  The jury is still out as to whether the gentleman on the left is a CERN staffer, or a Morlock caught on camera. Our eagle-eyed readers picked out some things we didn’t even notice at first blush – like the strange foreshortening of the “pipe smoking dude’s” right leg. (Yes, he is officially known as pipe smoking dude here at Hackaday HQ). We spotted him again in this image, and he’s in almost exactly the same pose!

The Funnies:

  • “Billy looked on as the James, the workplace bully, was about to walk in to Billy’s electrified puddle of water..” – [Leonard]
  • “This is Bob. Bob made a BAD ENGINEERING MISTAKE. Bob is going to spend some time in THE CORNER. Corners are not easy to find in a ring, so this is Bob’s BAD CORNER.?” – [ca5m1th]
  • “In a hole in the ground there lived a hobbit. His name was Boson Baggins and he had a great fondness for pipe weed and protons.” – [shlonkin]

The winner for this week is [Greg Kennedy] with “You call that a moonwalk? Stand back, Edmund, and let me show you how it’s done.”  If [Greg’s] name sounds familiar, that’s because he used some creative web scraping to compile the unofficial stats for the 2014 Hackaday prize. They were pretty interesting, so we featured them right here on the blog. [Greg] will be hacking in style wearing his new Robot T-Shirt From The Hackaday Store!

On to week 10!cern-10-sm

There’s something for everyone in this image from CERN’s achieves. Gas bottles, chemicals, huge concrete blocks, high voltage wires, and a rather surprised looking scientist. What sort of experiment would require this sort of shielding? What is the photographer standing on? Most importantly, is that a keg of beer hiding under the table to the right?

Add your humorous caption as a comment to this project log. Make sure you’re commenting on the project log, not on the project itself.

As always, if you actually have information about the image or the people in it, let CERN know on the original image discussion page.

Good Luck!

An Apple ][ Emulator On An Arduino Uno

April Fools’ Day may have passed, but we really had to check the calendar on this hack. [Damian Peckett] has implemented an Apple ][, its 6502 processor, and a cassette port, all on an Arduino Uno. If that wasn’t enough, he also uses a PS/2 keyboard for input and outputs analog VGA. [Damian] is doing all this with very few additional components. A couple of resistors, a capacitor and some very clever hacking were all [Damian] needed to convince an Arduino Uno that it was an Apple.

Making all this work boiled down to a case of resource management. The original Apple ][ had 4KB of RAM and 8KB of ROM. The ATmega328 has only 2KB of RAM, but 32KB of Flash. The only way to make this hack work would be to keep as much of the emulation and other routines in Flash, using as little RAM as possible.

The core of this hack starts with the MOS 6502, the processor used in the Apple. [Damian] wrote a simple assembler which translates the 6502 opcodes and address modes to instructions which can be executed by the Arduino’s ATmega328. To keep everything in ROM and make the emulator portable, [Damian] used two large switch statements. One for address modes, and a 352 line switch statement for the opcodes themselves.

A CPU alone is not an Apple though. [Damian] still needed input, output, and the ROM which made the Apple so special. Input was through a PS/2 keyboard. The PS/2 synchronous serial clock is easy to interface with an Arduino. Output was through a custom VGA implementation, which is a hack all its own. [Damian] used the lowly ATmega16u2 to generate the video timing. The 16u2 is normally used as the Arduino Uno’s USB interface. The only external hardware needed is a single 120 ohm resistor.

The original Apples had cassette and speaker interfaces. So does this emulated Apple. [Woz’s] original cassette and speaker interface accurate loops to generate and measure frequencies. One of the trade-offs [Damian] accepted in his 6502 was cycle accuracy, so he couldn’t use the original routines. Not a problem though, as he was able to write simple functions to replace these routines and drop them in place of the Apple’s own ROM calls.

The Apple ][ ROM itself is handled as one giant character array. This includes the system monitor, Mini-Assembler, Sweet-16, and [Woz’s] own Integer Basic. [Damian] caps off this incredible project by booting his new computer, loading a  Mandelbrot set program from cassette -or in this case an audio file stored on his cell phone, and running it. The well-known fractal is displayed in all its glory on a modern LCD monitor, driven by a microcontroller, emulating a computer from nearly 40 years ago.

Continue reading “An Apple ][ Emulator On An Arduino Uno”

Hacklet 41 – Prosthetics Projects

Throughout human history, mankind has worked to enable those with disabilities. This applies especially to those who have missing limbs, either from injury or since birth. Every time technology improves, prosthetics improve along with the way. Unfortunately this now means prosthetics have become expensive systems. Hackers, makers, and engineers are working to make prosthetics more affordable, and more available to everyone. This week’s Hacklet focuses on some of the best prosthetics projects on Hackaday.io!

bionic1We start with [Open Bionics] and Affordable Bionic Hands For Amputees. The [Open Bionics] team are using 3D printers to bring the cost of a prosthetic arm and hand down from up to $100,000 USD to just $1000 USD. They’ve also reduced the time to create a custom device from weeks to just 5 days. The team’s current hand has five degrees of freedom, uses electromyography (EMG) for control, and weighs just 268 grams. [Open Bionics] discovered that many amputees are willing to trade off functions for a lighter weight device. Having a sensor and motor studded hand won’t help much if the wearer is worn out after just a couple of hours!

bionic2Next up is [yash.gajra56] and RE-ARM. RE-ARM is a prosthetic arm project which aims to help both those who have lost limbs, and those with full or partial paralysis of a limb. Movement is provided by radio control style servos. Control is via voice commands and Bluetooth from a cell phone. [Yash] has incorporated feedback into RE-ARM by using flex sensors. Processing is handled by an Arduino. We like the low-cost, low tech approach RE-ARM uses. We’d love to see everyone have access to a 3D printer, but unfortunately the world isn’t there quite yet. RE-ARM uses readily available components to build a functional prosthetic. Nice work [yash]!

bionic3[OpenBionics] brings us  Affordable Prosthetic Hands. No, you didn’t read that name wrong. There are two “Open Bionics” on Hackaday.io! This [OpenBionics] team has no space, and is based in Athens, Greece. The other [Open Bionics] team does have a space between the words, and is based in Bristol in the United Kingdom. We’re hoping the two groups can come together and collaborate now that they’re both using Hackaday.io. This [OpenBionics] team is working on prosthetic hands, in the sub $200 USD price range. The team has come up with a novel thumb design which provides nearly full functionality with only one rotating joint. [OpenBionics] also allows their users to selectively lock digits, which allows for up to 144 different grasping postures.


bionic4

Finally we have [Daniel Mead] with Third World Medical Equipment (Arm). [Daniel] created this project as an independent study back in high school. The idea is create a simple arm with a gripper out of cheap or freely available items. The gripper is fashioned from a bicycle brake. The fitting system is especially novel. [Daniel] used an old soda bottle to create a custom mold for the amputee’s residual limb. Plastic bottles are generally made of polyethylene terephthalate, or PET, a thermoplastic. [Daniel] placed a wet sock over his arm, and a plastic bottle over the sock. Holding the plastic bottle above a fire created enough heat to shrink the bottle to his arm. the sock provided room for padding, and insulated him from getting burned during the molding process.

Not satisfied? Want more prosthetics? Check out the Prosthetics list over on Hackaday.io! If any of these projects inspire you, don’t forget that prosthetics are a great starting point for an entry in The Hackaday Prize!

That’s about all the time we have for this week’s Hacklet. As always, see you next week. Same hack time, same hack channel, bringing you the best of Hackaday.io!

Caption CERN Contest Is A GO For Week 9

Thanks for another week of great entries in the Caption CERN Contest over at Hackaday.io! We still aren’t sure if our CERN staffer is looking at that machine pensively, amorously, or with a bit of confusion, but you all found some great words to go with the image!

The Funnies:

  • “Dr. Breman’s early attempts to create the perfect robot woman had some early success, but was later scrapped do to a tragic input/output error.” – Terry Davis
  • “You were supposed to be intelligent, my dear. What do you mean by segfault?” –elias.alberto
  • “CERN’s pioneering computer dating service didn’t quite work out as expected.” – Nick Johnson

The winner for this week is Stripeytype with the quote seen in the top image of this article. Stripeytype will be sporting a CRT head T-Shirt From The Hackaday Store at their next hackerspace meeting.

cern-9-smWe’re not done searching out they mysteries of CERN’s history. Week 9 of the Caption CERN Contest has just begun! 

Some of CERN’s experiments take place in the miles of tunnels below their labs in and around Meyrin, on the border of France and Switzerland. It looks like this image was taken in one of those tunnels. It’s definitely an interesting shot. CERN’s documentation for the image has been lost to history, so it’s up to you to explain what’s going on here! Add your humorous caption as a comment to the project log. Make sure you’re commenting on the log, not on the project itself. As always, if you actually have information about the image or the people in it, let CERN know on the original image discussion page.

Good Luck!