Just about every hacker, maker and tinkerer out there received their early education the same way: A screwdriver in one and a discarded bit of electronics in the other. There is no better way to find out how something works than cracking it open and examining each piece. In recent years, teardown videos have become popular on YouTube, with some of the great examples coming from users like [EEVblog], [mikeselectricstuff], and [The Geek Group]. This week’s Hacklet is all about the best teardown projects on Hackaday.io!
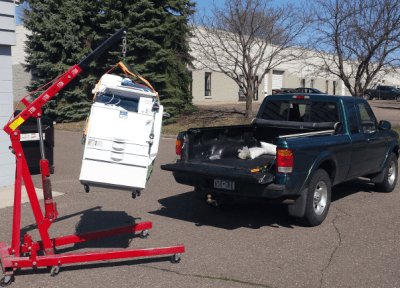 We start with [zakqwy] and his Savin C2020 Teardown. Photocopiers (and multifunction machines) are the workhorses of the modern office. This means there are plenty of used, abused, and outdated photocopiers available to hackers. [Zakqwy] got this monster when it started misbehaving at his office. Copiers are a venerable cornucopia of motors, gears, sensors (lots and lots of breakbeam sensors) and optics. The downside is toner: it’s messy, really bad to breathe, and if you don’t wear gloves it gets down into the pores of your skin, which takes forever to get out. [Zakqwy] persevered and found some awesome parts in his copier – like an Archimedes’ screw used to transport black toner.
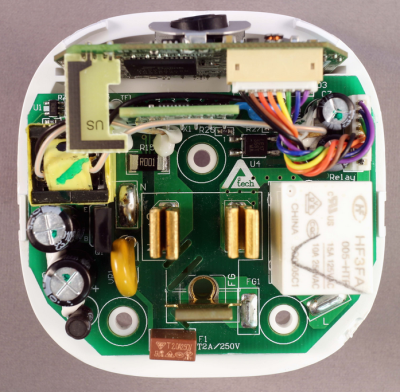 Next up is [Bob Blake] with Belkin WeMo Insight Teardown. [Bob] wanted a WiFi outlet, but wasn’t about to plug something in to both his power grid and his network without taking it apart first. [Bob] did an awesome job of documenting his teardown with lots of great high resolution photos – we love this stuff! He found a rather well thought out hardware design. The Insight has 3 interconnected PCBs inside. The power switching and supply circuits are all on one board. It includes slots and the proper creep distances one would expect in a design that will be carrying 120V AC mains power. A small daughter board holds an unknown chip – [Bob] is guessing it is the power sensing circuitry. A third board a tucked in at the top of the module holds the main CPU, a Ralink/MediaTek RT5350F SoC, RAM, and the all important WiFi antenna.
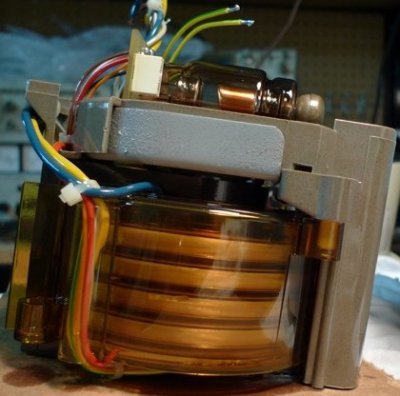 [Drhatch] took things into the danger zone with an X-ray Head Teardown. We’re not sure if [Drhatch] is a real doctor, but he does have a Heliodent MD dental X-ray head. Modern X-ray machines are generally radiation safe if they’re not powered up. Radiation isn’t the only dangers to worry about though – there are latent charged capacitors and cooling oils which may contain nasty chemicals like PCBs, among other things. [Drhatch] found some pretty interesting design decisions in his X-ray head. The tube actually fires through the cylindrical high voltage transformer. This means the transformer acts as a beam collimator, focusing the X-ray beam down like a lens. He also found plenty of lead shielding. Interestingly there are two thickness of lead in the housing. Shielding close to the tube is 1 mm thick, while shielding a bit further away is only 0.7 mm thick.
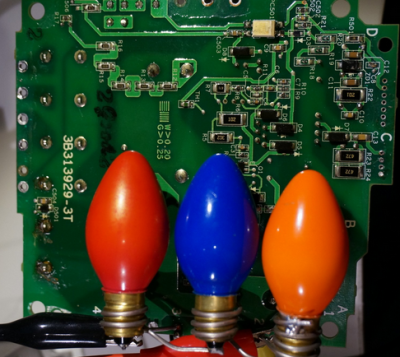 Finally, we have [danielmiester] with Inside a 3ph AC Motor Controller(VFD). [Daniel] tore down a Hitachi Variable-Frequency Drive (VFD) with the hopes of creating a frequency converter for a project. These high voltage, high power devices have quite a bit going on inside, so the conversion became a teardown project all its own. VFDs such as this one are used in industry to drive high power AC motors at varying speeds efficiently. As [Daniel] says, the cheaper ones are ” just really fancy PWM modules”. Handling 1.5 kW is no joke though. This VFD had a large brick of power transistors potted into its heat sink. The controller board was directly soldered to the transistors, as well as the rectifier diodes for the DC power supply. [Daniel] was doing some testing with the unit powered up, so he built a custom capacitor discharge unit from 3 C7 Christmas lights. Not only did they keep the capacitors discharged, they provided an indication that the unit was safe. No light means no charge.
Not satisfied? Want more teardown goodness? Check out our freshly minted Teardown List!
That’s about all the time we have for this week’s Hacklet. As always, see you next week. Same hack time, same hack channel, bringing you the best of Hackaday.io!

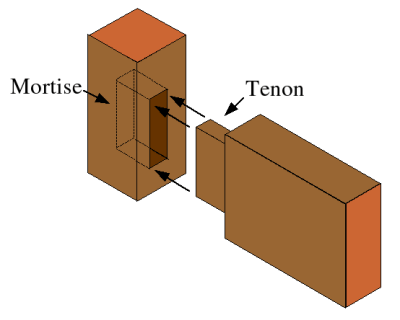 One common joinery method used in wood working is the mortise and tenon. A mortise is basically a hole in a piece of wood and the tenon is another piece of wood cut to tightly fit in that hole. The tenon is usually secured in place with either glue or a wooden pin or wedge.