Control The Volume

For anyone who has owned a boombox or an old(er) cassette player, the digital age volume controls feel incredibly awkward. Keep pressing buttons to get the volume just right can get tiresome real quick. The volume knob just makes sense and in a simple project, [Jeremy S Cook] brings us the Custom Computer Volume Control Knob.

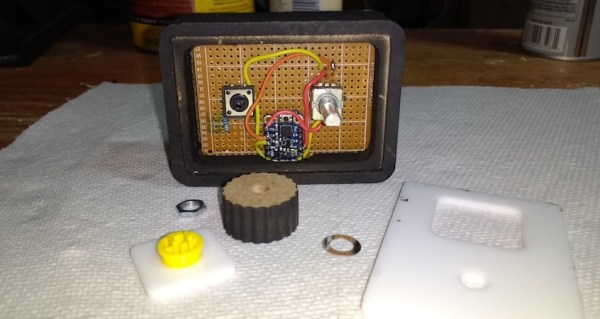
The build employs an Adafruit Trinket board coupled with a rotary encoder and a push button as described by the designers themselves. We reached out to [Jeremy S Cook] to enquire about the build and it turns out his version uses an MDF enclosure as well as an MDF knob. A larger PCB has the encoder and button solder on with the Trinket board connecting to them via multi strand wires. An Acrylic sheet cut to the size serves as the top cover and completes the build.

The button serves as a play/pause button and can come in handy. Since the device enumerates as an HMI device, it should work with almost any OS. It could easily be extended to work with Android Tablets or even iPads. Check out the video below for a demonstration and if you like the idea of custom input devices, check out this DIY shortcut Keyboard. Continue reading “Control The Volume”

Talking To A Lamp

Barking commands at furniture seems a bit odd but with voice controlled home automation platforms becoming the norm, you may be spending more time talking to your light fixtures than your kids. In one such project, [Becky Stern] used an Alexa Dot and an ESP8266 respond to voice commands.

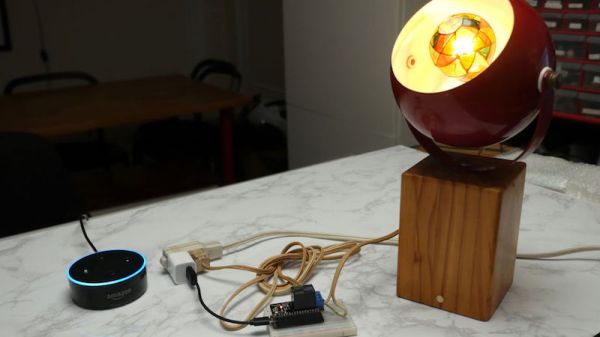
The design uses the Alexa Dot to interpret voice commands such as ‘Alexa turn the light ON’. The ESP8266 with a relay feather wing is used to switch the actual lamp ON and OFF. The glue between the two is the fauxmoESP library that allows the ESP8266 to receive commands from the Alexa API.

The best part of the project is the lamp itself which has a wooden base and is perfect for such experiments. [Becky Stern] does a wonderful job at carving out enough space and filling it with the electronics. The additional sanding and wood staining make the project more impressive and worthy of a living room. The idea could be easily extended to other own household items. Check out the video of the project below and for more inspiration, take a look at Theia IoT Light-Switch. Continue reading “Talking To A Lamp”

Robot Car Follows Wherever You Go

Having a pet can really make a difference to your happiness at the end of the day, but they’re also a lot of work. This project by [Ioannis Stoltidis] does something similar — minus all the responsibility. The Smart Car Follower Project is designed to track people using Bluetooth and IR and follow them around from room to room.

Submitted as part of a Master’s thesis, this project hacks a toy car and uses a key chain transmitter that sends the tracking signals. A Raspberry Pi 3 combines the Bluetooth RSSI and IR signals to make create an estimate of the position of the beacon. Arduinos facilitate the IR signaling as well as the motor control allowing the robot to chase the user around like a puppy. The whole thing also comes with obstacle avoidance using ultrasonic sensors on all sides which are good if you have a lot of furniture in the house.

You can also choose to go manual-mode and drive it around the block using a PC and gamepad. A webcam connected to the onboard computer allows a first person view of the vehicle by sending the video feed over wifi to a PC application. OpenCV is used to create the final GUI which allows you to see and control the project remotely. The source code is available for download for anyone who wants to replicate the project. Check out the video of it in action below.

Continue reading “Robot Car Follows Wherever You Go”

Backchannel UART Without The UART

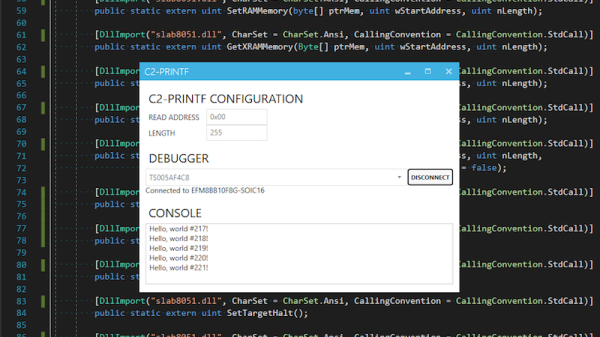
Anyone who has worked with a microcontroller is familiar with using printf as a makeshift debugger. This method is called tracing and it comes with the limitation that it uses up a UART peripheral. Believe it or not, there are 8051 variants out there that come with only one serial block and you are out of luck if your application needs it to communicate with another device.

[Jay Carlson] has a method by which he can piggyback these trace messages over an on-chip debugger. Though the newer ARM Cortex-M software debugger already has this facility but [Jay Carlson]’s hack is designed to work with the SiLabs EFM8 controllers. The idea is to write these debug messages to a predefined location in the RAM which the debugger can access anyway. His application polls a certain area of the memory and when it finds valid information, it reads the data and spits it out into a dedicated window. It’s using the debugger as a makeshift printf!

[Jay Carlson] used slab8051.dll interface and put together a C# program and GUI that works alongside the SiLab’s IDE. The code is available on GitHub for you to check out if you are working the EFM8 and need a helping hand. The idea is quite simple and can be ported to other controllers in a multitude of ways like the MSP430 perhaps. For those of you who like the Teensy, you might want to take a look at adding debugger support to the Teensy 3.5/3.6.

3D Printed Math Grenade

Calculator hacks are fun and educational and an awesome way to show-off how 1337 your skills are. [Marcus Wu] is a maker who likes 3D printing and his Jumbo Curta Mechanical Calculator is a project from a different era. For those who are unfamiliar with the Curta, it is a mechanical calculator that was the brainchild of Curt Herzstark of Austria from the 1930s. The most interesting things about the design were the compactness and the complexity which baffled its first owners.

The contraption has setting sliders for input digits on the side of the main cylindrical body. A crank at the top of the device allows for operations such as addition and subtraction with multiplication and division requiring a series of additional carriage shift operations. The result appears at the top of the device after each crank rotation that performs the desired mathematical operation. And though all this may seem cumbersome, the original device fit comfortably in one hand which consequently gave it the nick name ‘Math Grenade’.

[Marcus Wu] has shared all the 3D printable parts on Thingiverse for you to make your own and you should really take a look at the video below for a quick demo of the final device. There is also a detailed set of images (82 or so) here that present all the parts to be printed. This project will test your patience but the result is sure to impress your friends. For those looking to dip your toes in big printed machines, check out these Big Slew Bearings for some inspiration.

Hacking IBeacons For Automating Routines

Every self-respecting hacker has an automation hack somewhere in his/her bag of tricks. There are a lot of modern-day technologies that facilitate the functionality like GPS, scripting apps, and even IFTTT. In an interesting hack, [Nick Lee] has combined iBeacons and a reverse engineered Starbucks API to create an automated morning routine.

By creating a mobile app that scans for iBeacons, [Nick Lee] was able to reduce the effort made every morning while heading to his office. When the app encounters a relevant beacon, a NodeJS app sitting in the cloud is triggered. This consequently leads to desired actions like ordering an Uber ride and placing an order for an iced latte.

[Nick Lee] shares the code for the Starbucks application on GitHub for anyone who wants to order their favorite cup of joe automatically. This project can be easily expanded to work with GPS or even RFID tags and if you feel like adding IoT to a coffee machine, you could automate all of your beverage requirements in one go.

Make Some Noise With The Typewriter Keyboard

Are you an angry programmer? Do you get the frequent urge to smash the return key or space bar after finishing every single line of code? Well then [Konstantin Schauwecker]’s typewriter keyboard is just the thing for you. In his project, [Konstantin] hacked a German Olympia Monica typewriter into a USB keyboard.

The project uses no less than 50 photo interrupters mounted on a custom PCB that mounts directly under the typewriter itself. The circuit board is so designed that the hammer arms take a position in obstructing the opto-interrupters. Every time a key is pressed, the corresponding device sends a signal to an Arduino.

In order to enable the wiring of 50 signals to an Arduino Leonardo, multiplexers and decoders are employed. CD4515, 4×16 line decoders work to activate the optical signals and the CD4067, 16×4 multiplexers are used to return the scans. This forms the traditional scanning keyboard matrix and the whole thing is managed in the Arduino code (available as a zip file).

This project can be a great starting point for anyone who wants to hack their grandpa’s old typewriter or make one in order to annoy the guy sitting next to them. Check out the video below for a demo and teardown and if you prefer Raspberry Pis then check out this mechanical typewriter hack.