Almost An Amiga For Not A Lot

If you ask someone old enough to have been a computer user in the 16-bit era what machine they had, you’ll receive a variety of answers mentioning Commodore, Atari, Apple, or even PC brands. If your informant lay in the Commodore camp though, you’ll probably have an impassioned tale about their Amiga, its capabilities, and how it was a clearly superior platform whose potential was wasted. The Amiga was for a while one of the most capable commonly available computers, and became something of a cult within its own lifetime despite the truly dismal performance of the various companies that owned it. Today it retains one of the most active retro computer scenes, has an active software community, and even sees new hardware appearing.

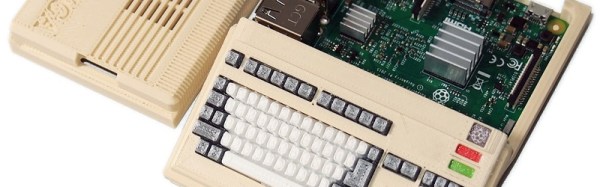
For Amiga enthusiasts without the eye-watering sums required to secure one of the new Amiga-compatible machines with a PowerPC or similar at its heart, the only option to relive the glory beside finding an original machine is to run an emulator. [Marco Chiapetta] takes us through this process using a Raspberry Pi, and produces an Amiga that’s close enough to the real thing to satisfy most misty-eyed enthusiasts.

He starts with a cutesy Amiga-themed Raspberry Pi case that while it’s not essential for the build, makes an entirely appropriate statement about his new machine, We’re taken through the set-up of the Amibian emulator distro, then locating a set of Amiga ROMs. Fortunately that last step is easier than you might think, even without trawling for an illicit copy.

The result is an Amiga. OK, it’s not an Amiga, but without the classic Commodore logo is it any more not an Amiga than some of the other non-branded Amiga-compatible boards out there? Less talking, more classic gaming!

We’ve covered quite a few Amigas on these pages. Getting an A500 online was the subject of a recent post, and we brought you news of a new graphics card for the big-box Amiga’s Zorro slot.

The Site Of A Hundred Languages

Silent film star [Lon Chaney] had the nickname “man of a thousand faces.”  The Try It Out website (tio.run) might well be the site of a hundred languages. Well, in all fairness, they only have 97 “practical” languages, but they do have 172 “recreational languages” but the site of 269 languages doesn’t trip off the tongue, does it? The site lets you run some code in each of those languages from inside your browser.

By the site’s definition, practical languages include things like C, Java, Python, and Perl. There’s also old school stuff like FOCAL-69, Fortran, Algol, and APL. There’s several flavors of assembly and plenty of other choices. On the recreational side, you can find Numberwang, LOLCODE, and quite a few we’ve never heard of.

Continue reading “The Site Of A Hundred Languages”

Backchannel UART Without The UART

Anyone who has worked with a microcontroller is familiar with using printf as a makeshift debugger. This method is called tracing and it comes with the limitation that it uses up a UART peripheral. Believe it or not, there are 8051 variants out there that come with only one serial block and you are out of luck if your application needs it to communicate with another device.

[Jay Carlson] has a method by which he can piggyback these trace messages over an on-chip debugger. Though the newer ARM Cortex-M software debugger already has this facility but [Jay Carlson]’s hack is designed to work with the SiLabs EFM8 controllers. The idea is to write these debug messages to a predefined location in the RAM which the debugger can access anyway. His application polls a certain area of the memory and when it finds valid information, it reads the data and spits it out into a dedicated window. It’s using the debugger as a makeshift printf!

[Jay Carlson] used slab8051.dll interface and put together a C# program and GUI that works alongside the SiLab’s IDE. The code is available on GitHub for you to check out if you are working the EFM8 and need a helping hand. The idea is quite simple and can be ported to other controllers in a multitude of ways like the MSP430 perhaps. For those of you who like the Teensy, you might want to take a look at adding debugger support to the Teensy 3.5/3.6.

DEF CON Badgelife: Someone Finally Did It

Badgelife is the celebration of electronic conference badges, a way of life that involves spending far too much time handling the logistics of electronics manufacturing, and an awesome hashtag on Twitter. Badgelife isn’t a new thing; it’s been around for a few years, but every summer we see a massive uptick in the lead up to Def Con.

For the last few years, the designers and engineers deep into Badgelife have had the same conversation dozens of times. One person says, “you know, someone should build a badge that’s a quadcopter.” Another person replies, “Can you imagine how annoying that would be? You’d be putting ten thousand people in a room during the closing ceremonies at DefCon, and a few dozen people would have quadcopters. It would be horrible” Yes, there have been plans to build a quadcopter badge for the last few years, but cooler heads prevailed.

Someone finally did it. The wearable electronic conference badge that’s also a quadcopter is finally here. It’s the work of [b1un7], and it’s going to be exactly as annoying as you would expect.

This badge is actually two PCBs, the first being the quadcopter itself, the second being the joystick/controller. The quad is shaped like the familiar jolly roger found in most Whiskey Pirate badges ([b1un7] hangs with that crew), and the controller is a pirate’s treasure map loaded up with joysticks, buttons, and radios. The motors for this quad appear to be brushed, not brushless, and it looks like the arms of the quad have some space for obnoxiously bright LEDs.

This is an awesome badge but it’s still [b1un7]’s first attempt at making a badge. Right now, there’s still a bit of work to do — there’s only one week until Defcon — but with any luck [b1un7] will have 25 of these wearable electronic conference badges buzzing around. It’s a terrible idea and we love it.

Hackaday Prize Entry: Dongle For A Headless Pi

Mass production means that there’s a lot of great hardware out there for dirt cheap. But it also means that the manufacturer isn’t going to spend years working on the firmware to squeeze every last feature out of it. Nope, that’s up to us.

[deqing] took a Bluetooth Low Energy / USB dongle and re-vamped the firmware to turn it into a remote keyboard and mouse, and then wrote a phone app to control it. The result? Plug the USB dongle in, and the computer thinks it sees a keyboard and mouse. Connect the phone via BLE, and you’re typing — even if you don’t have your trusty Model F by your side.

[Deqing] points out that ergonomics and latency will make you hate using this in the long term, but it’s just meant to work until you’ve got SSH up and running on that headless single-board Linux thing. If you’ve ever worked with the USB or BLE specifications, you can appreciate that there’s a bit of work behind the scenes in making everything plug and play, and the web-based interface is admirably slick.

Kudos, [deqing]!

Hitching A Ride On A Missile

Before the Saturn V rocket carried men to the moon, a number of smaller rockets carried men on suborbital and orbital flights around the Earth. These rockets weren’t purpose-built for this task, though. In fact, the first rockets that carried people into outer space were repurposed ballistic missiles, originally designed to carry weapons.

While it might seem like an arduous task to make a ballistic missile safe enough to carry a human, the path from a weapons delivery system to passenger vehicle was remarkably quick. Although there was enough safety engineering and redundancy to disqualify the space program as a hack, it certainly was a clever repurposing of the available technology. Read on for the full story.

Continue reading “Hitching A Ride On A Missile”

Beautiful DIY Spot Welder Reminds Us We Love 3D Printing

[Jim Conner]’s DIY tab spot welder is the sweetest spot welder we’ve ever seen. And we’re not ashamed to admit that we’ve said that before.

The essence of a spot welder is nothing more than a microwave oven transformer rewound to produce low voltage and high current instead of vice-versa. Some people control the pulse-length during the weld with nothing more than their bare hands, while others feel that it’s better implemented with a 555 timer circuit. [Jim]’s version uses a NodeMCU board, which is desperately overkill, but it was on his desk at the time. His comments in GitHub about coding in Lua are all too familiar — how do arrays work again?

Using the fancier microcontroller means that he can do fancy things, like double-pulse welding and so on. He’s not even touching the WiFi features, but whatever. The OLED and rotary encoder system are sweet, but the star of the show here is the 3D printed case, complete with soft parts where [Jim]’s hand rests when he’s using the welder. It looks like he could have bought this thing.
Continue reading “Beautiful DIY Spot Welder Reminds Us We Love 3D Printing”