Salvaging An Ancient, Dangerous Machine With Wood

What do you do when you have a gigantic old drum sander with a bent table? Scrapping it will give you a few cents per pound, but this machine is just too cool, and would be too useful to just throw away. That’s when inspiration strikes. To fix this old machine, [Frank Howarth] built a new bed for an old drum sander out of wood.

The machine in question is a Frank H. Clement Surface Sanding Machine from the early part of the 20th century. This machine is basically a 30 inch long, 14 inch diameter drum that’s wrapped in sandpaper. There are removable tables for this machine, and basically what we’re looking at here is a jointer that can handle 30-inch wide boards, only it’s a sander. [Frank] picked up this machine way back in 2015 from a friend for free, but everything has a cost. There’s a problem with this sander: one of the previous owners stored a heavy jointer on the table, and the hefty iron bed was bent down in the middle. This makes the vintage surface sanding machine absolutely useless for anything. A new bed would have to be constructed.

[Frank] is a master craftsman, though, and he has enough scrap wood sitting around to build just about anything. After taking some careful measurements of the frame of the sander, he cut and glued up a few large panels of a glueLam beam, salvaged from an earlier operation. This beam is tremendously strong, and resawing and gluing it up into a panel produced a very hefty board that’s perfect for the bed of a gigantic, ancient surface sanding machine.

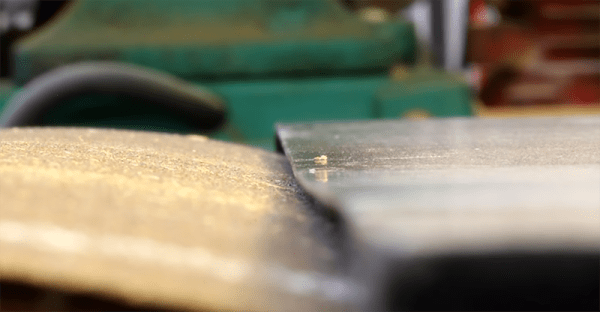
The actual fabrication of the new bed happened on [Frank]’s CNC router. The bottom of the bed was easy enough to fit to the cast iron frame, but there was an issue: because these tables are meant to butt up against a spinning drum, [Frank] needed to cut away a cove underneath the table. A CNC router can easily do this, but apparently the glueLam beam couldn’t handle it — a bit of the edge split off. These panels are basically made of glue, though, and some quick action with a few clamps saved the project.

The bed for this sander is now done, and a change in the pulley brought the speed of the drum down to something reasonable. Of course, this is a woodworking machine from the early 1900s, and safety was a secondary concern. We’re not worried, though. [Frank] still has all his fingers. A guard for the belt is in the works, though.

Continue reading “Salvaging An Ancient, Dangerous Machine With Wood”

Optimizing Screen Time To Heart Beats

Kids spend too much time in front of a screen these days. They also won’t get off my lawn, and music today is just a bunch of static. They don’t respect their elders, either. While kids today are terrible, we can fix that first problem — sitting in front of a screen all day. For his Hackaday Prize entry, [Donovan] has created a device that optimizes screen time to reduce sensory overload. It’s the Optimote, the combination of a remote control and biofeedback.

The idea behind the Optimote is to actually to reduce stimulation when watching something on a screen. For many people, including people on the autism spectrum, watching TV or YouTube videos can often result in debilitating sensory overload. You can’t relax in this state, you can’t learn, and you certainly can’t get any entertainment value out of the glowing rectangle in front of your face.

The Optimote uses a pulse sensor, an Arduino, an incredible break-away cable that seems to be missing from any other wearable device like this, and a software stack that interacts with VLC. During periods of high pulse rate, the video skips to low-intensity footage. There’s a ‘calm’ mode that puts media volume and tempo in sync with heart rate. The ‘thrill’ mode plays an eerie scene looping with the Jaws theme.

So far, the prototype is a success, and [Donovan] is looking forward to large-scale user experience testing to determine how effective and enjoyable this technology can become.

Turning A Fitness Tracker Into An EEG

Several years ago, a company called Neurosky came out with an interesting chipset meant to be put in an EEG headset. This chipset would track your brainwaves, do some fancy math, and output a few numbers based on the Delta, Gamma, Alpha, and Beta waves in your brain. Of course, the senseable thing to do with this technology would be to put it in a Star Wars-branded toy where you pretend to be a Jedi. All was good with the world, and a few people hacked these Jedi Mind Trainers for some interesting builds.

But the Neurosky chip was still a black box. No one knew how it worked. The ‘concentration’ number had no relation to anything, except how hard you were apparently concentrating. In an effort to break this black box and build upon years worth of EEG hacks, [Curt White] is hacking a fitness tracker for EEG analysis for his entry into the Hackaday Prize.

The hardware in question for this build is a B20 Fitness Tracker, an ungodly cheap piece of hardware that contains an ADS1292 bioimpedance sensor that can be used for ECG, EMG, and EEG. There’s also an nRF microcontroller with Bluetooth that’s easily programmed with an Arduino. All the building blocks are there.

Right now, [Curt] has successfully opened up one of these fitness trackers and has done enough of a teardown to get the data off of the bioimpedence sensor. The trick now is to emulate the ‘concentration’ and ‘relaxation’ values the Neurosky chip puts out. This is fairly difficult, as what these values actually mean in terms of brainwaves is a bit opaque, but [Curt] has some filters and some tools to pull data from the brain and output something. Now it’s just a question of outputting the right values.

It’s a fantastic hack, that is sure to be a lot more affordable than buying some old Star Wars toys or paying a licensing fee to Neurosky. This is commodity hardware hacked to do something it was never intended to do, and an excellent entry to this year’s Hackaday Prize.

Competitive Soldering Is Now A Thing

At Hackaday, we’re constantly impressed by the skill and technique that goes into soldering up some homebrew creations. We’re not just talking about hand-soldering 80-pin QFNs without a stencil, either: there are people building charlieplexed LED arrays out of bare copper wire, and using Kynar wire for mechanical stability. There are some very, very talented people out there, and they all work in the medium of wire, heat, and flux.

At this year’s DEF CON, we opened the floodgates to competitive soldering. Along with [Bunny] from Hardware Hacking Village and the many volunteers from the HHV and Soldering Skills Village, dozens competed to solder up a tiny kit full of LEDs and microscopic resistors.

The kit in question was an SMD Challenge Kit put together my MakersBox, and consisted of a small PCB, an SOIC-8 ATtiny, and a LED and resistor for 1206, 0805, 0603, 0402, and 0201 sizes. The contest is done in rounds. Six challengers compete at a time, and everyone is given 35 minutes to complete the kit.

We’ve seen — and participated in — soldering challenges before, and each one has a slightly unique twist to make it that much more interesting. For example, at this summer’s Toorcamp, the soldering challenge was to simply drink a beer before moving to the next size of parts. You would solder the 1206 LED and resistor sober, drink a beer, solder the 0805, drink a beer, and keep plugging away until you get to the 01005 parts. Yes, people were able to do it.

Of course, being DEF CON and all, we were trying to be a bit more formal, and drinking before noon is uncouth. The rules for this Soldering Challenge award points on five categories: the total time taken, if the components are actually soldered down, a ‘functionality’ test, the orientation of the parts, and the quality of the solder joints.

The winners of the soldering challenge, at the Hackaday Breakfast Meetup at DEF CON 26

So, with those rules in place, who won the Soldering Challenge at this year’s DEF CON? Out of a total 25 points, the top scorers are:

  • [True] – 23 pts
  • [Rushan] – 19 pts
  • [Ryan] – 18 pts
  • [Beardbyte] – 18 pts
  • [Casey] – 18 pts
  • [Bob] – 18 pts
  • [Nick] – 18 pts
  • [JEGEVA] – 18 pts

The Soldering Challenge had an incredible turnout, and the entire Soldering Skills Village was packed to the gills with folks eager to pick up an iron. The results were phenomenal!

We’d like to extend a note of thanks to [Bunny], the Hardware Hacking Village, the Soldering Skills Village, and MakersBox for making this happening. It was truly a magical experience, and now that competitive soldering is a thing, we’re going to be doing this a few more times. How do you think this could be improved? Leave a note in the comments.

This Is The Raspberry Pi Robot To Beat All Others

Before the introduction of the Raspberry Pi, building robots was hard. The best solution to turning motors on a chassis was repurposing an old roomba. For the brain, maybe you could throw Linux on a router and move your rover around with an old Linksys. Before that, you could buy a crappy robotics kit, thrown together in a box and sold as an ‘educational kit’. I’m sure there are a few readers out there that built robots by wire-wrapping HC11s.

Now we have 3D printers and Raspberry Pis, and with that comes a golden age of robotics. One of the best robot brains out there is the 8BitRobots Modules from [Tim Wilkinson], an entry for this year’s Hackaday Prize.

The 8BitRobots Modules are made up of a few components, not the least of which is a Pi Zero, a fantastically powerful (for its price) Linux computer that is available for five dollars. With an add-on board, cleverly named the RoBonnet, the Pi Zero gets PWM outputs for servos and ESCs, an H-bridge for motors, TTL serial, encoder inputs, a pressure and temperature sensor, an IMU, a power monitor, and everything else you need for a successful Pi robot.

But hardware is only one part of the equation. If you want to program a robot, you need a software stack that makes everything easy. That’s where the 8BitRobots distributed robot platform comes in. This is a bit of Javascript running on the Pi that allows you to program the robot in Blockly, a Scratch-like graphical programming environment that’s been adapted to run in a web browser. It’s an all-in-one solution to robotics development and programming, and an excellent addition to this year’s Hackaday Prize.

Friday Hack Chat: GNU Radio

Software defined radio picked up a lot of popularity when it was discovered that cheap USB TV tuners were functional bits of hardware that could become SDRs. It’s the software that makes this possible, and when it comes to SDR software, there’s no better tool than GNU Radio. For this week’s Hack Chat we’re going to sit down with some of the people behind this awesome software tool and pick their brains.

Our guests for this week’s Hack Chat will be Derek Kozel and Nate Temple, officers of the GNU Radio project. They’re also organizers of this year’s GNU Radio Conference. Also joining in on the Hack Chat will be Martin Braun, community manager, PyBOMBS maintainer, and GNU Radio Foundation officer.

GNU Radio is perhaps the most important bit of any software defined radio toolchain. This is the software that provides signal processing blocks to implement software defined radios. GNU radio is how you take a TV tuner USB dongle and pull images from satellites. You can use it for simulation, and GNU Radio is widely used by hobbyists, academics, and by people in industry.

For this week’s Hack Chat, we’re going to be talking all about GNU Radio. What can you do with it? Was the interface really inspired by MaxMSP? All that and more in this week’s Hack Chat.

  • Various bits of hardware that make GNU Radio work
  • The core process of writing modules
  • Upcoming features of GNU Radio

You are, of course, encouraged to add your own questions to the discussion. You can do that by leaving a comment on the GNU Radio Hack Chat Event Page and we’ll put that in the queue for the Hack Chat discussion.join-hack-chat

Our Hack Chats are live community events on the Hackaday.io Hack Chat group messaging. This week is just like any other, and we’ll be gathering ’round our video terminals at noon, Pacific, on Friday, August 31st. Need a countdown timer? We should look into hosting these countdown timers on hackaday.io, actually.

Click that speech bubble to the right, and you’ll be taken directly to the Hack Chat group on Hackaday.io.

You don’t have to wait until Friday; join whenever you want and you can see what the community is talking about.

The Largest Aircraft Ever Built Will Soon Launch Rockets To Space

Deep in the mojave, the largest aircraft ever made will soon be making test flights. This is the Stratolaunch, and it’s measured the largest to ever fly based on wingspan. The Stratolaunch was constructed out of two 747s, and is designed for a single purpose: as a mobile launch platform for orbital rockets.

There are a couple of ways to measure the size of an aircraft. The AN-225 Mriya has the highest payload capacity, but only one of those was ever built (though that might change soon). The Spruce Goose was formerly the largest aircraft by wingspan, but it only flew once, and only in ground effect. The Stratolaunch is in another category entirely. This is an aircraft that contains some of the largest composite structures on the planet. Not only can you park a school bus between the fuselages of the Stratolaunch, you can strap that school bus to the plane and carry it up to 30,000 feet.

But why build this astonishing aircraft? The reasons go back more than a decade, and the end result is a spaceplane.

Continue reading “The Largest Aircraft Ever Built Will Soon Launch Rockets To Space”