$99 Pinebook Gets KDE Neon Port

If you’re the kind of person who likes small and cheap Linux devices, you’re definitely alive in the perfect moment in history. It seems as if every few months we’ve got another tiny Linux board competing for our pocket change, all desperate to try to dethrone the Raspberry Pi which has already set the price bar exceptionally high (or low, as the case may be). We’ve even started to see these Linux boards work their way into appropriately cheap laptops, though so far none have really made that great of an impression.

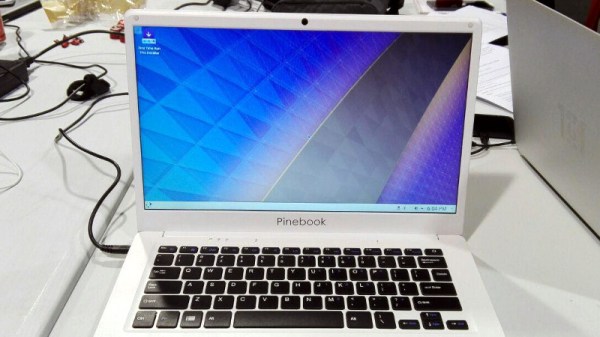
But thanks to the efforts of Blue Systems and Pine64, the situation might be improving: they’ve worked together on a build of KDE Neon for the $99 Pinebook. The fact that they’ve gotten Plasma, KDE’s modern desktop environment, running on the rather mediocre hardware at all is an accomplishment by itself. But they’ve also set out tailor the entire system for the Pinebook, from the kernel and graphics drivers all the way up to Qt and Plasma tweaks.

In a blog post announcing the release candidate of the OS, Neon developer [Jonathan Riddell] says that these top-to-bottom improvements show that you can turn a super cheap Linux laptop into a practical computer if you’re willing to really get in there and optimize it. He also says the project has been something of a two-way street, in that improvements made for the Pinebook build have also been applied to upstream development.

The last time we looked at the Pinebook, we came away cautiously optimistic. It wasn’t great, but it was about as good as you could possibly expect given the price. If more developers are willing to go out on a limb and start optimizing their software for the device, it might become a very promising platform for low-cost mobile hacking.

Linux Fu: Modernize Your Command Line

If you use Linux and its associated tools on the desktop or on a Raspberry Pi, or on a server, you probably have used the command line. Some people love it and some people hate it. However, many of us have been using Linux for years and sometimes Unix before that, and we tend to use the same old tried-and-true tools. [Remy Sharp] had a recent post talking about how he had created aliases to replace those old tools with great modern replacements and it is definitely worth a read.

We’ll be honest, when we first saw the post we almost skipped reading it. A lot of Linux tip posts are pretty uninteresting unless you are a total beginner. But [Remy] has a lot of really great tools and how he has them installed including bat, which is like cat but with syntax coloring (see picture above), and fzf — a command line history search on steroids. He even shows how to join fzf and bat to make a very cool file browser from the command line (see below).

Continue reading “Linux Fu: Modernize Your Command Line”

Faded Beauty DMM Gets An OLED Makeover

When a fine piece of lab instrumentation crosses your bench, you’ve got to do your best to put it to work. But even in the highest quality devices no component lasts forever, especially vacuum tubes. For some vintage instruments with vacuum fluorescent displays, that means putting up with less-than-perfect digits in order to get that sweet, sweet precision. Or not – you can always reverse engineer the thing and add a spanking new OLED display.

The Hewlett-Packard 34401A digital multimeter that fell into [qu1ck]’s lap was a beauty, but it had clearly seen better days. The display was full of spuriously illuminated dots and segments, making it hard to use the 6.5 digit DMM. After a futile bit of probing to see if a relatively easy driver fix would help, and with a replacement display being made of solid unobtanium, [qu1ck] settled in for the long process of reverse engineering the front panel protocol. As luck would have it, H-P used the SPI protocol to talk to the display, and it wasn’t long before [qu1ck] had a decent prototype working. The final version is much more polished, with a display sized to fit inside the original space occupied by the VFD. The original digits and annunciator icons are recreated, and he added a USB port and the bargraph display show in the clip below.

We think it looks fabulous, and both the firmware and hardware are on Github if you’d like to rescue a similar meter. You may want to check our guide to buying old test gear first, though, to get the most bang for your buck.

Continue reading “Faded Beauty DMM Gets An OLED Makeover”

3D Printed Magnetic Dust Port Keeps Shop Clean

Too often we hear that 3D printing is at best only a way for making prototypes before you invest in “real” manufacturing. At worst, it’s a way to make little toys for your desk or cubicle. The detractors say that 3D printing doesn’t lend itself to building practical devices, and even if you do manage to print something useful, you probably could have made it faster or better with more traditional manufacturing methods. So naturally we’re especially excited when we see a printed design that manages to buck both criticisms at once.

Not only does this magnetic dust port connector created by [Taylor Landry] have a clear practical purpose, but its design largely defies normal construction techniques. It consists of two flanges, sized for common 4″ flexible ducting, which feature embedded magnets on the faces.

This allows the two sides of the coupling to easily be connected and disconnected without relying on threads or a friction fit. Not only would threads likely get caked with sawdust, but the magnetic connection allows the coupling to release in the event somebody trips on the duct or the tool is moved.

Currently only one type of coupling is available, but [Taylor] says he’s looking at adapting the design to other tools. He also mentions that the magnets he’s currently using are a custom size he had left over from a previous project, so if you’re looking to replicate the design you might need to tweak the magnet openings. Luckily, he’s provided the STEP files so you don’t have to hack the STL.

A quick connect dust port like the one [Taylor] has come up with seems like it would be a perfect addition to the whole-shop dust collection systems we’ve covered in the past. In fact, it might not even be the only 3D printed component in the system.

This Is The Raspberry Pi Robot To Beat All Others

Before the introduction of the Raspberry Pi, building robots was hard. The best solution to turning motors on a chassis was repurposing an old roomba. For the brain, maybe you could throw Linux on a router and move your rover around with an old Linksys. Before that, you could buy a crappy robotics kit, thrown together in a box and sold as an ‘educational kit’. I’m sure there are a few readers out there that built robots by wire-wrapping HC11s.

Now we have 3D printers and Raspberry Pis, and with that comes a golden age of robotics. One of the best robot brains out there is the 8BitRobots Modules from [Tim Wilkinson], an entry for this year’s Hackaday Prize.

The 8BitRobots Modules are made up of a few components, not the least of which is a Pi Zero, a fantastically powerful (for its price) Linux computer that is available for five dollars. With an add-on board, cleverly named the RoBonnet, the Pi Zero gets PWM outputs for servos and ESCs, an H-bridge for motors, TTL serial, encoder inputs, a pressure and temperature sensor, an IMU, a power monitor, and everything else you need for a successful Pi robot.

But hardware is only one part of the equation. If you want to program a robot, you need a software stack that makes everything easy. That’s where the 8BitRobots distributed robot platform comes in. This is a bit of Javascript running on the Pi that allows you to program the robot in Blockly, a Scratch-like graphical programming environment that’s been adapted to run in a web browser. It’s an all-in-one solution to robotics development and programming, and an excellent addition to this year’s Hackaday Prize.

All The Badges Of DEF CON 26 (vol 3)

I tried my best to see every badge and speak with every badge maker at DEF CON 26. One thing’s for sure, seeing them all was absolutely impossible this year, but I came close. Check out the great badges shown off in volume 1 and in volume 2 of this series. The game is afoot, and if you are headed to a hacker conference there’s never been a better time to build your own hardware badge — whether you build 5 or 500!

All right, let’s look at the badges!

Continue reading “All The Badges Of DEF CON 26 (vol 3)”

Friday Hack Chat: GNU Radio

Software defined radio picked up a lot of popularity when it was discovered that cheap USB TV tuners were functional bits of hardware that could become SDRs. It’s the software that makes this possible, and when it comes to SDR software, there’s no better tool than GNU Radio. For this week’s Hack Chat we’re going to sit down with some of the people behind this awesome software tool and pick their brains.

Our guests for this week’s Hack Chat will be Derek Kozel and Nate Temple, officers of the GNU Radio project. They’re also organizers of this year’s GNU Radio Conference. Also joining in on the Hack Chat will be Martin Braun, community manager, PyBOMBS maintainer, and GNU Radio Foundation officer.

GNU Radio is perhaps the most important bit of any software defined radio toolchain. This is the software that provides signal processing blocks to implement software defined radios. GNU radio is how you take a TV tuner USB dongle and pull images from satellites. You can use it for simulation, and GNU Radio is widely used by hobbyists, academics, and by people in industry.

For this week’s Hack Chat, we’re going to be talking all about GNU Radio. What can you do with it? Was the interface really inspired by MaxMSP? All that and more in this week’s Hack Chat.

  • Various bits of hardware that make GNU Radio work
  • The core process of writing modules
  • Upcoming features of GNU Radio

You are, of course, encouraged to add your own questions to the discussion. You can do that by leaving a comment on the GNU Radio Hack Chat Event Page and we’ll put that in the queue for the Hack Chat discussion.join-hack-chat

Our Hack Chats are live community events on the Hackaday.io Hack Chat group messaging. This week is just like any other, and we’ll be gathering ’round our video terminals at noon, Pacific, on Friday, August 31st. Need a countdown timer? We should look into hosting these countdown timers on hackaday.io, actually.

Click that speech bubble to the right, and you’ll be taken directly to the Hack Chat group on Hackaday.io.

You don’t have to wait until Friday; join whenever you want and you can see what the community is talking about.